

This step-by-step guide provides instructions for managing app execution aliases in Windows 10 and Windows 11. It demonstrates how to enable or disable app execution aliases and explains how to fix app execution alias conflicts.
How to enable/disable app execution aliases in Windows 11
The below tutorial steps show you how to manage app execution aliases using the Settings app in Windows 11:
- Right-click on the Start button and click Settings
- Click on Apps in the navigation sidebar to the left
- Select Advanced app settings and then App execution aliases
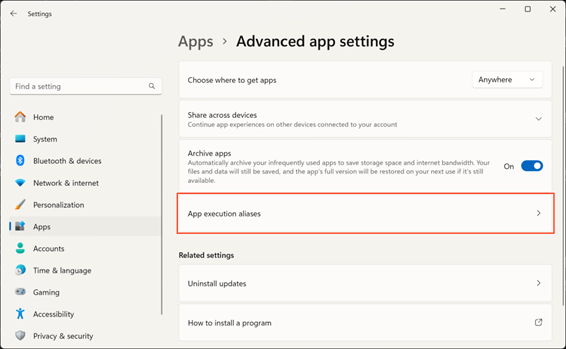
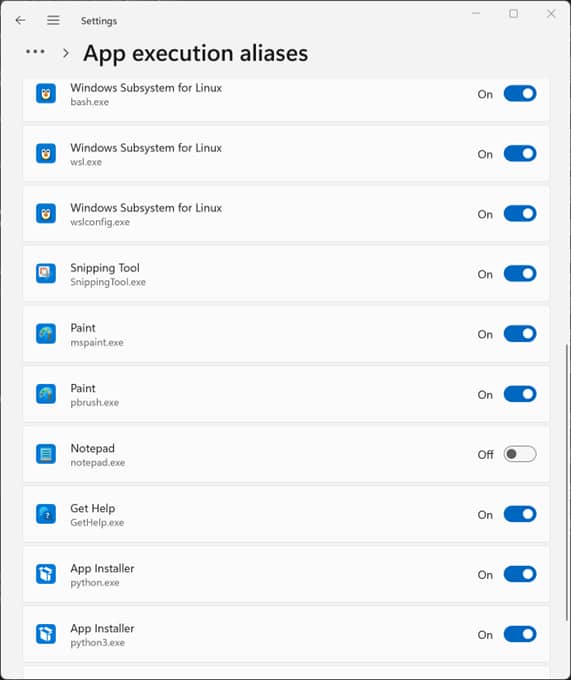
- Enable or disable the app execution alias for each program listed using the toggles
- Note that you may need to close and re-open any apps or terminal windows that use the affected aliases for the change to affect them
Note also that you cannot create app execution aliases, as they are automatically created for apps from the Microsoft Store. To achieve similar functionality, you can configure app paths as described below.
How to enable/disable app execution aliases in Windows 10
The steps to navigate to the App execution aliases settings differ slightly on Windows 10 devices:
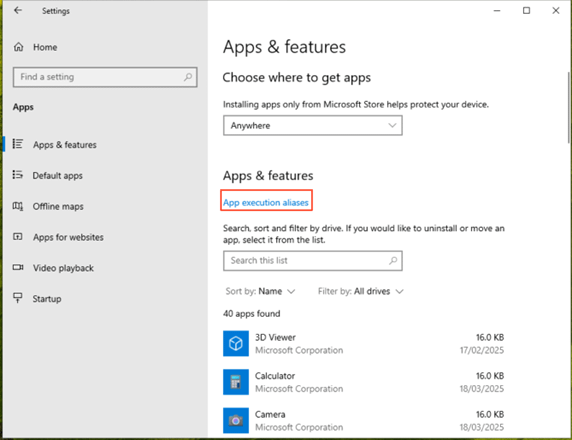
- Open the Settings app from the Start menu
- Select Apps and then App execution aliases
- Continue following the steps described for Windows 11 above
Managing app paths using the Windows Registry Editor
Before making changes to the Windows Registry, you should create a backup of its current state in case you make a mistake. You will need to be logged in as an administrator to use the Registry Editor.
App paths work similarly to app execution aliases but can be manually created. Note that app paths in the registry will not be reflected in the Settings app — they are separate systems.
- Right-click on the Start button and select Run
- Open the Windows Registry Editor by entering the command regedit in the Run dialog and pressing OK
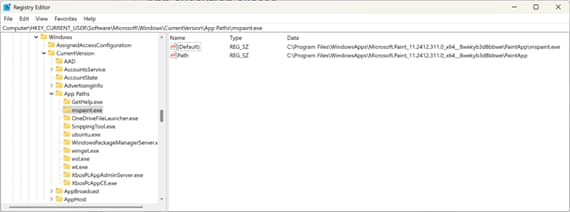
- Navigate to Computer\HKEY_CURRENT_USER\Software\Microsoft\Windows\CurrentVersion\App Paths (you can copy and paste this path in to the address bar in the Registry editor)
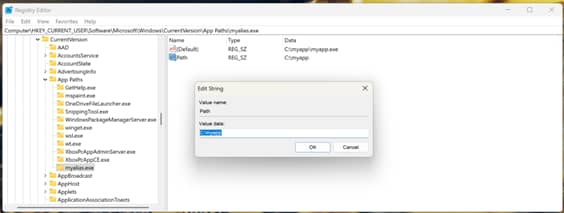
- Click on one of the existing app path keys under App paths and note its structure: each app path is named to the alias that will be used (ending in .exe) has a (Default) value and a Path value
- To create/enable an app path, right-click the App Paths key and select New > Key, then rename it to the alias you want to use (e.g., myalias.exe)
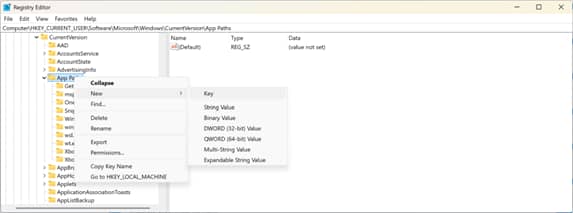
- To set the path to the executable, select the new key and then Edit > New > String Value from the toolbar, then name the new value Path
- To complete creating the new app path, set the value for (Default) to the full path to the executable and Path to the directory containing it by double clicking on them and entering the paths into Value data: field
- Press OK to save
- To disable an app path, delete the registry key by right-clicking on it in the navigation tree and selecting Delete
You can export these registry keys for automated deployment if you want to configure the same app paths across multiple PCs. You should ensure that you do not create app paths that conflict with app execution aliases configured in the Settings app.
What are app execution aliases and what problem do they solve?
In Windows 10 and Windows 11, app execution aliases let you run an application from the Microsoft Store (Windows’ app store) using the Run dialog, shortcuts, or the command line/PowerShell.
Many Windows Store apps will automatically create an alias to make running them easier (allowing you to type the alias rather than the full path to the app executable). This can cause issues, however, if multiple apps claim the same alias. By enabling or disabling app execution aliases in the Settings app, you can prevent alias conflicts by only enabling the alias for the executable you want to use.
A common use-case for this is the Python programming environment: Some apps will ship with their own Python executable, while Windows supplies its version through the Microsoft store. Having multiple versions of Python sharing an alias can cause conflicts that can be resolved by disabling the aliases for all but the version of Python you want to use.
Manually creating app paths serves a similar function in the Windows Registry and can be beneficial to developers and IT professionals who want to be able to run apps without typing their full path but do not want to add the parent directory of those executables to their system paths.
Managing app execution aliases and other Windows settings for multiple devices
In education and enterprise environments, consistency is vital: each device must provide users with the tools they need, with a standard configuration (including the configuration of app execution aliases). This ensures that employees know how to access the functionality they require, as well as assisting with onboarding and troubleshooting. Mobile device management (MDM) by NinjaOne lets you create and enforce policies for Windows, Apple, and Android devices, helping to ensure a consistent user experience and predictable support workflow.


