This guide includes detailed instructions that demonstrate how to apply Local Group Policy settings to specific users or groups in Windows 11 and Windows 10. It includes tips about managing Local Group Policy in Windows, as well as troubleshooting and best practices you should follow for managing user-specific group policies at scale.
Learn how to apply Local Group Policies to specific users to help you retain control over what certain users can and can’t do on a Windows PC, allowing you granular control over what apps and functionality can be used.
Understanding Local Group Policy in Windows
Group Policy is a Windows feature that allows for the central administration of Windows devices, including system and user settings as well as application configuration. This includes managing security policies, user permissions, network configuration, and how user profiles are managed. Group Policy is only available in pro and enterprise versions of Windows — if you’re using Windows 11 Home or Windows 10 Home, you won’t be able to access this functionality.
Group Policies contain Group Policy Objects (GPOs), which are sets of configuration options that affect how the associated Windows feature or application behaves. GPOs are set up as either Computer Configuration (which apply to a specific Windows device and any user who is logged in to that device) or User Configuration (which apply to only a single specific user account for the duration that they are logged in to a Windows device).
You may configure Local Group Policy for an individual user using Local Windows Group Policies and Group Policy Objects to:
- Automatically connect to network shares and online printers.
- Run scripts when the user logs on or off.
- Configure web browser security settings.
- Make sure that firewall and antivirus are enabled (and that they can’t be turned off).
- Block access to certain applications or Windows features (for example, to disable access to the command prompt for specific users).
Windows Group Policy can be set up on the local machine, or as part of a Windows domain for enterprise usage:
- Local Group Policy: Local group policies are only applied to the specific machine they are set up on. In the case of a conflict, Local Group Policy Objects are overruled by Domain Group Policy Objects from Group Policy in Active Directory.
- Group Policy in Active Directory: Group Policy Objects can also be defined in a Windows Active Directory domain (for example in a small business, education, or enterprise scenario). This grants you centralized control of users and computers connected to a network. Group policies in Active Directory are scoped based on the user’s or device’s Organizational Unit.
Why apply Group Policy to specific users?
Group Policy is usually configured in enterprise environments as part of an Active Directory domain for control of Windows devices as part of a larger corporate IT infrastructure. However, it is also useful in small-scale Windows deployments as it allows small businesses and those who support home users to do things like:
- Configuring Windows Updates and making sure they are installed in a timely manner.
- Setting default applications such as a secure web browser or mail client.
- Enforcing system settings to prevent users from disabling important security features such as anti-malware and Windows Firewall.
- Stopping unauthorized users from installing apps and running scripts (especially if certain users frequently open malicious email attachments or download software from suspicious websites).
- Making sure that specific users can only open certain applications, for example setting up a user that can only access a specific app or website for use as well as a web kiosk or for product demonstrations.
Prerequisites to set Local Group Policies for certain users
Windows Group Policy is not available on Home editions of the Windows operating system. To leverage both Local Group Policy and Group Policy in Active Directory you will need one of the following operating system versions:
- Windows 10 Pro, Enterprise, or Education.
- Windows 11 Pro, Enterprise, or Education.
- Windows 7/8 Pro, Enterprise, or Ultimate (if you are still using these Windows operating systems, you should upgrade ASAP, as they are no longer supported).
You will also need to be logged in with a user account with administrative privileges.
Creating users and groups in Windows 11
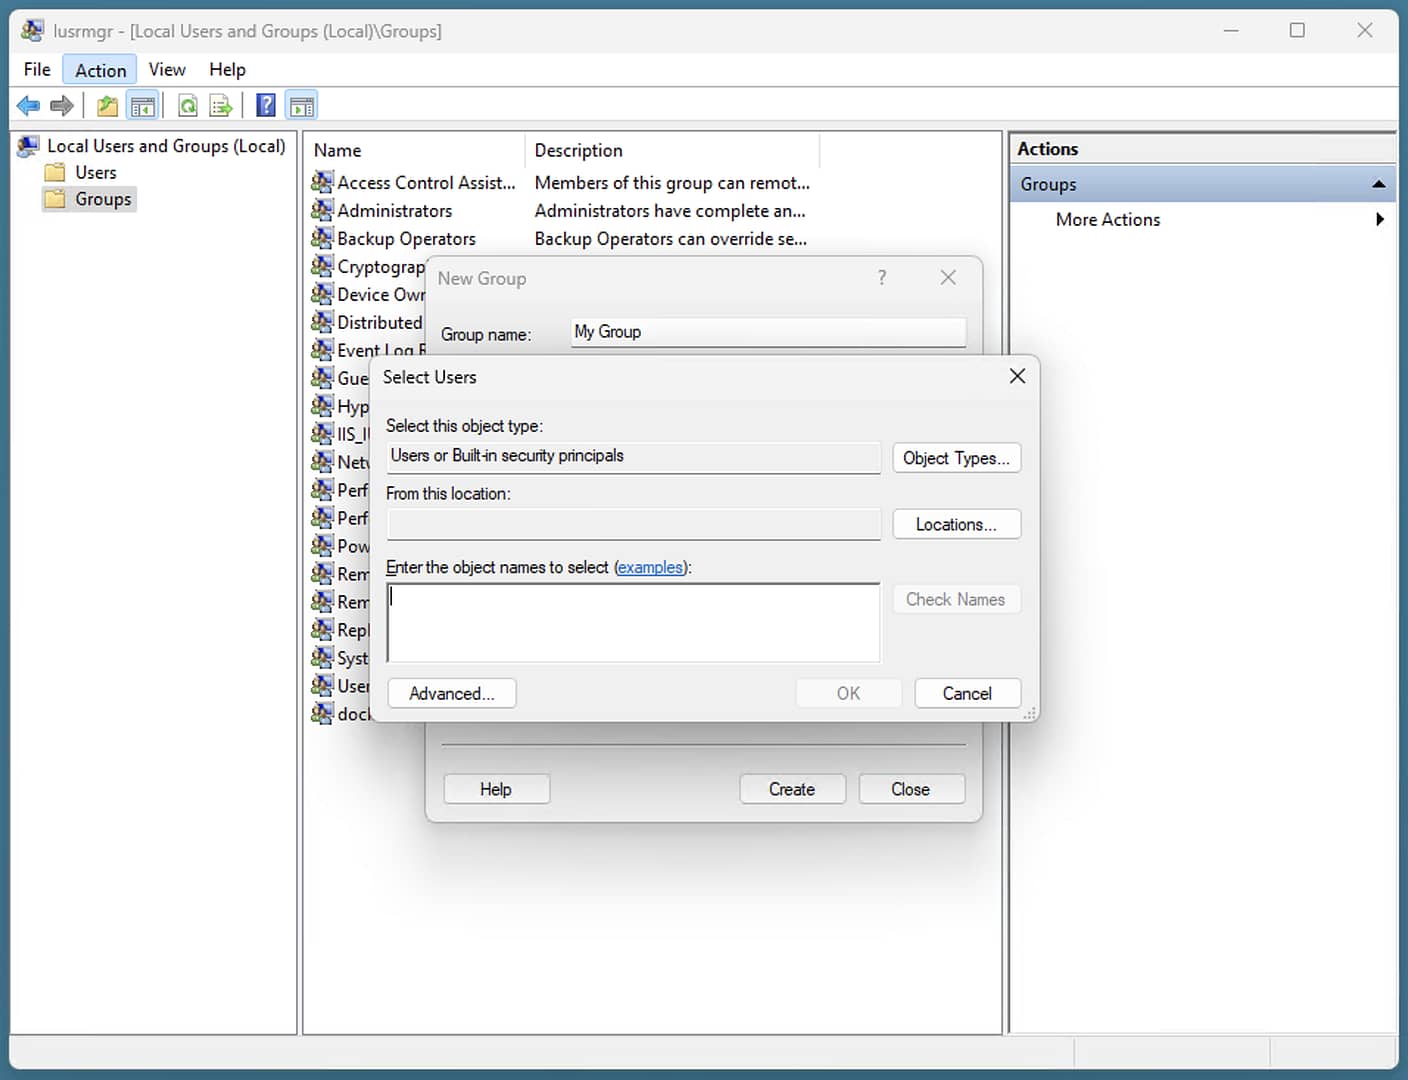
To add, remove, or edit local users and groups on a Windows PC, follow these steps:
- Right-click on the start button and click Run.
- Enter lusermgr.msc and click OK to pull up the local user manager.
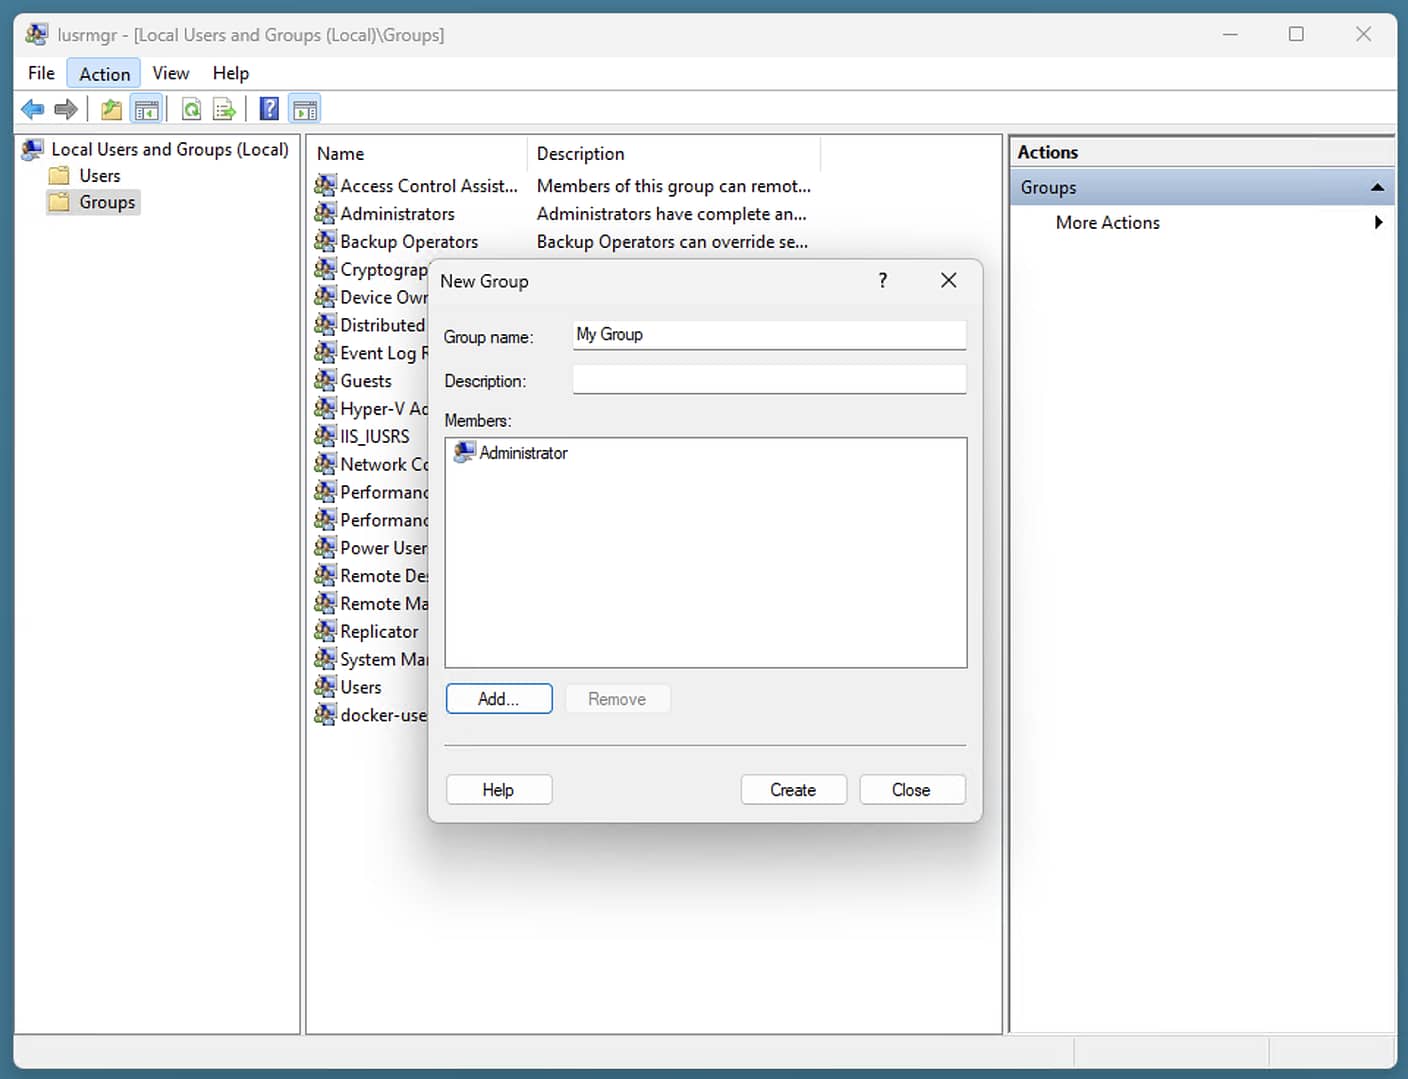
- To add a new user, click Users in the sidebar, then click Action in the menu bar, then New User.
- To add a new group, click Groups in the sidebar, then click on Action > New Group.
- When adding a new group, you can select the users that will be part of it by clicking the Add… button under Members.
- Enter the usernames of those you want to add to the group, and press OK.
Once you have added users and groups, you can target them specifically with Local Group Policies. Generally, it’s best to add users to a group so that you can then adjust settings for all users in that group, and later add new users to that group rather than having to apply the same settings to each user individually.
Step-by-step guide: applying Local Group Policy to specific users
To apply Local Group Policies to individual users in Windows, you need to create a custom Microsoft Management Console (MMC) window that edits group policies only for those users or a specified group:
- Right-click on the Start button, then select Run.
- Enter mmc, click OK, and click Yes on the User Account Control Prompt to open the MMC.
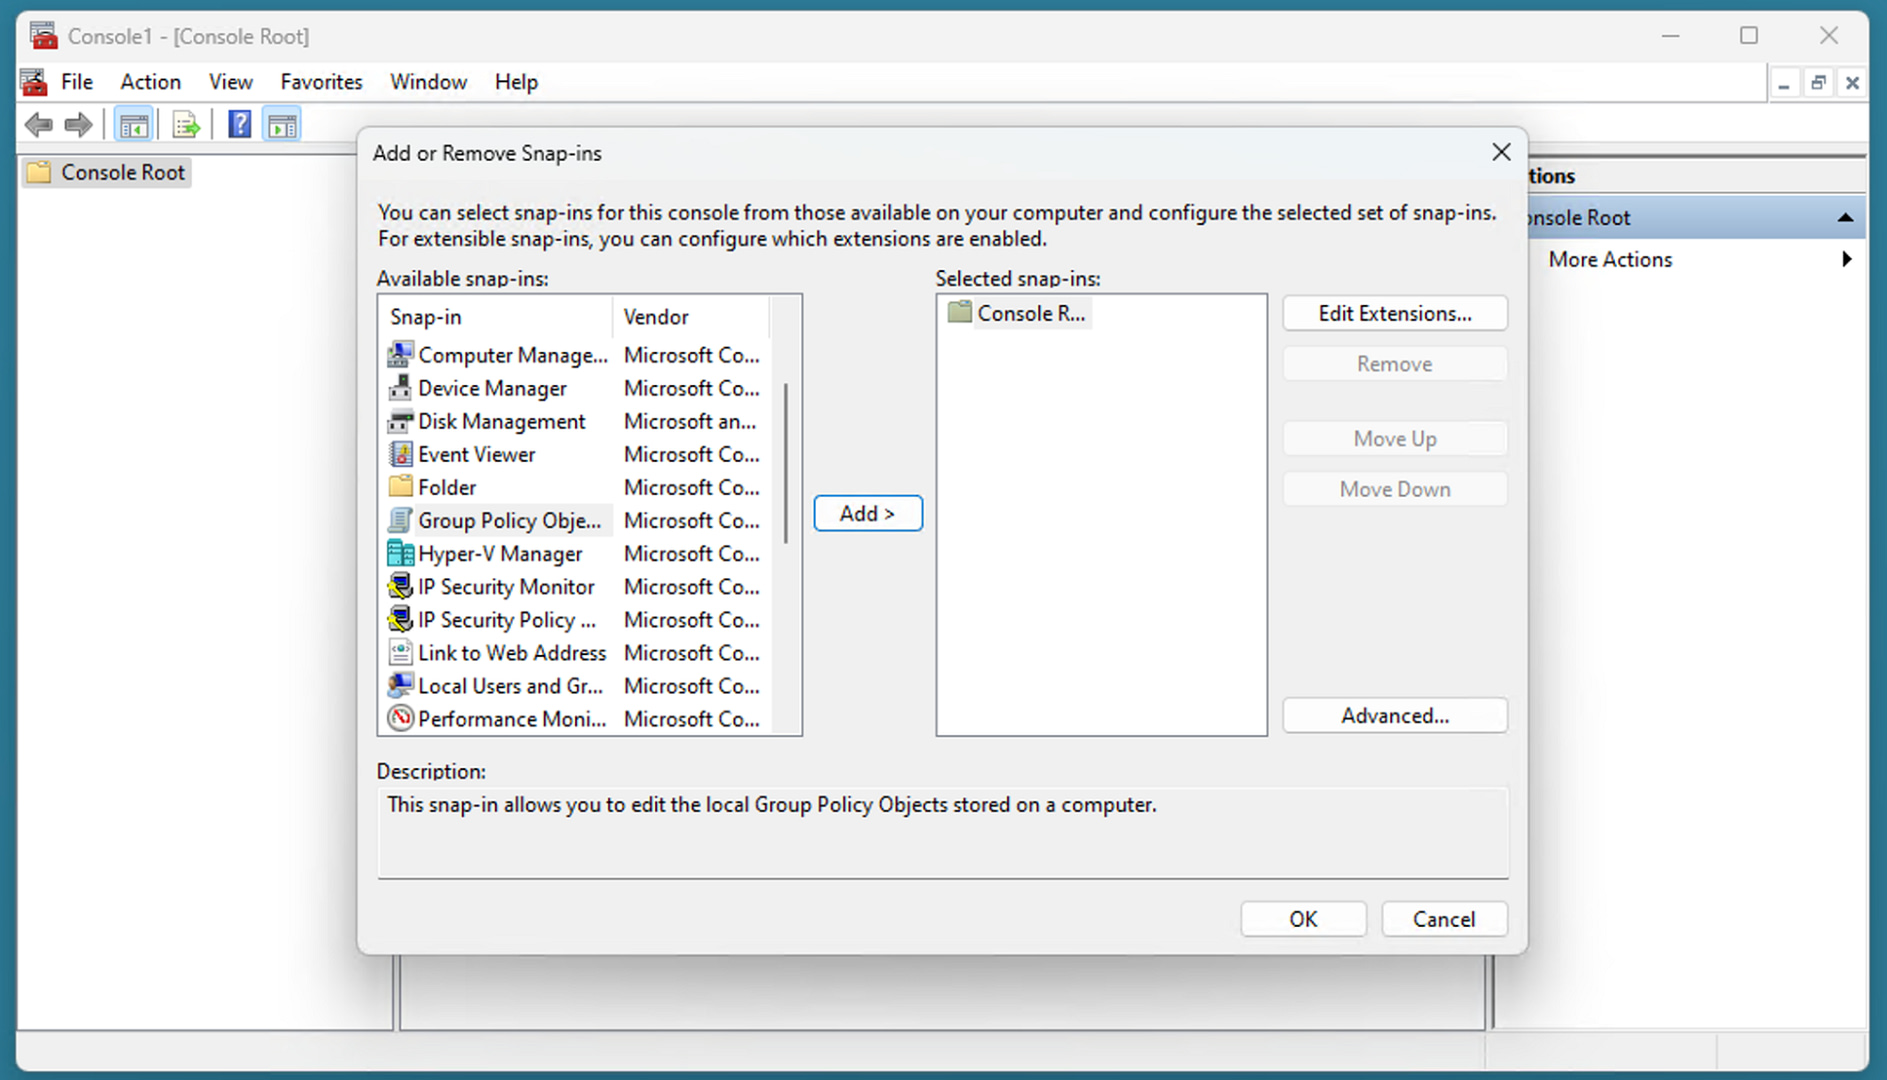
- Click File in the menu bar, then select Add/Remove Snap-In…
- Select Group Policy Object Editor from the list of Available snap-ins.
- Click the Add > button to add it to the list of Selected snap-ins.
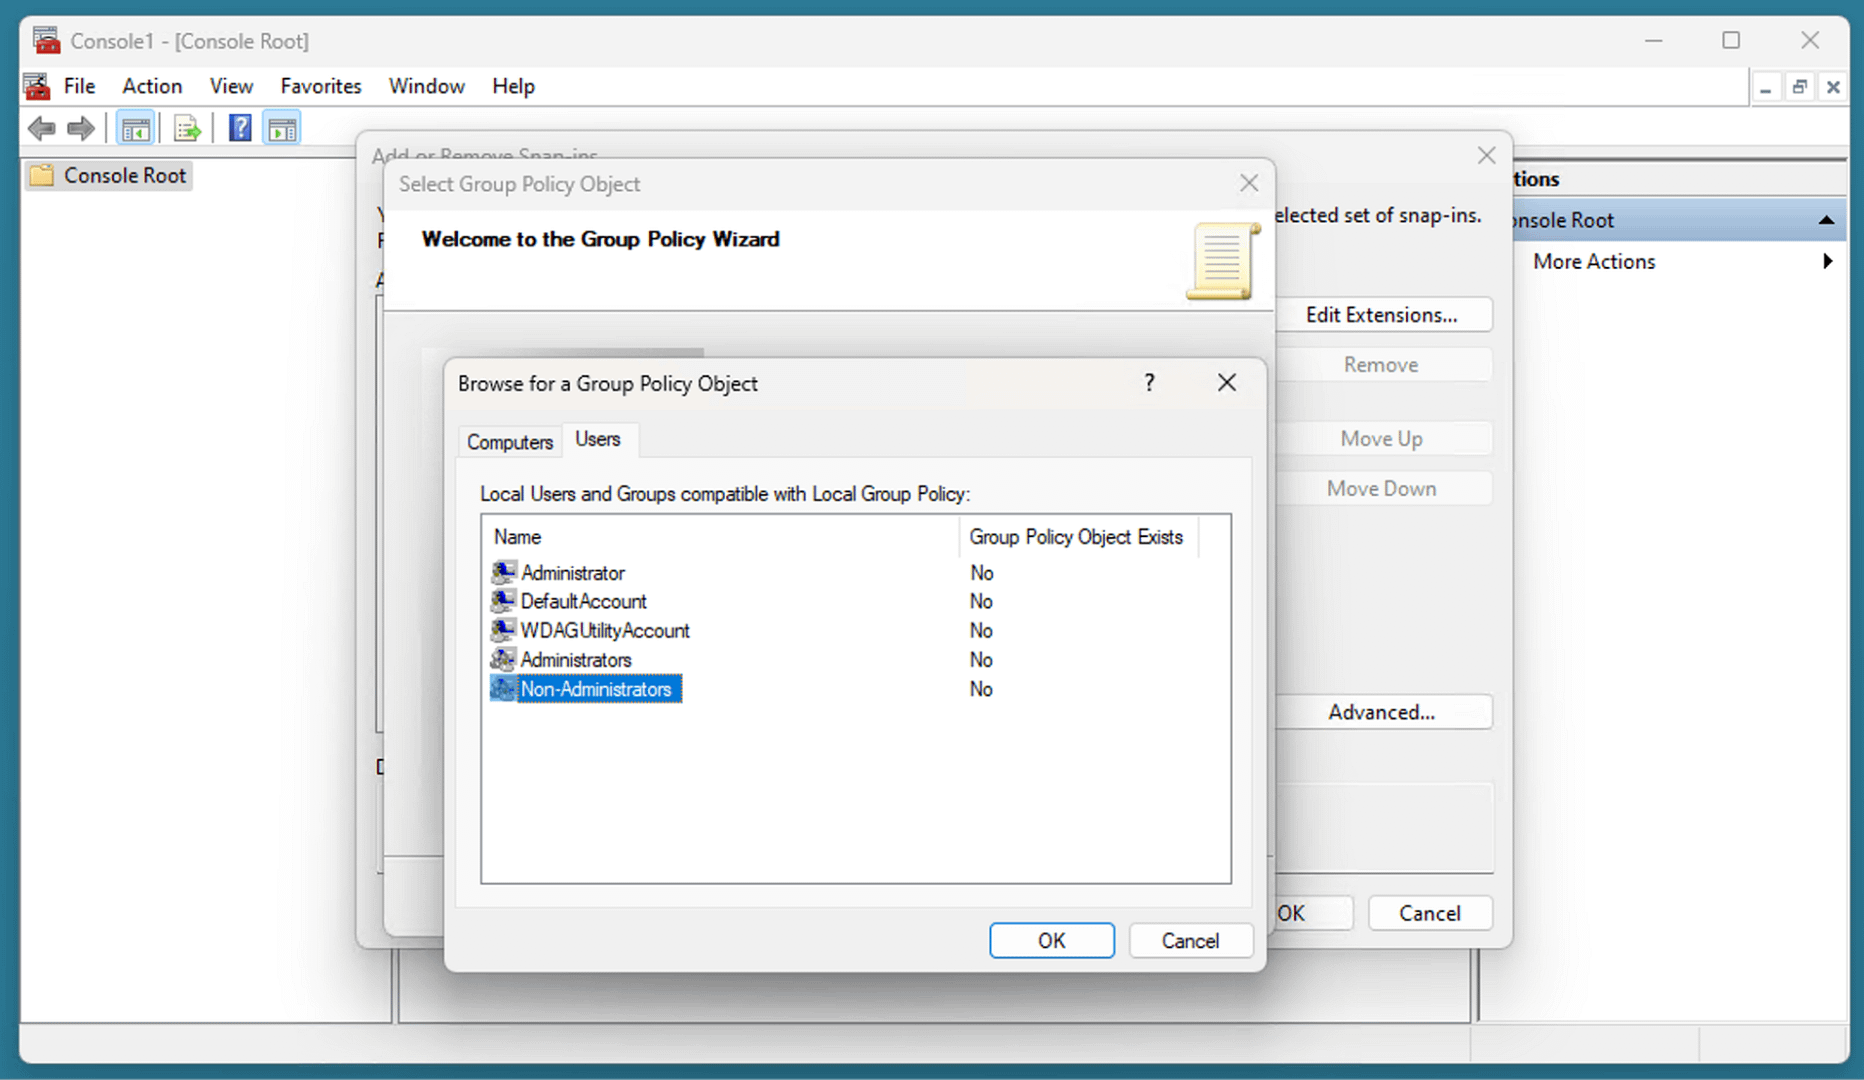
- Click on the Browse button in the Select Group Policy Object window.
- Select the Users tab and then select the specific users or user group and then press OK.
- Click Finish in the Select Group Policy window and then press OK in the Add or Remove Snap-ins window.
- The MMC window will now show your Local Group Policy Editor for specific users in the navigation pane.
- Click File then Save As, and save this custom MMC view to the desktop as Group Policy Editor for specific users (for convenience, include the group name in the MMC name).
- Now, you can skip all of the above steps whenever you want to manage user policies for that user or group, and use the MMC file saved to your desktop.
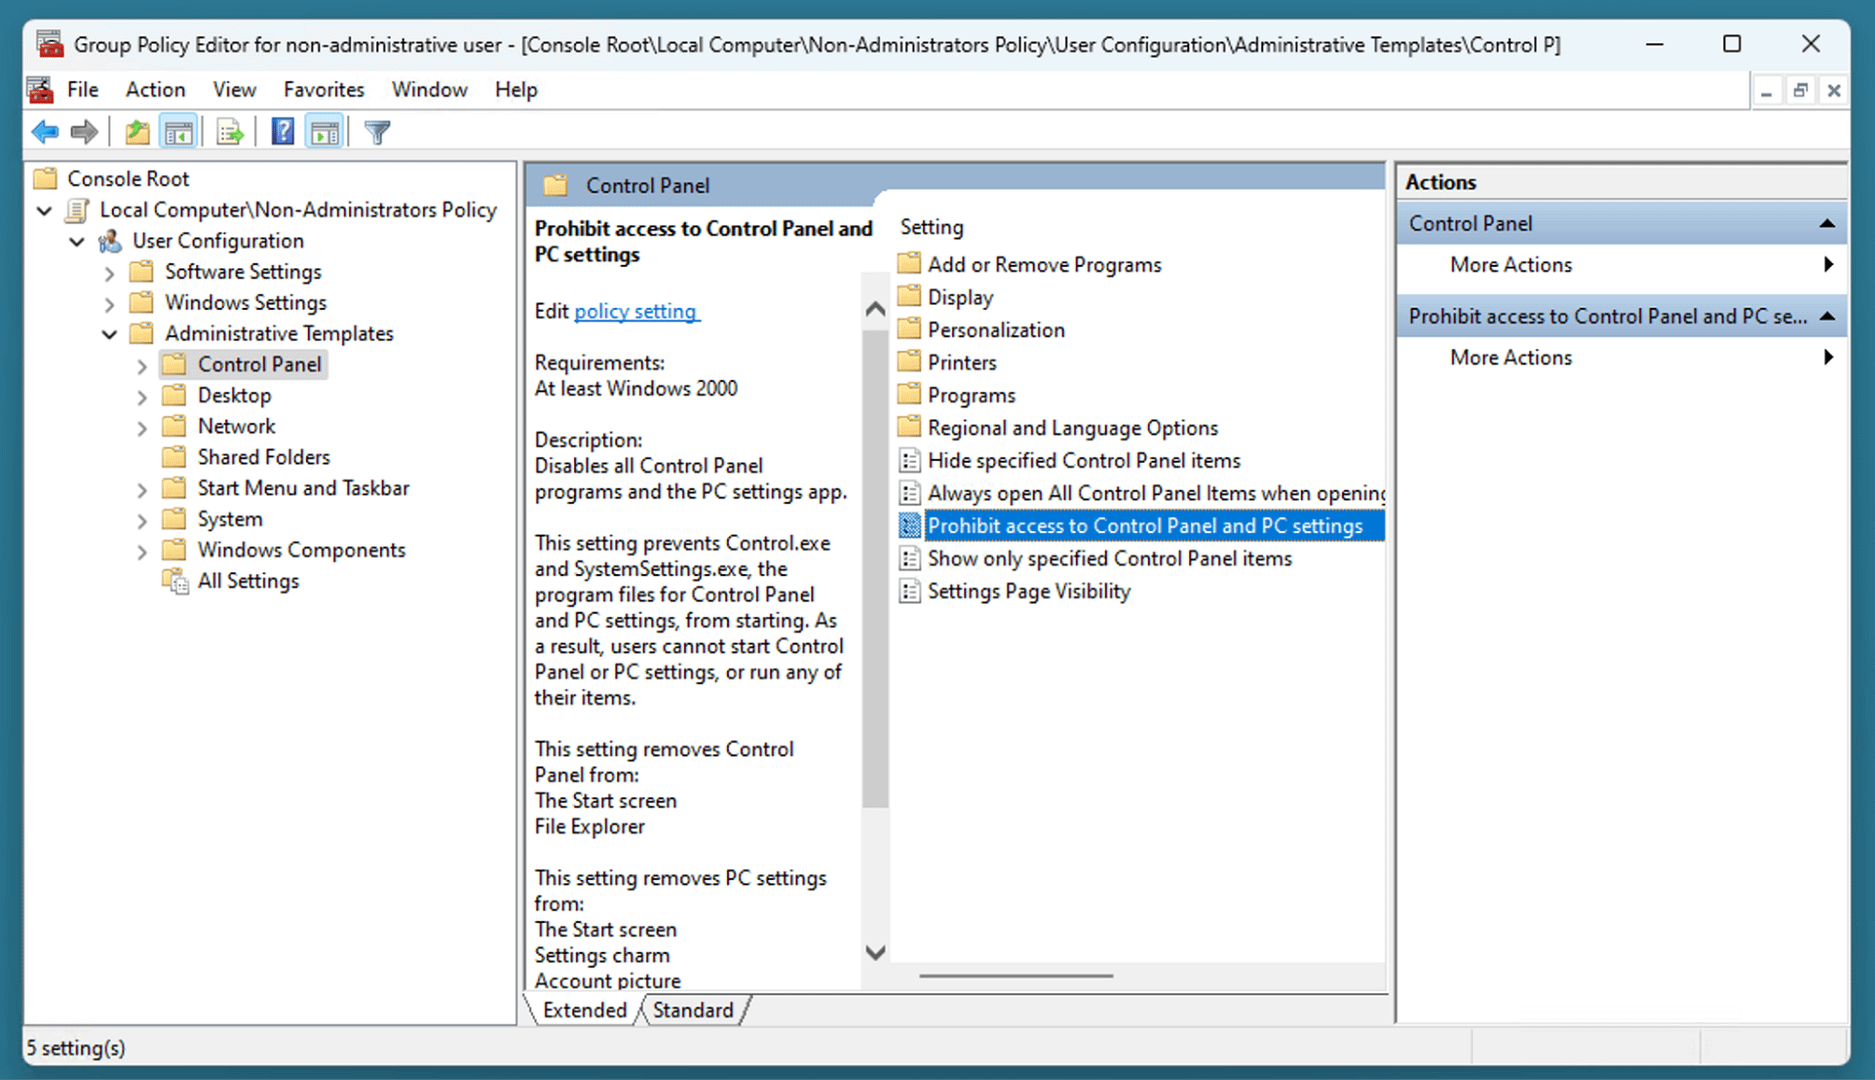
Any group policy changes you make in this MMC window will apply only to the specified users or group. For example, you could configure a group policy preventing members of a certain group from accessing the control panel:
- Open the MMC using the file you created above.
- Navigate to Local Computer/specific users Policy/User Configuration/Administrative Templates/Control Panel.
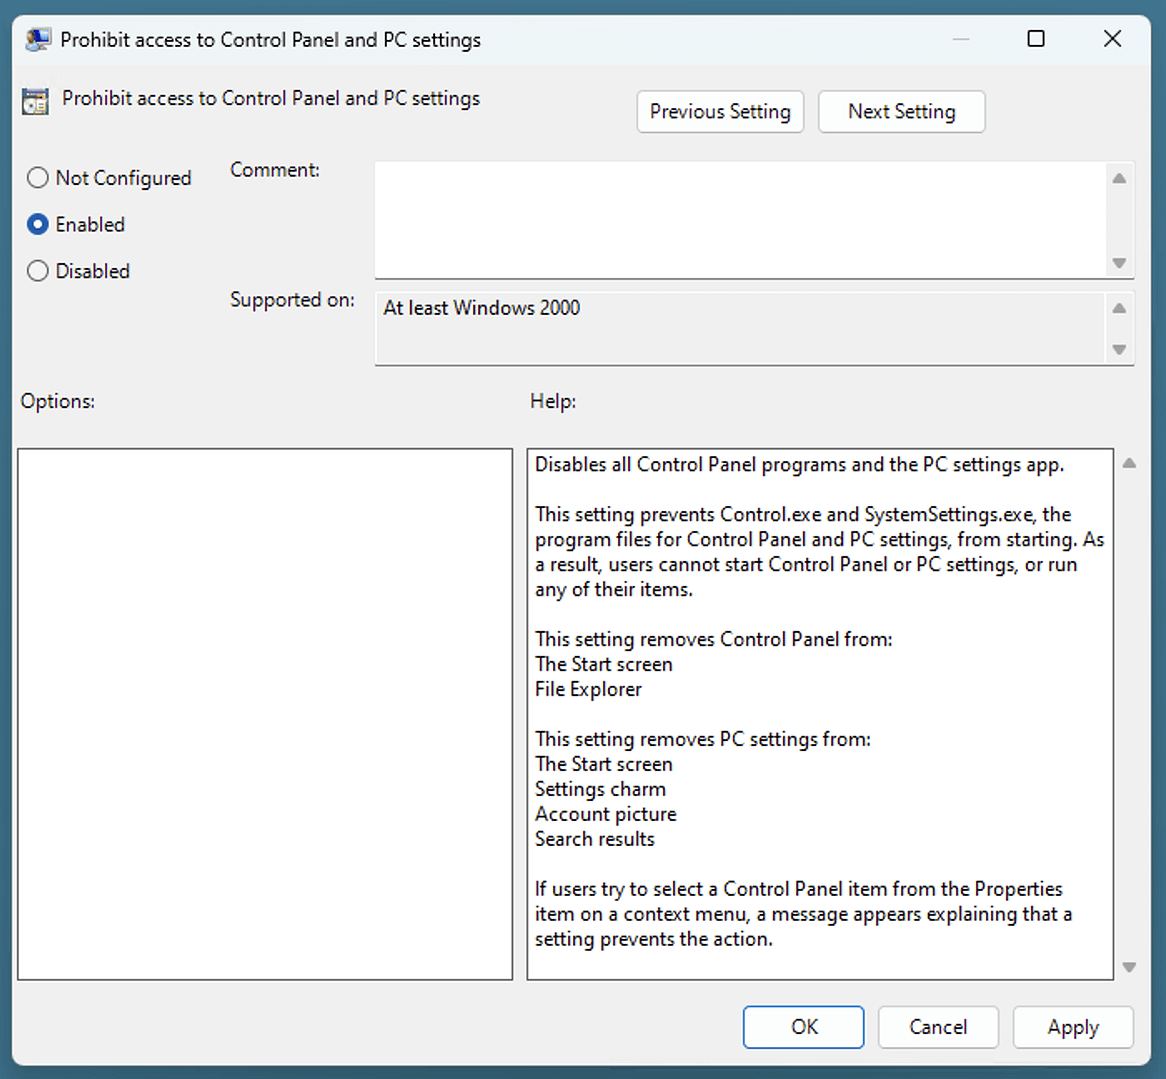
- Double-click on Prohibit access to Control Panel and PC settings setting.
- Select Enabled in the setting window and then click OK.
- To apply the changes, reboot or run the command gpupdate /force from PowerShell or the command prompt.
This can be reversed by navigating back to the Prohibit access to Control Panel and PC settings setting, and then selecting Disabled or Not Configured.
It is important to test any Group Policy Objects you create to make sure they are having the desired effect.
Troubleshooting common Local Group Policy issues
To troubleshoot setting up Local Group Policy per-user, you can check the following:
- Make sure that the policies are assigned to the intended user or group.
- Confirm that the users you are trying to create policies for are members of the group the policy is assigned to.
To troubleshoot further, run gpresult /r to list all currently active group policies. Note that in case of a conflict, the most restrictive of the conflicting policies takes effect.
If you make a mistake when creating Local Group Policies or can’t narrow down the source of a problem, you can revert all group policies by running the following commands as an administrator:
gpupdate /force
secedit /configure /cfg %windir%\inf\defltbase.inf /db defltbase.sdb /verbose
After running the commands above and restarting your Windows PC, the computer configuration and user configuration policies will have been reset to their default.
How to efficiently manage Windows Group Policy at enterprise scale
Using Local Group Policy to restrict access to individual users for multiple Windows devices while trying to keep your configuration secure and consistent across them can be time-consuming. In addition, there is the risk of making mistakes that go unnoticed. For configuring more than a few Windows machines in an organization, it is best practice to set up an Active Directory domain so that Group Policy and other Windows configurations can be managed centrally. This offers more control and visibility over your IT assets.
To further ensure the consistency, reliability, and security of your vital IT infrastructure, you can deploy an endpoint management solution for Windows domains. Endpoint and remote monitoring and management from NinjaOne provides you with a centralized management interface that spans your entire Windows fleet, as well as Apple, Linux, and mobile devices, wherever they are located.

