

In this guide, we detail the necessary steps to change closed caption settings to enhance readability and improve comfort.
Closed captions are an essential accessibility feature in Windows 10, helping users with hearing impairments or those who prefer to read subtitles while watching videos have a more enjoyable experience.
As their name suggests, closed captions are text-based transcriptions of spoken dialogue and other relevant audio cues, like sound effects and speaker identification. These captions appear in various places, including streaming services, media players, and even system notifications, and help users follow along with content even when audio is not available.
Step-by-step guide on how to enable or disable closed captions in Windows 10
First, you need to access closed caption settings on Windows 10. There are two main ways to open these settings:
Option 1: Via the Settings menu
- Click on the Start menu and select Settings (the gear icon).
- Navigate to Accessibility.
- In the left-hand menu, select Closed Captions.
Option 2: Using the Windows Search bar
- Clock on the Search bar in the taskbar
- Type “Closed caption settings” and select the matching result.
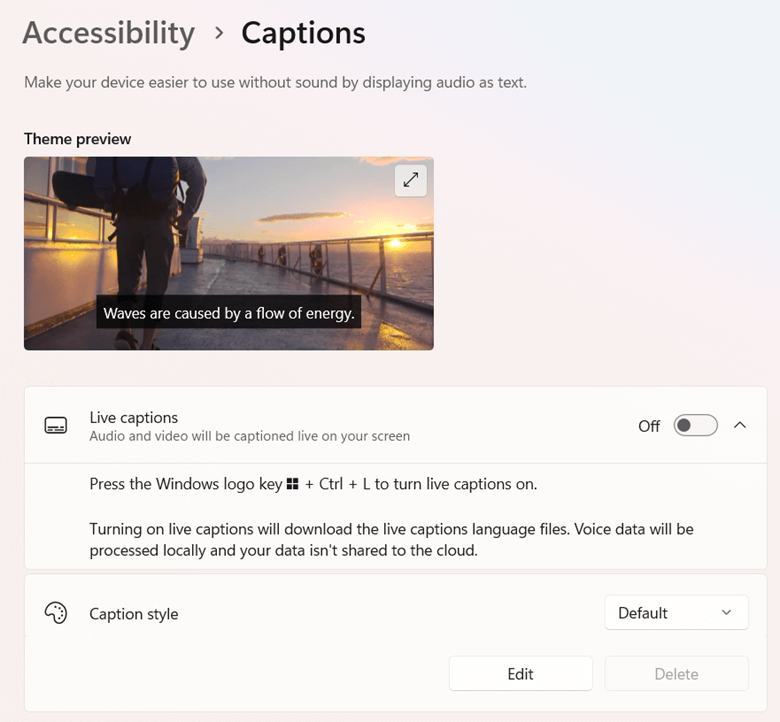
Once inside the closed captions menu, you will see various customization options that allow you to modify the appearance of captions according to your preferences.
Enabling or disabling closed captions in Windows 10
Once inside the Closed Captions menu:
- To enable captions, ensure they are turned on in apps or media.
- To disable captions, turn them off in the same apps or media players.
Customize subtitles in Windows 10
Windows 10 offers several ways to personalize the look of closed captions. Here are some settings you can modify:
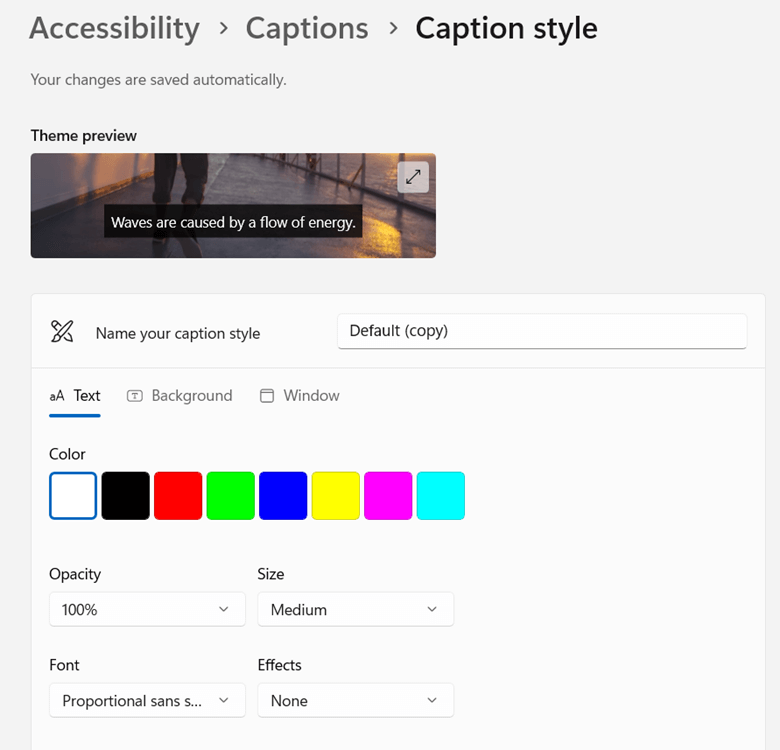
Font options
You can modify the caption’s font size, style, and color to match your needs.
- Size: Select between small, medium, or large font sizes.
- Style: Options include different font styles, such as Sans Serif and cursive.
- Color: Choose from a range of colors to ensure the captions contrast well against different backgrounds.
 Background and window color settings
You can adjust the background and window colors (the box surrounding the text) to make captions stand out. This feature is invaluable for users with difficulty reading white text on light backgrounds or black text on dark backgrounds.
Transparency adjustments
Windows 10 accessibility settings allow you to modify the transparency of the caption background, ranging from Opaque to Transparent. This feature is useful for ensuring captions are visible without blocking too much of the underlying video or application content.
Previewing changes
Before finalizing your modifications, Windows provides a preview section where you can see how your changes will look in real time. This ensures you achieve the optimal balance of readability and aesthetics before applying your settings.
Make your working environment more user-friendly with closed captions and the right Windows calibration.
→ Read this guide on “How to Calibrate Your Monitor in Windows”.
Troubleshooting common issues when adjusting Windows 10 accessibility settings
“Why are my subtitles not working on Windows 10?” On occasion, when you customize subtitles in Windows 10, the closed captions may not appear correctly or function as expected. Here are some common issues and their solutions.
-
Closed captions are not displayed.
- Ensure that closed captions are enabled in the application or media player you are using.
- Restart the application or refresh the video to see if the captions reappear.
-
Issues with specific apps or media players
- Some third-party applications have their own closed caption settings, which may override Windows settings. Check the app’s settings menu to ensure captions are enabled.
- If captions do not appear in the web browser, check that browser extensions or ad blockers are not inferring.
-
Resetting closed captions settings to default
If you experience persistent issues, you can reset closed captions to their default appearance. To do this:
-
- Go to Settings > Accessibility > Closed captions
- Click on Restore default settings to revert all modifications.
Additional accessibility features in Windows 10
Windows 10 includes various accessibility features that complement closed captions. These are:
- Narrator. This is a built-in screen reader that reads texts out loud for visually impaired users. We’ve written a guide on “How to Configure Narrator in Windows 10” here.
- Magnifier. This enlarges parts of the screen for better visibility.
- High contrast mode. This improves readability by adjusting text and background contrast.
- Speech recognition. This allows users to control their computer using voice commands.
- Eye control. This feature enables eye-tracking technology to control the mouse, keyboard, and text-to-speech functions.
- Sticky keys. This helps users who have difficulty pressing multiple keys simultaneously by allowing one key at a time to be pressed for shortcut combinations.
- Filter keys. This ignored repeated or accidental keystrokes, which is useful for users with motor control difficulties.
- Windows Hello. This provides biometric authentication, such as facial recognition and fingerprint scanning, to help users with disabilities log in more easily without needing to type passwords.
💡 Read this guide on How to Improve Windows Hello Face Recognition in Windows 10.
These features, when combined with Windows 10 closed captions, make the operating system much more convenient and accessible for users with different needs.
Frequently Asked Questions (FAQs)
Can I enable closed captions for all applications?
Closed captions are available for many applications and media players, but some apps may have their own captioning settings. It’s a good idea to check an app’s settings if Windows captions do not appear.
Do these settings affect third-party apps like YouTube and Netflix?
Windows 10 closed caption settings primarily affect system-wide captions. However, streaming platforms like YouTube and Netflix often have their own caption customization options, which may override Windows settings.
How do I revert to the default caption settings?
You can reset your caption settings by going to Settings > Ease of Access > Closed captions and selecting Restore default settings.
Why it’s important to know how to customize font and color for closed captions in Windows
Knowing how to change closed caption settings in Windows 10 is a great way to enhance accessibility and readability—especially if you have hearing problems or intend to show your video to people who do. By adjusting font styles, colors, background transparency, and more, you can create a captivating experience that best suits your preferences.


