

HungAppTimeout specifies how long your computer waits for a frozen application to respond. This timer applies when you end processes through the Task Manager or the shutdown/restart/sign-out screen, and like any setting, it can be adjusted to your liking. Changing HungAppTimeout gives you more control over apps that “hang” often, saving precious time and energy.
This article explains how to change HungAppTimeout value, its purpose, and best safety practices.
How to change HungAppTimeout value in Windows
Here are the steps to adjust Windows application timeout using the Registry Editor:
A. For the current user
To change HungAppTimeout for one user, do the following:
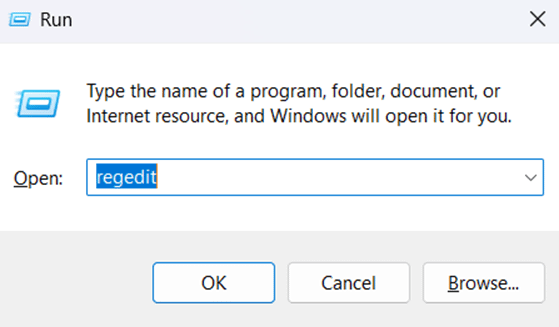
- Press Windows key + R to open the Run dialog box.
- Type “regedit” and press Enter to access the Registry Editor.

- Enter the following directory in the address bar:
Computer\HKEY_CURRENT_USER\Control Panel\Desktop
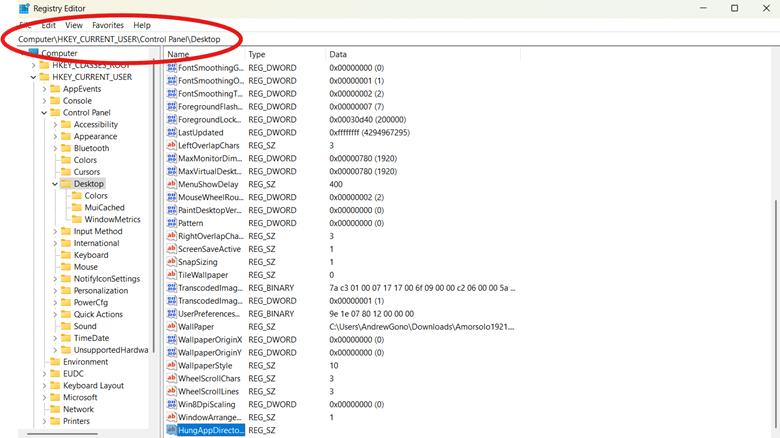
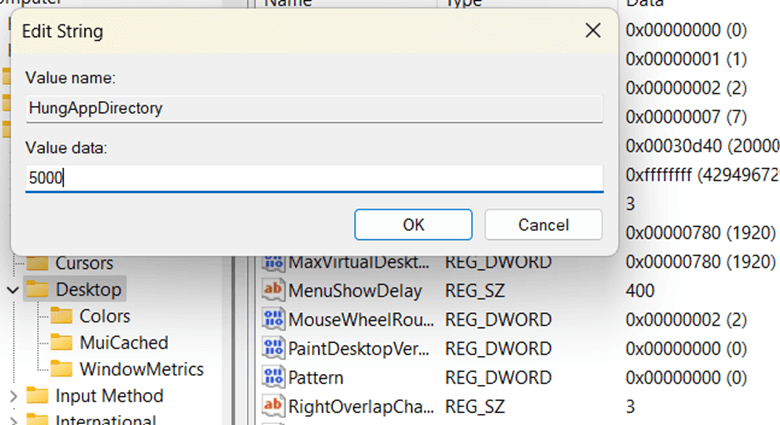
- In the right-most pane, look for HungAppDirectory and double-click it.
- If it doesn’t show, right-click on a space within the Desktop pane, click New, select String Value, type HungAppDirectory and press Enter.
- Under Value Data, enter the amount of time you prefer in milliseconds and press OK.
- Sign out and sign back in to apply changes.
Prevent performance issues by learning how to correctly use Registry Editor.
→ Read this guide, How to Use the Registry Editor on Windows 11
B. For all users
Here are the steps on how to change HungAppTimeout value for all users.
⚠️ IMPORTANT: This overrides single-user settings.
- Sign-in as Administrator. You can use the Microsoft tutorial for how to “Manage User Accounts in Windows” here for detailed instructions.
- Press Windows key + R to open the Run dialog box.
- Type “regedit” and press Enter to access the Registry Editor.
- Enter the following directory in the address bar:
Computer\HKEY_USERS\.DEFAULT\Control Panel\Desktop - In the right-most pane, look for HungAppDirectory and double-click it.
- If it doesn’t show, right-click on a space within the Desktop pane, click New, select String Value, type HungAppDirectory, and press Enter.
- Under Value Data, enter the amount of time you prefer in milliseconds and press OK.

- Sign out and sign back in to apply changes.
What is HungAppTimeout?
HungAppTimeout is a setting that represents how long your computer waits for an unresponsive application before allowing you to force-close it. By default, HungAppTimeout is set to 5000 milliseconds (ms) —or 5 seconds—of wait time, but you can adjust it via the Registry Editor to determine how soon the “End Task” box appears.
Best practices & troubleshooting
It’s completely normal if you don’t see the HungAppTimeout setting in your registry. The default value applies even if the entry isn’t there, and you can always add it to your Windows registry’s desktop pane if needed.
However, it’s worth noting that HungAppTimeout has been associated with app stability issues and crashes. One of its functions, which whites out to an unresponsive screen, can sometimes glitch and make your system unstable or prone to crashes.
Deleting HungAppTimeout resolves this, but more changes can lead to a messy Registry Editor, which stores critical system data and specific application settings. So before making any changes, we recommend first creating a backup of your registry.
💻 Protect business-critical data and ensure system stability.
Read this guide, “How to Back Up and Restore the Windows Registry”
Additionally, only modify keys you understand, and conduct proper research on the values you wish to delete. Data types are extremely sensitive to syntax errors, so an extra space or a wrong letter can have a major impact.
Vital applications with incorrect values can keep them from functioning properly (or at all!), especially when they work with other programs. So it bears repeating: save a backup of the default settings before doing anything!
Frequently Asked Questions (FAQs)
-
What is the default HungAppTimeout value in Windows?
Five seconds is the default waiting time for hung Windows applications. This used to be set by the HungAppTimeout value in the Registry Editor, but the setting has since been removed due to performance issues.
-
Will lowering HungAppTimeout improve performance?
Adjusting HungAppTimeout doesn’t speed up your system, but lowering its value can improve perceived performance by letting you shut down unresponsive apps faster.
-
Can changing this setting cause system instability?
Simply changing the duration doesn’t cause problems, but invalid data types in HungAppTimeout can cause apps to malfunction. This can happen in the form of “window ghosting,” where a program window abruptly gets whited out and unresponsive.
-
How to reset HungAppTimeout to default?
Manually reset the HungAppTimeout’s threshold via the Registry Editor. To do this, press Windows + R to open the Run dialog box. Type “regedit”, press Enter, and open the Desktop folder. From there, scroll down to find HungAppTimeout on the list, double-click it, and set the timer to 5000 milliseconds.
Alternatively, you can also restore your entire registry’s default settings if you previously saved a backup, which is highly recommended!
-
What’s the recommended value for HungAppTimeout in Windows 10?
It’s recommended that HungAppTimeout has more than 1000 ms to give frozen programs at least one second to respond. That said, feel free to adjust HungAppTimeout to fit your needs.
Keep in mind that setting a lower value lets you end problematic apps that cause delays, while a higher value grants more processing time for hardware-extensive tasks like image and video rendering.
-
Where do you find HungAppTimeout?
To modify the HungAppTimeout threshold, open the Registry Editor – a database of critical system info that lets you turn the dials on deep-root features.
-
What is HungAppTimeout used for?
HungAppTimeout is a setting that determines how long a system waits for a frozen application to respond before letting you forcefully close the program. This countdown also applies during special cases.
Tasks that don’t automatically close when you shut down/restart/sign out trigger the HungAppTimeout countdown. Once it ends, a screen will appear, giving you the option to either cancel or shut down/restart/sign out.
The importance of knowing how to change HungAppTimeout Value
HungAppTimeout determines how long your system waits before allowing you to force-close a frozen or unresponsive application, with the default set to five seconds. Modifying this value in the Registry Editor HungAppTimeout box gives you control over when to take action on a hung application. While this has its benefits, adjusting HungAppTimeout values is extremely risky if not done properly, so play it safe and keep a backup that can restore your registry back to default.


