This tutorial provides step-by-step instructions on how to confirm if Secure Boot is Enabled or Disabled in Windows 10 and Windows 11. It explains what Secure Boot is, why it is important to the security of your PC, and provides several methods for checking the Secure Boot status of your system.
Take control of your Windows systems with NinjaOne.
What is Secure Boot?
Secure Boot is the process used by modern PCs to prevent untrusted or malicious software from running when your computer starts. Secure Boot is supported in Windows 10 and Windows 11, as well as most modern Linux distributions. To use Secure Boot, you must have a PC with UEFI firmware, as Legacy BIOS does not include this functionality.
Secure Boot functions by comparing the cryptographic signature of software that runs when your computer starts against a database of trusted signatures from known vendors (or your custom signatures if you are developing your own software or drivers).
Secure Boot stops software that does not pass its checks from running. This prevents malware from loading before Windows and hiding from its built-in security features and third-party anti-malware software. It also ensures the integrity of firmware, drivers, bootloaders, and the Windows operating system itself.
Why check Secure Boot status?
Secure Boot provides better security and faster boot times than Legacy Boot. It is important that Secure Boot is enabled where supported, but there are situations where it may be disabled to support specific software or hardware, or where it was temporarily turned off for troubleshooting (and mistakenly not turned back on).
Checking the Secure Boot status of your PC can assist with troubleshooting and also allows you to confirm that Secure Boot is enabled, so that you can ensure the security of your Windows devices. You may also wish to check its status before configuring dual-boot with another operating system that does not support Secure Boot.
Additionally, in business scenarios, confirming that Secure Boot is functioning may be required for compliance reasons — many data protection laws (such as GDPR) require that you utilize all the security technologies available to you to protect your customers’ data.
Tutorial: How to confirm if Secure Boot is enabled or disabled
There are several methods you can use to confirm if Secure Boot is enabled. This can be done within Windows (without BIOS access) and from your System’s UEFI firmware interface.
Method 1: Display Secure Boot State in the System Information Tool
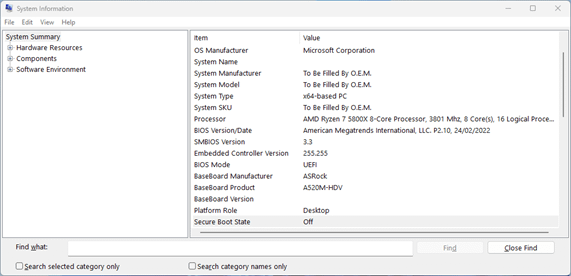
To check if Secure Boot is enabled or disabled using the System Information tool in Windows 10 and Windows 11, follow these steps:
- Right-click on the Start button and select Run
- Enter msinfo32 in the Run dialog and then press the OK button
- Click on System Summary

- Scroll down to Secure Boot State in the list of items
- It will be listed as either Off or On, indicating whether Secure Boot is enabled or disabled
Method 2: Checking Secure Boot using PowerShell
To confirm the status of Secure Boot using PowerShell, open PowerShell as Administrator and run the following command:
Confirm-SecureBootUEFI
This command will return either True or False, indicating whether Secure Boot is turned on or off.
Method 3: Accessing UEFI/BIOS settings
You can confirm the Secure Boot status of your system in the UEFI firmware setup interface. This method works for any operating system, as it directly checks the Secure Boot status using your device’s firmware. To access UEFI firmware, you need to press a specific key while your computer boots to interrupt the boot process. Which key this is differs between manufacturers, but it is usually one of the DELETE, ESCAPE, F1, F2, F10, or F12 keys.
Many motherboards will display which key this is briefly as they start up (showing a message like Press ESC to enter setup). Your device or motherboard user manual will also tell you exactly which key it is, or you can find out by trial and error (a valid method used by many expert IT technicians).
Once you have gained access to the UEFI firmware setup interface, you can navigate to the boot or security section to check whether Secure Boot is enabled or disabled.
Secure Boot troubleshooting and FAQs
In addition to confirming the security of your Windows 10 or Windows 11 system, checking whether Secure Boot is enabled or disabled can help you troubleshoot boot issues.
Changes to Secure Boot can prevent your system from booting, requiring that you use launch System Recovery to use the Startup Repair tool. You may also need to provide a BitLocker recovery key to access your data after a change to Secure Boot configuration, so it’s important to be able to check its status from within Windows (giving you a chance to back up your recovery key and important data) before you attempt to alter your UEFI configuration.
Manage and secure your devices with NinjaOne’s all-in-one tool.
Secure Boot in enterprise and education environments
It is vital for the protection of your core business data and the protection of your customer and employee data that Secure Boot is enabled on your Windows 10 and Windows 11 devices. This protects your business’s operational data and ensures compliance with increasingly stronger data protection laws.
Confirming that Secure Boot is enabled should be a part of your regular security auditing process. Remote monitoring and management by NinjaOne allows you to monitor the security status of all of your devices and deploy security policies, protecting devices and the data on them in the case of loss, theft, malware, or other cybersecurity incidents.


