

This guide explains how to convert a GUID Partition Table (GPT) disk to MBR in Windows 10 and Windows 11. It discusses the differences between each partitioning system, how to use Windows’ built-in disk management tools, and how to convert GPT to Master Boot Record (MBR) without data loss using third-party disk partitioning tools.
Ease endpoint management complexities across your Windows devices.
Understanding GPT vs. MBR
MBR and GPT are disk partitioning schemes for hard drives and portable storage devices. Both are supported in Windows 10 and Windows 11.
The key details of the GPT partitioning scheme are:
- Modern, 64-bit
- Supported by Windows 7 and up
- Can only boot Windows on 64-bit UEFI systems
- Can be read from all supported Windows versions
- Partitions up to 256 TB in size
- Support for up to 128 partitions on a storage device
- Improved reliability and data integrity
The key details of the MBR partitioning scheme are:
- Legacy, 32-bit
- Supported by all versions of Windows
- Can be used to boot the Windows operating system
- Can be read from all supported Windows versions
- Partitions up to 2 TB in size
- Support for up to 4 partitions on a storage device
- Wider compatibility than GPT
GPT is the more modern and reliable of the two partitioning schemes (and the better choice for most use cases) and is best suited for use with UEFI systems. MBR has better compatibility with both newer UEFI and legacy BIOS systems, meaning that, in some instances, it is necessary to convert between the two.
Note that in Windows, removable storage uses MBR by default for the widest compatibility.
GPT to MBR pre-conversion considerations
It is vital that you back up the data on the disk you are converting from GPT to MBR. You should back this data up to a separate physical device to ensure it is not lost, regardless of whichever method you use to convert your disk from GPT to MBR.
While the first method detailed below is intended to preserve your data, if the process is interrupted or an error occurs, your data is still at risk of being lost. Before you start, you should back up and also familiarize yourself with Windows data recovery tools. You should also check that the disk and data on it are supported by MBR before trying to convert it, including the number of partitions and the partition sizes. Attempting to convert the disk that your Windows 10 or Windows 11 operating system is installed on is highly discouraged, as it is likely you will be unable to boot your PC afterward.
Tutorial: How to convert GPT to MBR in Windows 10 and Windows 11
Ensure that you follow instructions carefully and verify the steps you are taking — again, these processes put your data at risk of permanent loss. You will need to be logged in as an administrator to convert a GPT disk to MBR.
Before you start, you should check whether your disk is already using the MBR partitioning scheme:
- Right-click on the Start button and click Disk Management
- Right-click on the storage device you wish to convert (Disk 1, Disk 2, etc.) and click Properties
- Navigate to the Volumes tab and check the Partition Style field to determine whether the disk is using GPT or MBR

If your disk does not appear, you can troubleshoot by checking that it is properly connected, and whether it’s appearing in your BIOS and the Windows Device Manager.
Converting GPT to MBR without data loss
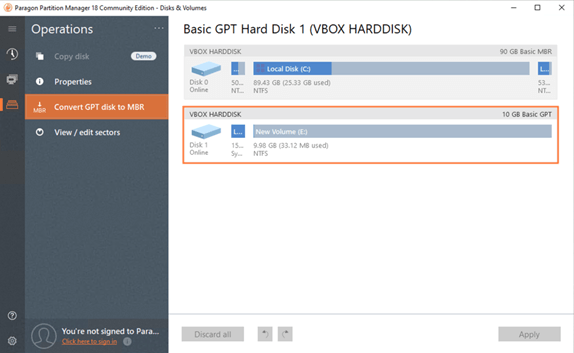
Paragon Partition Manager Community Edition is a free disk management tool for Windows 10 and Windows 11 that can convert GPT to MBR without data loss. Here’s how to use it:
- Download and install Paragon Partition Manager Community Edition
- Open Paragon Partition Manager from the desktop shortcut
- Click on the disk you wish to convert from the GPT to MBR partitioning scheme
- Click Convert GPT disk to MBR in the sidebar
- Leave the default settings, but verify that the changes are those you intend to make by comparing the before/after changes tabs
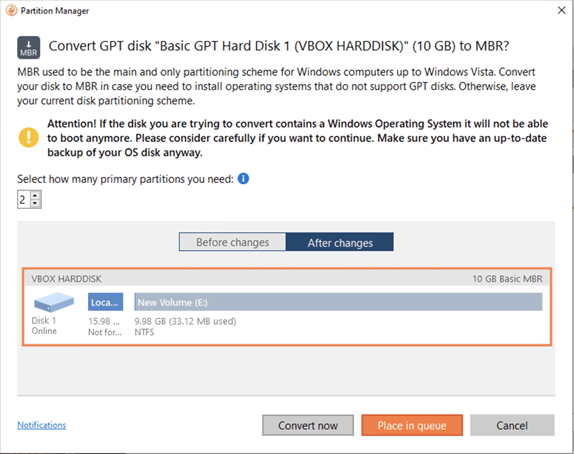
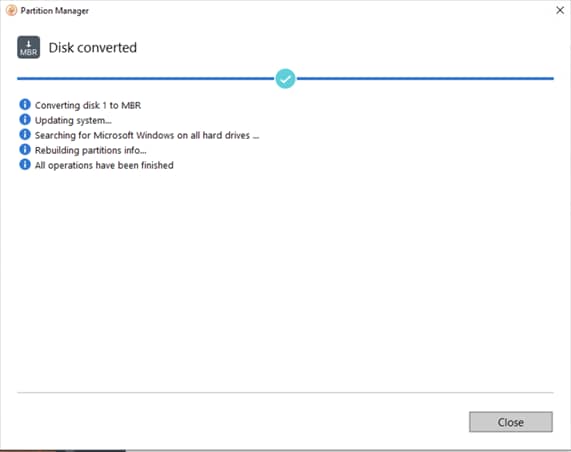
- Click Convert Now and wait for the process to complete
Converting GPT to MBR using Disk Management (destroying all data)
Warning: Using this method will result in the destruction of all data on the target disk.
- Right-click on the start button and open Disk Management
- Delete all the partitions on the disk you wish to convert from GPT to MBR by right-clicking on each partition and selecting Delete, until the entire disk is shown as Unallocated
- Right-click on the intended disk and click Convert to MBR disk
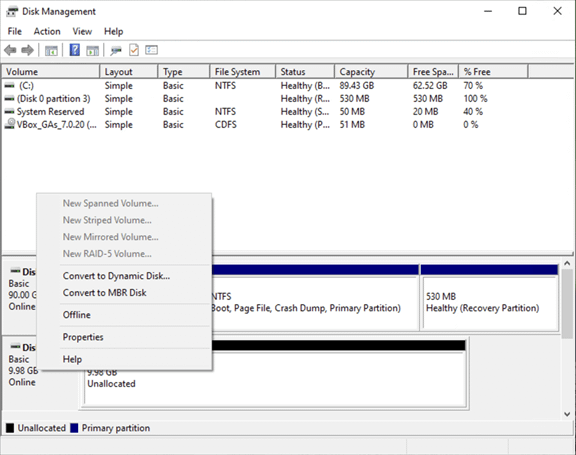
- Right-click on the unallocated space on the disk and create a New Simple Volume and follow the process to create a new empty partition
This will completely wipe all data from the disk, convert it from GPT to MBR, and create a new partition ready for use.
Unlock seamless IT management with enterprise-grade tools to for your organization.
Using the Command Prompt or PowerShell (destroying all data)
Warning: Using this method will result in the destruction of all data on the target disk.
To use the diskpart command line tool to wipe a disk of all data and convert it from GPT to MBR, follow these steps:
- Open an elevated Command Prompt or Powershell session
- Type the command diskpart and press the Enter key
- Enter list disk followed by the Enter key to display all available disks
- Enter select disk X (replacing X with the number of the disk you wish to convert from GPT to MBR) and press the Enter key
- Run the clean command to destroy all data on the disk and reset it
- Run the convert mbr command to convert the disk to MBR
- Type exit and press the Enter key to exit the diskpart program
You can now create a new partition on the drive using the Disk Management tool.
Maintaining Windows 10 and Windows 11 devices in enterprise environments
Mobile device management (MDM) by NinjaOne lets you configure tens, hundreds, or thousands of Windows 10 and Windows 11 devices through a secure, centralized web interface. You can check that all GPT and MBR disks are properly configured, and that all users have access to the data and tools they require.


