

In this guide, we detail the steps to convert Windows 11 ISO from Legacy BIOS to UEFI. You may be considering switching to UEFI to support modern hardware capabilities, managing drives larger than 2 TB using GPT, or even using features such as Secure Boot to protect against unauthorized bootloaders and malware.
Whatever your reason, switching to UEFI can benefit your company, especially if you need to use advanced security features. We’ve made this guide as straightforward as possible to help make the Windows 10 UEFI conversion process easier and avoid data loss.
Why you should consider a Legacy BIOS upgrade
Computers have two fundamental systems for managing hardware and booting the operating system: Legacy BIOS and UEFI. While Legacy BIOS has been the standard for years, UEFI (unified extensible firmware interface) has emerged as a more advanced option, with the Nationa Security Agency (NSA) even releasing a guide on UEFI advantages over Legacy Mode. Of particular note is that the former offers several benefits over the latter, such as faster boot times and improved security.
What is the difference between Legacy BIOS and UEFI?
It’s worth noting that Legacy BIOS is limited to 16-bit code and can only boot from drives with a Master Boot Record (MBR) partition style, restricting drive sizes to 2 TB. On the other hand, UEFI supports 64-bit architecture and can boot from drives using the GUID Partition Table (GPT), allowing it to accommodate much larger drives. In addition, UEFI offers a graphical interface, network connectivity during boot, and advanced features like Secure Boot.
As such, a Windows 10 UEFI conversion is worth considering for anyone looking to unlock the benefits of modern computing.
Prerequisites and precautions
Before taking the steps to convert Windows 11 ISO from Legacy BIOS to UEFI, it’s crucial to prepare your system and understand the potential risks.
Verify system compatibility for UEFI
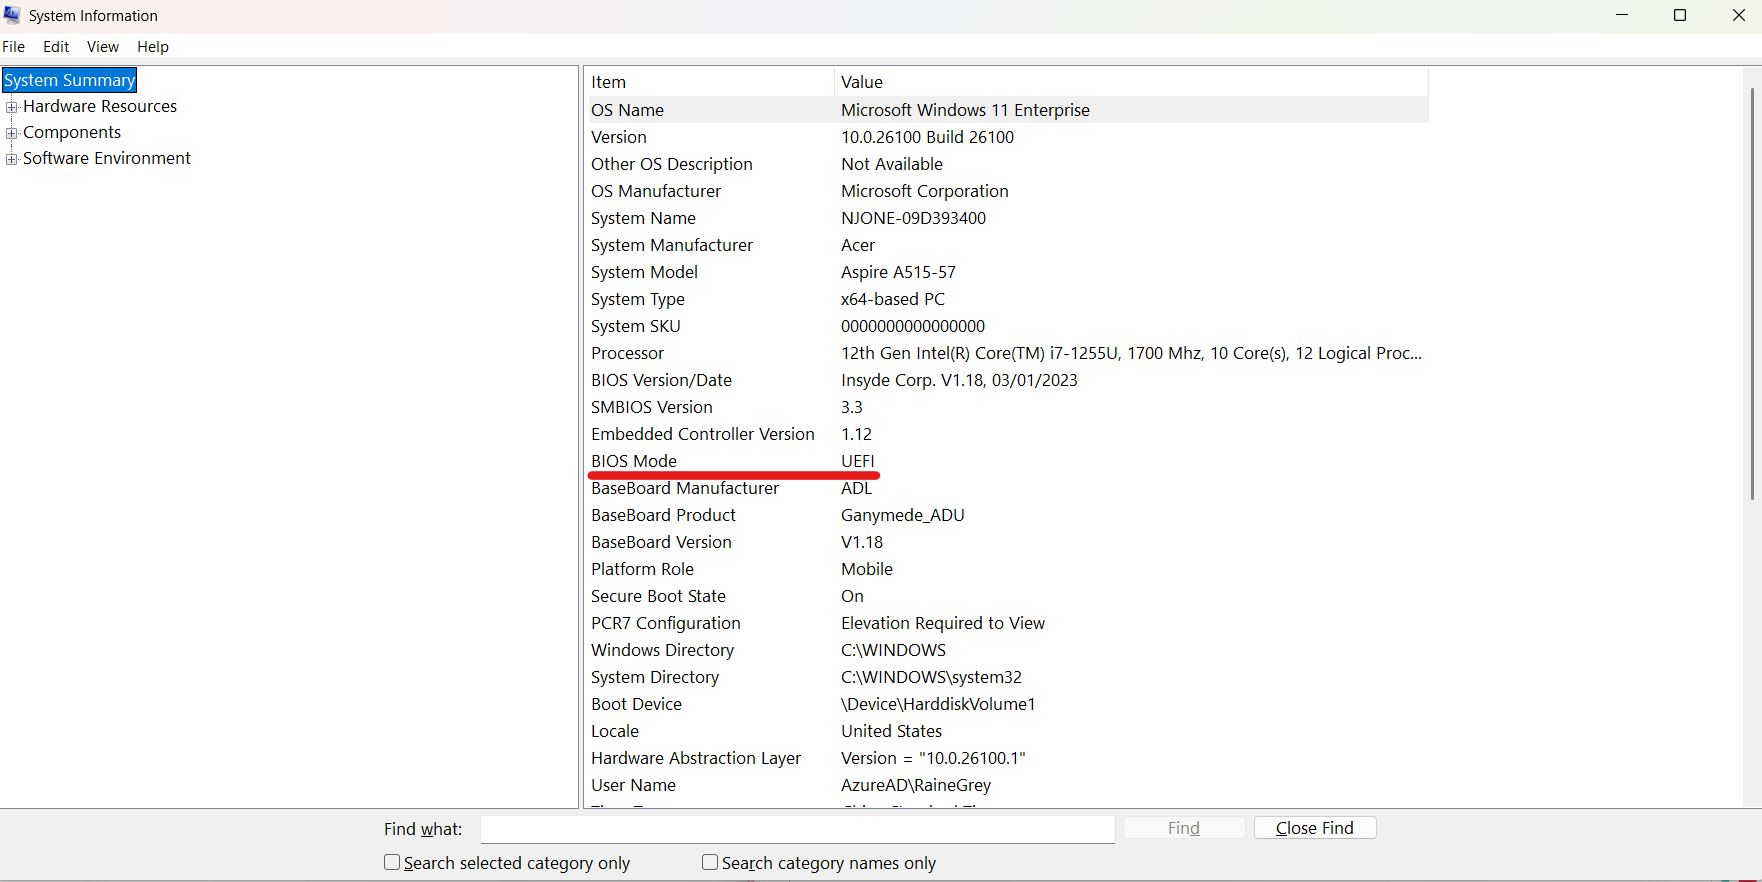
Most modern systems support UEFI. Still, it’s wise to check. To do this, refer to your motherboard’s documentation or visit the manufacturer’s website. You can also check your system’s firmware type in Windows by accessing the System Information tool.
- Simultaneously press the Windows key + R, type “msinfo32”, and press Enter. Alternatively, you can type “System Information” in your Windows search bar.
- Look for “BIOS Mode” entry. If it says “Legacy”, your system is using Legacy BIOS. If not, it should say, “UEFI”
Backup your data
Converting Legacy BIOS to UEFI involves modifying critical system settings and disk configurations. To safeguard against potential data loss, create a complete backup of your important files. Consider using tools like NinjaOne to safeguard business-critical data.
Understand partition styles: MBR vs GPT
Legacy BIOS uses the MBR partition style, while UEFI requires GPT. MBR is limited to four primary partitioners and a maximum drive size of 2 TB. GPT, however, supports up to 128 partitions and significantly larger drives. If your drive uses MBR, it must be converted to GPT before UEFI is enabled. We’ve written a guide on How to Partition a Hard Drive in Windows 10 for more information.
Gather the necessary tools
You will need: 1. Windows built-in utilities like Disk Management and Command Prompt, and 2. The MBR2GPT tool for partition conversion.
Step-by-step guide to converting BIOS to UEFI
1. Check current firmware mode.
a. Using the steps mentioned above, check if your system is currently in “BIOS.” If it says “Legacy” or “BIOS,” you can proceed with the conversion process.
2. Prepare the system.
a. Backup your data.
b. Check your partition style. To do this:
i. Open Disk Management by pressing Windows + X and selecting “Disk Management”
ii. Right-click your system drive and select “Properties”.
iii. Go to “Volumes” and check “Partition Style”.
iv. If it’s MBR, proceed to the next step.
3. Convert MBR to GPT with MBR2GPT.
a. Open Command Prompt as an administrator. You can do this by:
i. Pressing Windows + X, select “Shut Down”, and click on “Restart” while holding the Shift key.
ii. Your system will reboot into the Advanced Startup screen.
iii. Click on Troubleshoot.
iv. Select Advanced Option.
v. Click Command Prompt.
b. Type the following command, “mbr2gpt / validate,” to validate your drive and ensure it meets the conversion requirements.
c. Run the conversion command “mbr2gpt / convert”
d. Wait for the process to complete.
4. Enable UEFI in the system firmware.
a. Restart your computer and access the firmware settings (usually by pressing Del, F2, or Esc during boot).
b. Navigate to the boot settings and change the boot mode from “Legacy” to “UEFI”.
c. Save changes and exit firmware settings.
5. Verify the conversion.
a. Boot into Windows.
b. Open System Information and confirm that “BIOS Mode” now shows “UEFI”.
How to enable UEFI boot mode in Dell/HP/Lenovo laptops
Enabling UEFI boot mode varies slightly depending on the manufacturer. Here are general steps for popular brands.
Dell laptops
- Restart the laptop and press F2 repeatedly during startup to access the BIOS settings.
- Navigate to “Boot” or “Boot Sequence”.
- Select the boot mode and switch it to UEFI.
- Save changes and exit the BIOS settings.
HP laptops
- Restart the laptop and press Esc or F10 during startup to enter the BIOS.
- Go to “System Configuration” or “Boot Options”
- Locate “Legacy Support” and disable it.
- Enable “Secure Boot” (optional) and set the boot mode to UEFI.
Lenovo laptops
- Restart the laptop and press F2 and Enter repeatedly during startup.
- Select “Boot”.
- Change the boot mode to UEFI and disable Legacy Boot, if present.
- Save changes and exit the BIOS.
Post-conversion checklist
Even if the Legacy BIOS upgrade runs smoothly, it’s important that you ensure the operating system boots correctly. We likewise recommend monitoring boot times, application responsiveness, and overall system behavior. If any issues arise, consider updating drivers or running diagnostic tools.
Troubleshooting common issues
In this portion of the guide, we discuss troubleshooting Legacy BIOS to UEFI conversion errors.
Boot errors
One of the most common issues is the system failing to boot after enabling UEFI. This usually happens if the firmware settings are incorrect or Secure Boot is misconfigured. To resolve this:
- Re-enter the firmware settings by pressing Del, F2, or Esc during boot.
- Verify that the boot order prioritizes the correct drive containing the operating system.
- If Secure Boot is causing problems, try disabling it temporarily to see if the system boots. Once resolved, you can re-enable Secure Boot after ensuring compatibility.
Missing drives or partitions
Sometimes, drives may not appear in Windows after the conversion. This may happen due to partition letter assignments or corrupted partition tables. To resolve this:
- Open Disk Management by pressing Windows + X and selecting “Disk Management”.
- Locate the missing drive. If it is listed but lacks a drive letter, right-click it and choose “Change Drive Letter and Paths” to assign a letter.
- If the drive is not listed, use disk recovery tools or professional recovery services to investigate further.
Error messages during conversion
Errors such as “validation failed” while running the MBR2GPT tool are typically caused by unsupported partition layouts. To resolve this:
- Check if the disk contains more than three primary partitions. If so, consolidate data and remove unnecessary partitions before retrying.
- Verify that the system drive is selected. Only the system drive can be converted with MBR2GPT.
Compatibility issues with older hardware
Some older hardware components may not function properly in UEFI mode. If you experience issues, such as unresponsive peripherals or display problems:
- Update your drivers to the latest versions from the manufacturer’s website. Use a tool like NinjaOne to help you automate patch management.
- Check if the device has specific software or firmware updates to improve UEFI compatibility.
Performance problems
If system performance deteriorates after the conversion, try:
- Updating all drivers, focusing on critical components like the chipset, graphics card, and network adapters.
- Run a system diagnostic tool to identify bottlenecks or errors.
- Check for and install Windows updates to ensure optimal performance.
Convert Windows 11 ISO from Legacy BIOS to UEFI: UEFI firmware benefits
Converting from Legacy BIOS to UEFI offers numerous advantages, including faster boot times, enhanced security, and support for modern hardware. Regardless, it’s highly recommended that you supplement the process by using a robust backup solution like NinjaOne. Trusted by thousands of customers worldwide, NinjaOne offers a backup solution to ensure any files your users create are securely saved faster than ever before.
If you’re ready, request a free quote, sign up for a 14-day free trial, or watch a demo.
Frequently Asked Questions (FAQs)
1. Can I convert Legacy BIOS to UEFI without reinstalling Windows?
Yes, using the MBR2GPT tool ensures that conversion can be done without reinstalling the operating system.
2. What are the risks of converting to UEFI for Legacy BIOS?
The main risks include data loss and boot failures. You can minimize these risks by backing up your data and following the steps mentioned above carefully. You can also refer to the troubleshooting section of this guide.
3. Is UEFI required for all modern applications and hardware?
While not mandatory, UEFI is recommended for modern hardware and software to leverage advanced features and performance improvements.
4. What if my system does not support UEFI?
If your hardware does not support UEFI, you must continue using Legacy BIOS or consider upgrading your hardware.


