

Key Points
- Windows Explorer (Win 10/11): Open This PC, right-click the mapped share under “Network locations,” and click Disconnect.
- Command Prompt: Run
net use X: /delete(replace X with your mapped drive letter). - PowerShell: Use
Remove-PSDrive -Name X(no colon after the drive letter). - Shortcuts: Right-click and delete shortcuts pinned to Desktop or Quick access.
- Troubleshooting:
- If removal fails, open Command Prompt/PowerShell as Administrator and retry.
- Deleting a mapped drive does not delete the actual files; it only removes the reference.
- Manage at Scale: Enforce permissions, back up critical data, and consider tools like NinjaOne for centralized oversight of Windows endpoints and shares.
This guide demonstrates how to delete a network share on Windows 10 and Windows 11 with step-by-step instructions for removing mapped network drives. It explains several methods, additional tools, and how to troubleshoot network share deletion.
What are Windows network shares
A network share allows access to files and folders between computers over a local network or VPN. Network shares are commonly used in business and education environments to share files between users for collaboration and to keep them stored in a safe, controlled (and backed up) location. They are also increasingly common at home when connected to VPNs for remote work or sharing media with smart devices.
On Windows, it is common practice to permanently assign a network share to a local drive letter so that it’s always available in Windows Explorer. By doing this, the network share can be accessed just like your regular hard drive or a plugged-in USB stick using a drive letter (for example, instead of having to go to the network location \serverpathtoshare you can just navigate to the share mapped to the Z: drive). This is known as mapping a network drive. This saves the time and hassle of having to manually navigate to the network share (or type it in).
However, sometimes these shares can get disconnected or are no longer required: the location of a share may change, you may no longer have permission to access it, or you simply may no longer need to use the files on it. In some instances, shares are created on a Windows machine with the files on an external device that is later removed, but the share remains present (but unavailable).
Even when the share that was mapped to a network drive has been deleted, the mapped network drive needs to be manually removed.
Manage Windows endpoint with the #1-rated Windows RMM solution by G2.
Step-by-step guide to deleting network shares
To remove a network share on Windows, follow the relevant instructions below. If these basic instructions do not work for you, follow on for further troubleshooting steps using the Command Line.
How to delete network share mapping in Windows 11
The process to delete a network share that is mapped to a drive letter on Windows 11 is as follows:
- Open the File Explorer (you can always find it by right-clicking on the Start button).
- Click on This PC in the left navigation pane.
- Under Network locations, Right-click on the mapped network share that you want to remove.
- Click Disconnect.
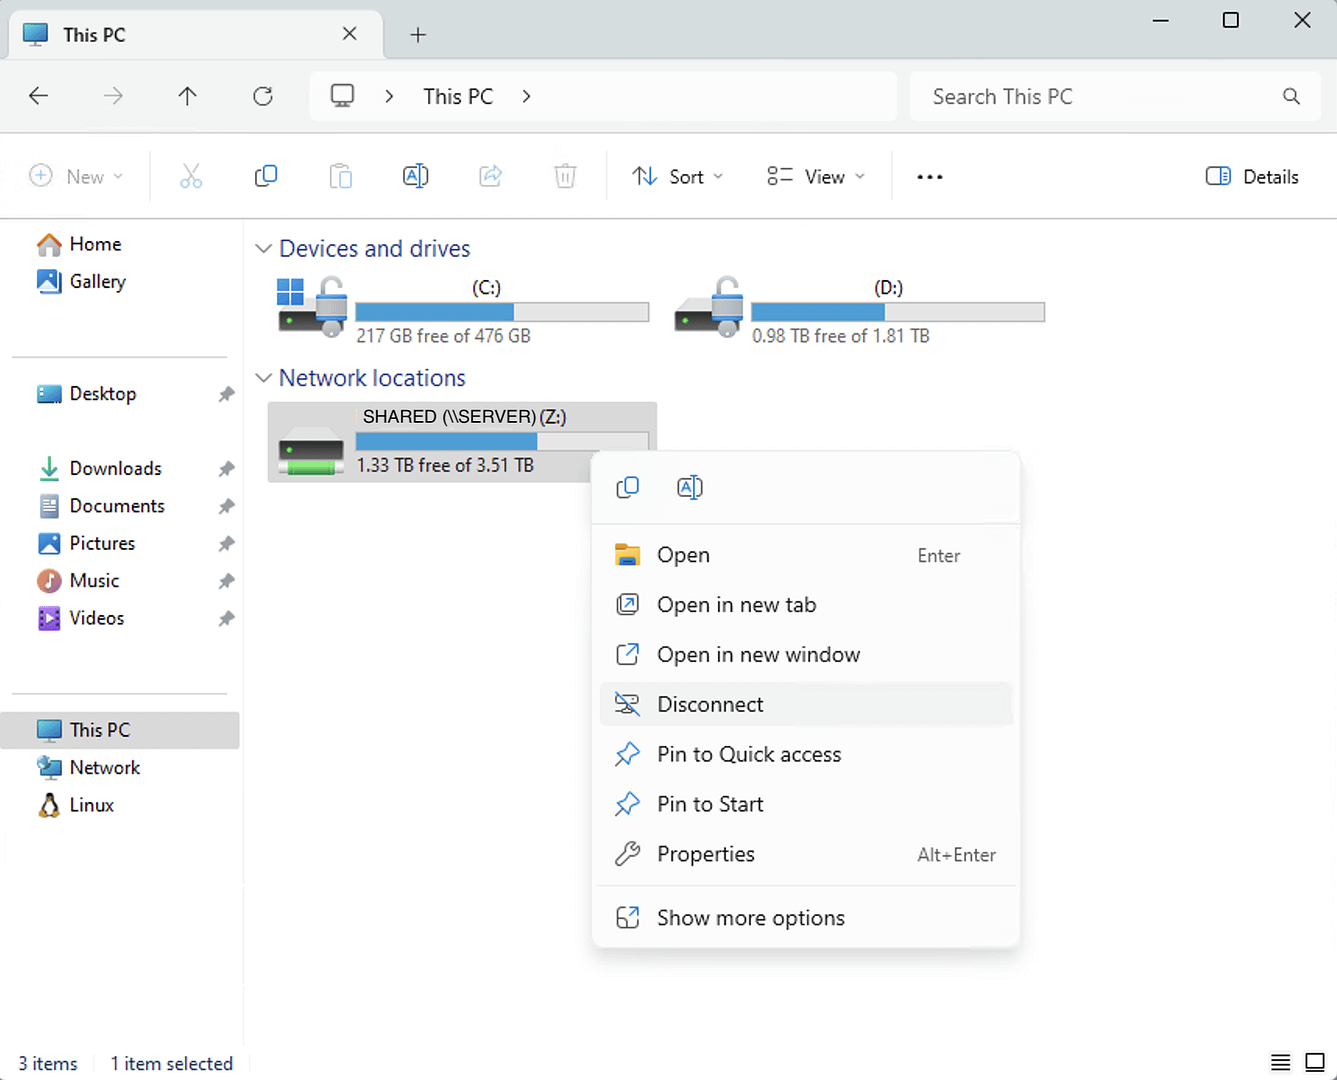
This will remove the mapped shared drive, freeing up the drive letter for use. To restore the network drive, you will need to navigate back to its network address and re-map it.
How to delete network share mapping in Windows 10
The steps to remove a network share on Windows 10 that is mapped to a drive in Explorer is identical to Windows 11.
Deleting mapped network shares from the Command Prompt
To delete Windows shares that you’ve mapped to a network drive, use the net use command:
net use DRIVE_LETTER: /delete
Replace DRIVE_LETTER with the mapped network drive letter you want to delete (note that you also need to include the colon symbol).
For example, to delete a mapped network drive at the location Z:, run the following command:
net use Z: /delete
Deleting mapped network shares from PowerShell
To delete a mapped network drive in PowerShell, use the Remove-PSDrive cmdlet with the following syntax:
Remove-PSDrive -Name DRIVE_LETTER
Unlike net use, you don’t include the colon with the drive letter when running this command. For example, to delete the Z drive network share mapping, you would run:
Remove-PSDrive -Name Z
Deleting network share shortcuts
If you have a shortcut to network share on your Desktop or pinned to Quick access in Windows Explorer, you can simply right-click to delete it as you would any other shortcut.
Troubleshoot network share deletion
If a mapped share does not disappear after deletion, try running Command Prompt or PowerShell as Administrator to remove it. To do this, right-click on the Start menu and open the Command Prompt or PowerShell as Admin, and then run the above commands.
A network share that has had its drive mapping removed will no longer appear in Explorer under This PC. Once you delete a mapped network share on Windows, any shortcuts you have created to files or folders on it will stop working.
Deleting a mapped network drive does not delete the files on it, it’s just removing the reference to it. Deleting files stored in a network share does delete them from the share, possibly permanently. A robust backup solution will protect you from accidental data loss if you are sharing files among multiple users.
🥷 NinjaOne offers automated, centralized, and reliable data protection.
Efficiently managing and securing Windows Shares at scale
If you are managing network shares and drive mappings for a fleet of devices, it’s important that both access is controlled and files are kept secure.
Users should only have access to the files they require, to prevent sensitive information from being over-shared or leaked. Implementing permissions across your network also prevents users from accidentally interfering with the work of others. In addition to this, you should take advantage of the centralized nature of file shares in order to back up all the vital data and ongoing work for your organization.
NinjaOne provides a unified remote monitoring and management that automates and streamlines your IT operations, granting you visibility over your entire IT portfolio and ensuring that security policies are deployed and enforced.


