Key Points
How to Disable ‘Check for Updates’ in Windows 11 & 10 (Pro & Enterprise)
- Using Group Policy Editor (gpedit.msc)
- Open Run (
Win + R), typegpedit.msc, and press Enter. - Navigate to:
- Windows 11:
Computer Configuration > Administrative Templates > Windows Components > Windows Update > Manage end user experience - Windows 10:
Computer Configuration > Administrative Templates > Windows Components > Windows Update
- Windows 11:
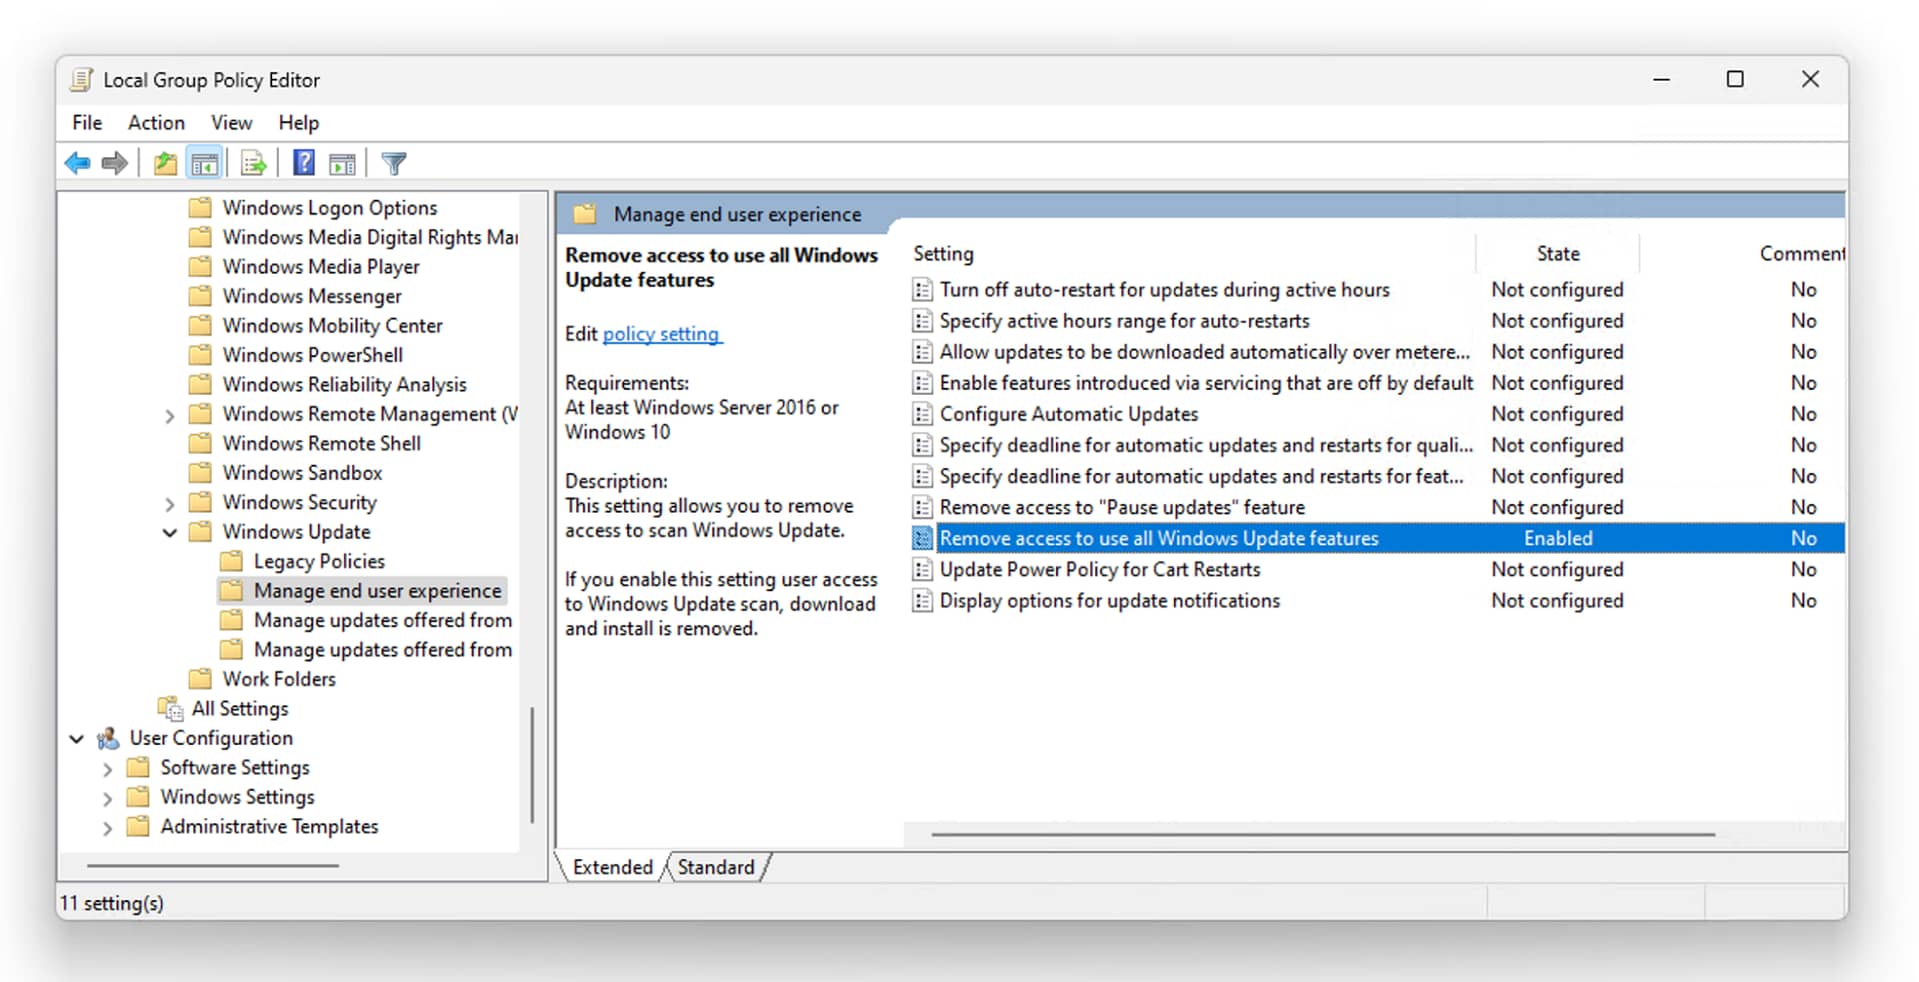
- Open Remove access to use all Windows Update features.
- Set the State to Enabled.
- Run
gpupdate /forcein Command Prompt (Admin) or restart your PC.
- Open Run (
How to Disable ‘Check for Updates’ in Windows 11 & 10 (Home)
- Using Registry Editor (regedit)
- Open Run (
Win + R), typeregedit, and press Enter. - Navigate to:
HKEY_LOCAL_MACHINE\SOFTWARE\Policies\Microsoft\Windows\WindowsUpdate - Create or modify the DWORD (32-bit) Value named
SetDisableUXWUAccess. - Set its value to 1 to disable the button.
- Restart your PC to apply changes.
- Open Run (
How to Re-enable the ‘Check for Updates’ Button
-
- Group Policy Editor: Set Remove access to use all Windows Update features to Not Configured or Disabled.
- Registry Editor: Delete the
SetDisableUXWUAccessentry.
This tutorial demonstrates how to enable and disable the “Check for updates” button in Windows 11 and Windows 10. This prevents users from having to check for Windows updates manually, which can be useful in managed environments.
Note that this does not prevent Windows from automatically checking for updates, and installing them per your update schedule.
Understanding Windows Update settings
Windows 11 and Windows 10 heavily enforce automatic updates. While they can be disabled with some workarounds, doing this is not supported by Microsoft. Despite this strict enforcement (which is done for good reason, explained below), you do have some control over Windows Update settings, allowing you to do things such as:
- Manually check for updates using the Check for updates button
- Pause updates for a period of up to 5 weeks (after which automatic updates will resume unless you manually postpone them again)
- Elect to receive updates to other Microsoft software via Windows Update
- Install optional features and drive updates
- Disable updating when using a metered connection (critical security updates will still be downloaded and installed)
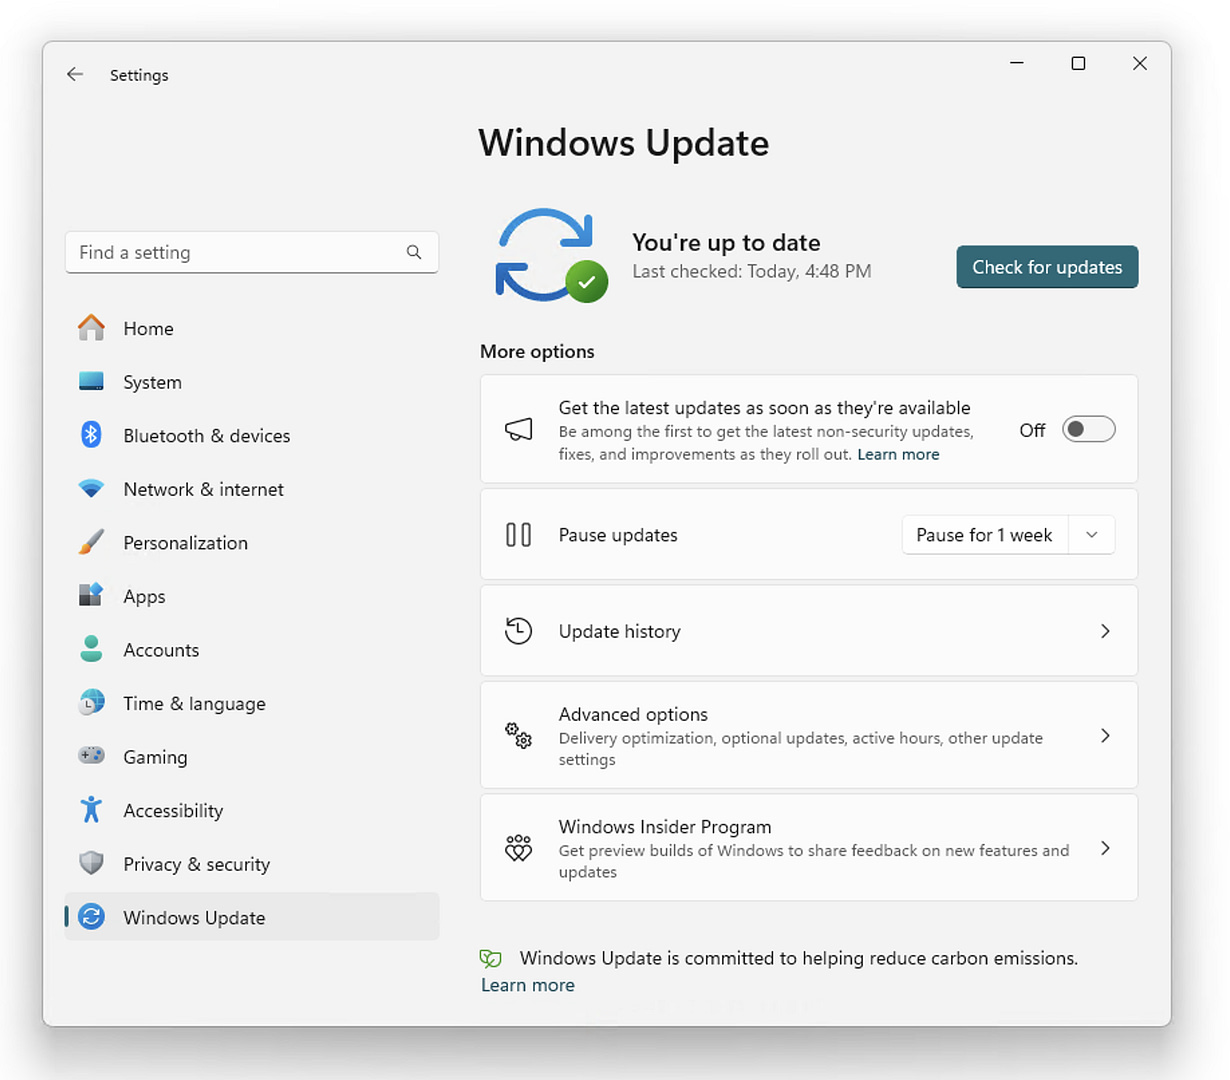
Windows Update Settings can be found at the bottom of the navigation menu in the Windows Settings app.

Why is Windows so adamant that you install updates? It’s actually for your own good: historically, users would put off installing updates because it was an inconvenient and often time-consuming process. This resulted in huge numbers of out-of-date PCs being infected with malware that exploited already patched vulnerabilities. This gave Windows a reputation for poor security, when it was actually users’ insistence on not installing updates causing many of their problems.
It also means your Windows PC has the latest non-security bug features that can improve performance or fix issues like device incompatibilities or critical bugs that could result in data loss.
If you’re looking to disable Windows updates permanently, you should strongly consider why you need to do this, and seek alternative solutions that don’t involve disabling the vital automatic update functionality that keeps your system stable and secure.
Benefits and risks of enabling/disabling Windows manual update checking
You can disable the ability for users to manually check for updates from the Windows Settings app by disabling the ‘Check for updates’ button. You may do this to prevent them from interfering with the automatic update process, or because you are in an enterprise environment and want to ensure updates are only deployed according to your own policies.
There are no major disadvantages to doing this (aside from potentially annoying users who like to press the ‘Check for updates’ button). Windows will continue to manage its own automatic update process in the background, and ensure that critical updates are downloaded and applied regardless of whether the user can manually check or not.
Before you make any changes to your Windows system using the Local Group Policy Editor or Registry Editor, make sure you back up your local group policy settings or back up your registry so that if you make a mistake, you can restore things back to normal.
It’s also encouraged to take a full system backup before making changes using local group policies or through the registry, especially if you are not experienced with either.
All the following steps require that you be logged in as an Administrator.
Step-by-Step Guide: How to enable/disable Check for updates in Windows 11
If you’re using either the Windows 11 Pro or Enterprise versions, the best way to disable the ‘Check for updates’ button is using the Local Group Policy Editor:
- Close the Windows Settings app
- Open the Local Group Policy Editor by right-clicking on the Start button, selecting Run, and entering gpedit.msc followed by the Enter key
- Navigate to Computer Configuration/Administrative Templates/Windows Components/Windows Update/Manage end user experience
- Double-click on the Remove access to use all Windows Update features setting in the right panel of the Local Group Policy Editor
- Set the State to Enabled and press OK to save the change
- Open the Command Prompt as Administrator and run gpupdate /force to immediately apply the change, or reboot your Windows PC
To re-enable the Check for updates button, follow the above steps, but set the State of the Remove access to use all Windows Update features setting to Not configured (the default), or Disabled.
If you are running Windows 11 Home, you’ll need to use the Registry Editor to disable the ‘Check for updates’ button (as Local Group Policy is not available in Home versions of Windows) by following these steps:
- Close the Windows Settings app
- Open the Registry Editor
- Navigate to the HKEY_LOCAL_MACHINE\SOFTWARE\Policies\Microsoft\Windows\WindowsUpdate key
- Set the value of the SetDisableUXWUAccess entry to 1 to disable the ‘Check for updates’ button
- If this value does not exist, create it by right-clicking in the right panel of the Registry Editor, selecting New > DWORD (32-bit) Value, and naming it SetDisableUXWUAccess
To re-enable the Check for updates button from the registry, delete the SetDisableUXWUAccess entry.
Step-by-step guide: How to enable/disable Check for updates in Windows 10
The steps for disabling the ‘Check for updates’ button in Windows 10 are largely the same as in Windows 11, except the path to the Group Policy setting is slightly different:
- Close the Windows Settings app
- Open the Local Group Policy Editor by right-clicking on the Start button, selecting Run, and entering gpedit.msc followed by the Enter key
- Navigate to Computer Configuration/Administrative Templates/Windows Components/Windows Update
- Double click on the Remove access to use all Windows Update features setting in the right panel of the Local Group Policy Editor
- Set the State to Enabled and press OK to save the change
- Open the Command Prompt as Administrator and run gpupdate /force to immediately apply the change, or reboot your Windows PC
If you’re using Windows 10 Home, you won’t have access to the Local Group Policy Editor, and will need to use the Registry Editor. The steps for this are identical to those listed for Windows 11 above.
Don’t try to solve IT issues by disabling vital functionality: Use system management tools instead
Windows 11’s enforcement of automatic updates is a good thing for the security and stability of users’ devices, but they still have some leeway in deferring installing updates. Connectivity issues and problems with Windows may also prevent updates from being successfully deployed, leaving systems vulnerable to known exploits or malfunctions that could lead to data loss.
Because of this, relying on users to manage Windows updates themselves in enterprise environments where productivity and business-critical data could be affected by a malfunction or cybersecurity incident is a real risk.
NinjaOne Patch Management provides automated Windows update management with central reporting so you can see that all of your Windows (as well as Android and Apple) devices are fully up-to-date and protected against the latest threats. NinjaOne’s patch management software doesn’t just cover the operating system, but also installed applications, ensuring full update coverage and the best possible proactive security.


