

Discover why full data backup is the preferred choice for scaling businesses.
→ See how NinjaOne Backup® measures up vs. cloud storage solutions
This step-by-step tutorial demonstrates how to create a Windows Preinstallation Environment (WinPE) bootable USB drive or DVD/CD using an ISO image. It also explains what WinPE is used for, and how to leverage it.
You can also view this brief video guide: How to Create a Windows Preinstallation Environment Bootable USB Flash Drive or ISO.
Step-by-step guide: How to create a WinPE bootable USB drive in Windows 11
These instructions will work for creating a WinPE bootable USB drive on Windows 11 systems.
Before you begin, you’ll need a USB drive to install WinPE on (be aware that the contents of the drive will be completely erased and that all files on it will be lost during the process). This USB drive should have enough space for WinPE as well as any files you may wish to copy to the drive and use from the Windows Preinstallation Environment once booted.
You should also make a full backup of your system before proceeding to install the Windows ADK and make changes to your PC.
Discover why full data backup is the preferred choice for scaling businesses.
→ See how NinjaOne Backup® measures up vs. cloud storage solutions
How to install the Windows ADK
Creating a bootable Windows Preinstallation Environment USB drive or ISO requires the Windows ADK (Assessment and Deployment Kit). To download and install the Windows ADK, follow these steps:
- Visit this link.
- Scroll to Download the ADK
- Download the latest Windows ADK and the Windows PE add-on for it.
- Run aksetup.exe to install the Windows ADK
- When installing the ADK, choose to install it to this computer, and accept the terms by pressing Next until you reach the Select the features you want to install screen
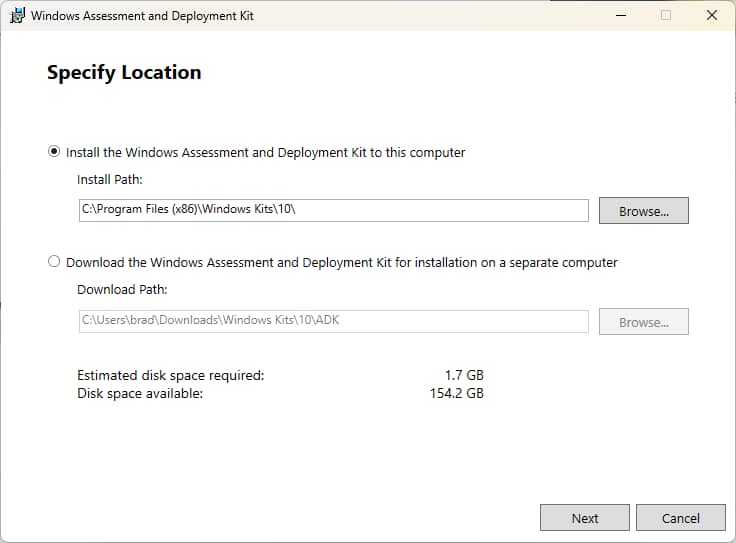
- Check only Deployment tools and press Install
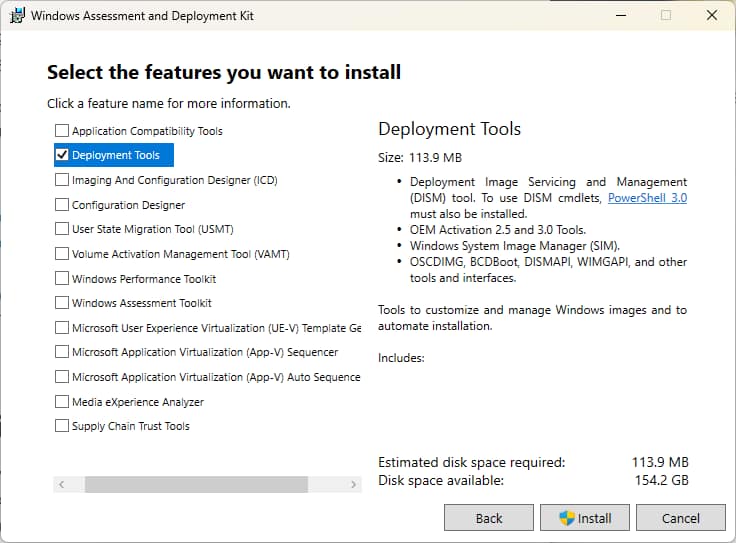
- Click the Close button when complete
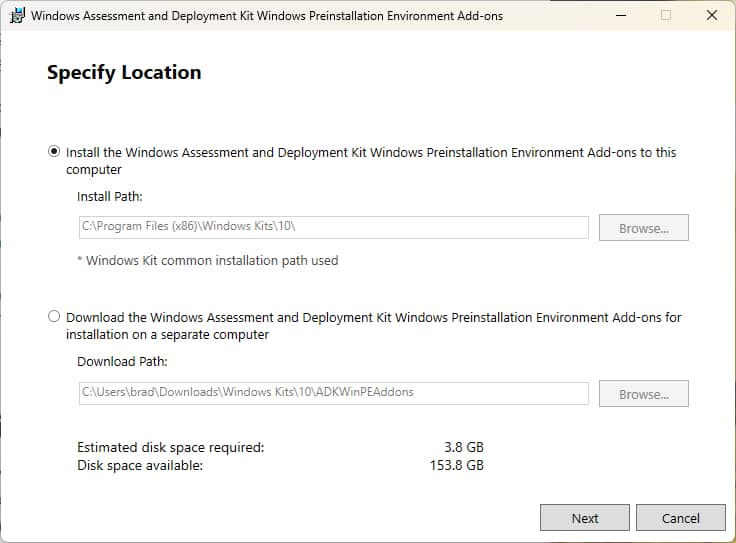
- Run adkwinpesetup.exe to install the WinPE add-on
- Select the option to install it on this computer
- Click Next until you reach Select the features you want to install
- Ensure that Windows Preinstallation Environment (WinPE) is checked and click Install
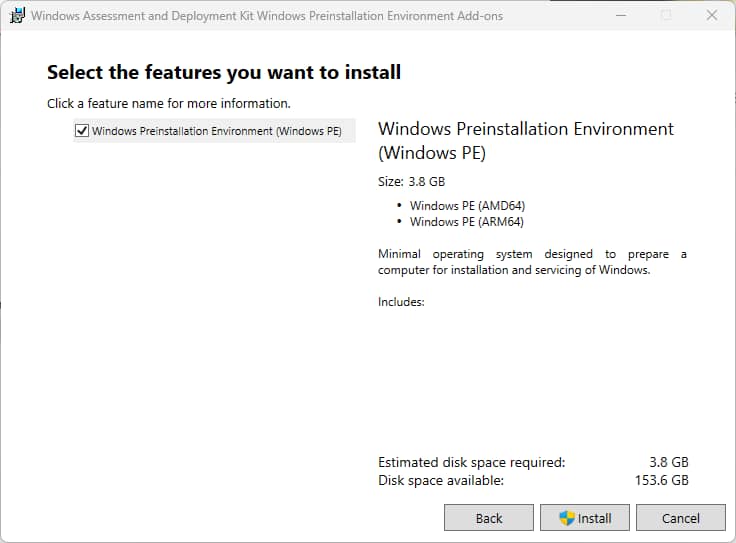
- Click the Close button when complete
Note that the installation time will vary, and may take a while on slower connections as additional files must be downloaded.
Another important consideration is to always download the Windows ADK version that matches or is newer than the version of Windows you plan to deploy. As of current releases, WinPE is provided as a separate add-on and must be installed after the core ADK.
Ho to use the Deployment and Imaging Tools Environment to create bootable WinPE media
With the Windows ADK installed, you can proceed to set up a bootable Windows Preinstallation Environment on a USB drive:
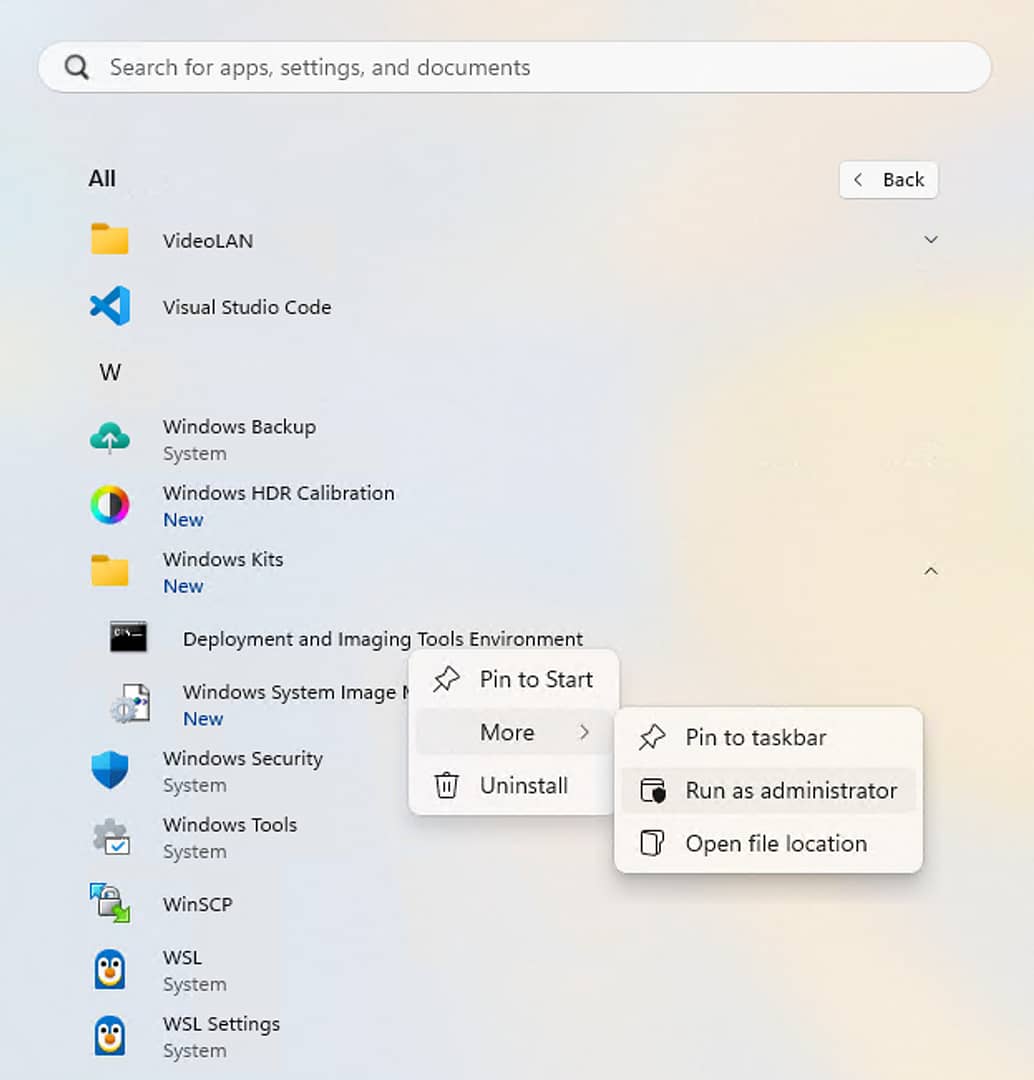
- Run Deployment and Imaging Tools Environment as an administrator from the Start menu (if you can’t find it, try using the search bar in the Start menu)
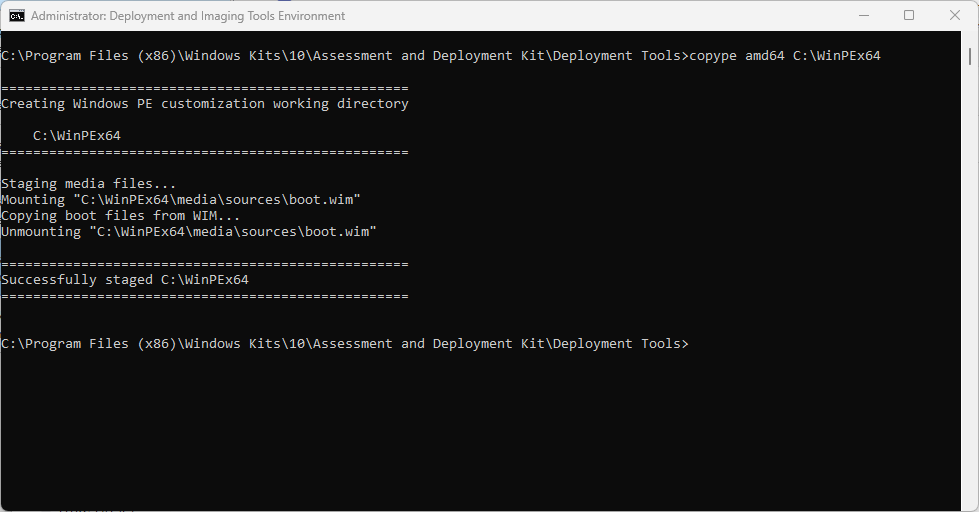
- Enter the following command into the Deployment and Imaging Tools Environment command prompt and replace C:\WinPEx64 with the path to the folder you want to stage the WindPE files to (this shouldn’t be your USB drive as this directory is where the files will be prepared before they’re copied to it)
copype amd64 C:\WinPEx64
- If you’re using a 32-bit system, use the following command instead (though note that 32-bit Windows is effectively deprecated in modern enterprise environments; as such, x86 should only be used for legacy systems):
copype x86 C:\WinPEx86
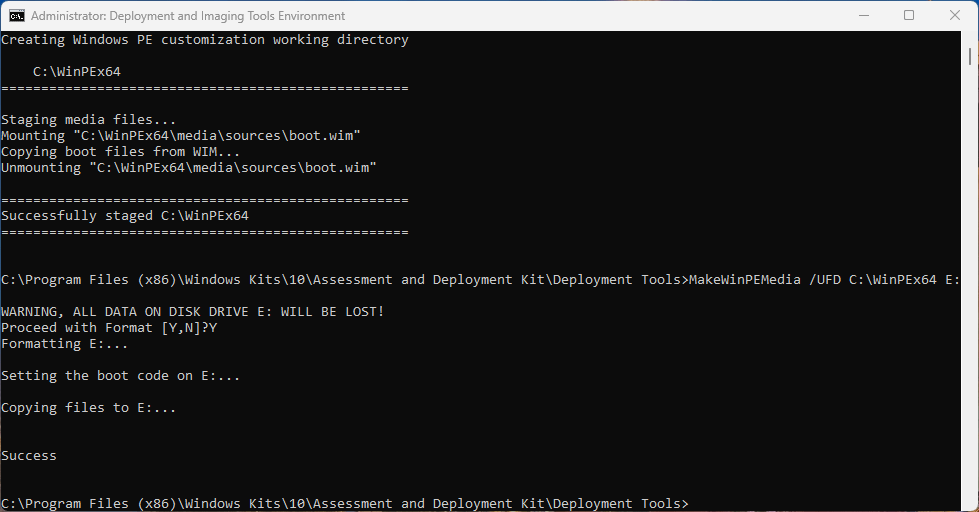
- Enter the following command to create the bootable WinPE USB drive (which will wipe the existing contents of the USB drive), replacing C:\WinPEx64 with the path you used with the copype command above, and E: with the drive letter for your USB drive
MakeWinPEMedia /UFD C:\WinPEx64 E:
Once the process is completed, you can remove the directory containing the WinPE staging files.
How to make a bootable WinPE ISO image
To create a bootable WinPE ISO image instead of a USB drive, follow the steps described above, but instead of using the command MakeWinPEMedia /UFD C:\WinPEx64 E:, replace it with the following command:
MakeWinPEMedia /ISO C:\WinPEx64 C:\WinPEx64.iso
Replace C:\WinPEx64.iso with the path to where you want to write the new ISO image file.
Now to write the image to disk, follow these steps:
- Right-click the ISO image. and
- Click Show more options.
- Click Burn disc image (note that, you’ll need a physical DVD drive with write capability and a blank CD or DVD).
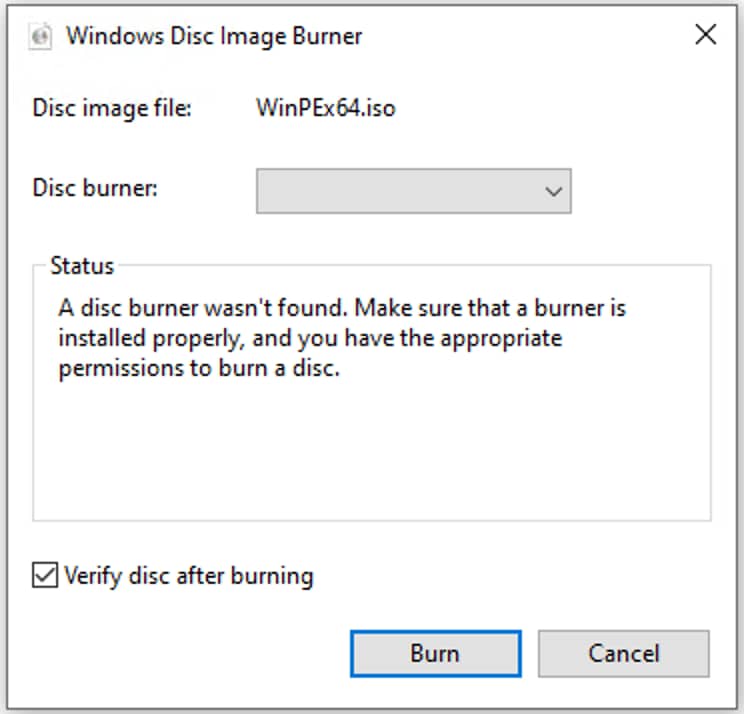
- This will open the Windows disc image burner , where you can specify the disk burner drive letter to write the image to.
- Check Verify disk after burning, and finally Burn to write the WinPE ISO to the physical disk.
How to boot into the Windows Preinstallation Environment
To boot your WinPE USB drive or disk, you’ll need to interrupt startup and select your WinPE bootable media as your boot device instead of your normal hard drive. Most devices have an assigned key that, when held while your computer starts, will allow access to boot device selection.
It will differ depending on your device model or manufacturer. Usually, it’s DEL, ESC, or one of the F1-F12 keys. The key may be displayed briefly while your computer starts, or you can search for your device’s user manual online. As a last resort, trial and error can help you identify which key to press to select the boot device.
You can also try holding the Shift key while selecting Restart from the Start menu, which will reboot into the Windows Recovery Environment (WinRE). From there, you can select Use a device to boot from your WinPE media.
To avoid confusion, below is a quick table differentiating WinPE from WinRE:
| WinRE | WinPE |
| Built into Windows | Built via ADK |
| Limited recovery tools | Fully customizable |
| Auto-repair focused | Deployment and enterprise use |
How to customize WinPE (optional advanced steps)
To customize your bootable Windows PE Media, you can use the DISM (Deployment Image Servicing Management) tool included in the Windows ADK. To add drivers to your Windows Preinstallation Environment (e.g. for networking), use the DISM command to add it to the staging directory (in this case, C:\WinPEx64), before you write it to your bootable media using MakeWinPEMedia in the steps above:
Dism /Add-Driver /Image:”C:\WinPEx64\mount” /Driver:”C:\my_driver\driver.inf”
You can also customize the languages and packages included, referring to the list of optional WinPE components, and using the following command with the path to the component you wish to add:
Dism /Add-Package /Image:”C:\WinPEx64\mount” /PackagePath:”C:\Program Files\Windows Kits\10\Assessment and Deployment Kit\Windows Preinstallation Environment\amd64\package_name\package_name.cab”
Additional files and folders can be added to Windows by copying them to the mount directory inside the staging folder before you run MakeWinPEMedia. They’ll be available in the X: drive once you’ve booted WinPE.
You can also customize the startup script located at mount\Windows\System32\Startnet.cmd within your WinPE staging folder, and perform a number of other customizations.
What is the Windows Preinstallation Environment?
The Windows Preinstallation Environment (WinPE) is a bootable tool for the recovery of devices running Windows 11. It was built to replace MS-DOS as the minimalist operating system for running recovery commands to
- fix operating system issues,
- clone disks, and
- recover data.
WinPE isn’t included by default in Windows and requires the use of the Windows ADK (Assessment and Deployment Kit) and the installation of the WinPE ADK add-on, which is compatible with Windows 11. This environment isn’t intended for daily or production use, and all changes and data are lost when it reboots, which happens automatically every 72 hours if left running (this is a licensing design limitation and can’t be disabled).
WinPE uses the FAT32 file system by default (meaning a file size limit of 4 GB) and a volume size limit of 32 GB. In addition, FAT32 is required for UEFI Secure Boot.
Troubleshooting common WinPE issues
If you can’t boot into WinPE, try the following:
- Your BIOS/UEFI should support booting from USB devices, if it doesn’t, you’ll need to write an ISO image to optical media as an alternative.
- Try a different USB device, USB drives that use flash storage can degrade over time
- Check if your WinPE drive boots successfully on a different device to rule-out hardware or UEFI/BIOS configuration issues
Once created, a bootable Windows Preinstallation Environment will work on any PC, not just the one it was created on. However, if network access is required for the tasks you need to perform, you’ll need to add the drivers for the different networking hardware in each device you’ll be troubleshooting.
Safeguard business data with a reliable automated backup and recovery solution.
Imaging and deploying Windows in education and enterprise environments
Creating bootable WinPE USB drives and ISO images can assist with troubleshooting individual Windows 11 devices. However, it’s not sufficient in distributed environments where many devices are spread across different sites or where staff work remotely.
Image backup software by NinjaOne can remotely back up and restore images of full Windows installations, with granular backups that let you revert devices to a known good state at a specific date and time. Combined with NinjaOne’s endpoint management tools, you have a complete view of your employees’ devices and any issues they are experiencing, allowing for fast remediation using automation and remote access.


