

This tutorial demonstrates how to enable or disable the Diagnostic Data Viewer on Windows 10 and Windows 11 PCs. The Diagnostic Data Viewer can help you troubleshoot your PC, and to better understand the diagnostic reports that are automatically sent to Microsoft from your device.
What is the Diagnostic Data Viewer and what does it show?
The Windows Diagnostic Data Viewer is an interface for viewing diagnostic data that is collected by Microsoft from your device, and sent to them so that they can use it for product improvement and debugging. The goal of this is to collect information from millions of consumer Windows devices, and analyze it for potential problems or compatibility issues that can be fixed through Windows updates.
You have limited control over how much diagnostic data your Windows device shares with Microsoft:
- Required: This mandatory reporting data is limited to what Microsoft deems necessary to keep your device operational and secure
- Optional: Includes additional data about the apps you use, the websites you visit, and additional error details
Whether you send only the required, or the additional optional data is configured when you first set up your Windows device. It can also be configured in the Settings app in the Privacy & Security > Diagnostics & feedback section.
Reasons to enable or disable the Diagnostic Data Viewer
Enabling the Diagnostic Data Viewer lets you see information that can help you troubleshoot issues with your PC. Reviewing the contents of the telemetry that is sent to Microsoft can also assist with understanding and improving your online privacy.
It is not possible to completely disable the collection of diagnostic data in Windows 10 and Windows 11 (disabling the Diagnostic Data Viewer only hides the information — it is still collected by Microsoft). You can, however, configure firewall policies or use third-party tools to block your PC from connecting to the servers to upload the data.
You may wish to disable the Diagnostic Data Viewer if you share your PC and do not want the information in it (which may include data about your website or app usage) to be visible to other users, or for compliance reasons.
How to turn on the Diagnostic Data Viewer (Windows 11)
Use the following tutorial steps to turn on the Diagnostic Data viewer in Windows 11:
- Right-click on the Start button and select Settings
- Select Privacy & Security in the sidebar to the left
- Select Diagnostics & feedback from the list of Windows permissions to the right
- Scroll down to and expand the View diagnostic data option
- Toggle the Turn on the Diagnostic Data Viewer option to enable
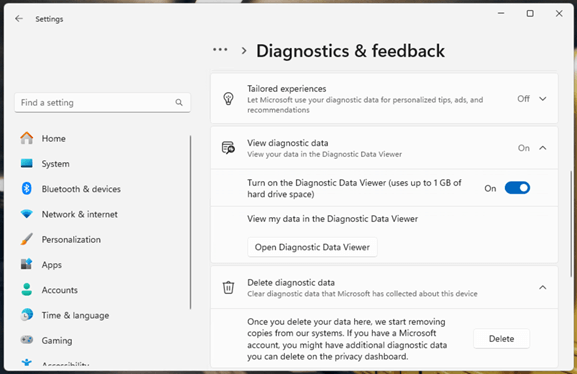
- Click the button to Open Diagnostic Data Viewer
- If the Diagnostic Data Viewer is not installed, the Windows Store page for the tool will open so that it can be downloaded
- Once the Windows Diagnostic Data Viewer is installed it can be opened with the button in the Settings app described above, or directly from the Start menu
How to turn on the Diagnostic Data Viewer in Windows 10
The instructions to enable the Diagnostic Data Viewer differ slightly for Windows 10 devices:
- Open the Settings app from the Start menu
- Select Privacy and then select Diagnostics & feedback in the left sidebar
- Scroll down to View diagnostic data and toggle the option on
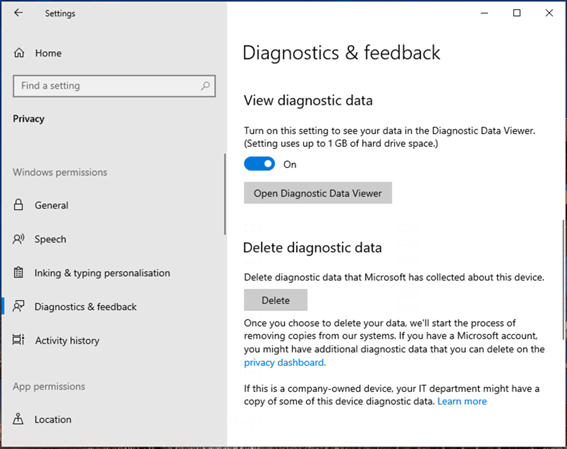
- Click Open Diagnostic Data Viewer (if it is not installed, the Windows Store page for it will open)
- Once installed, you can open the Diagnostic Data Viewer from the start menu, or through the Diagnostics & feedback section of the Settings app
How to turn off the Diagnostic Data Viewer in Windows 10 and Windows 11
To disable the Diagnostic Data Viewer in Windows 10 or Windows 11, follow the relevant instructions above, but instead, toggle the View diagnostic data option to off. You can then also uninstall the Diagnostic Data Viewer app.
Enabling or disabling the Diagnostic Data Viewer with the Local Group Policy Editor
Note that using the Windows Settings app is the preferred method for enabling the Diagnostic Data Viewer as it is less error-prone than using Local Group Policy or the Registry. If you do use either of these methods, you may no longer be able to change diagnostic data options in the Settings app, and will need to return the Local Group Policy and Registry settings to their defaults before you can again do so.
To enable diagnostic data using the Local Group Policy editor:
- Open the Local Group Policy Editor
- Navigate to Local Computer Policy\Computer Configuration\Administrative Templates\Windows Components\Data Collection and Preview Builds
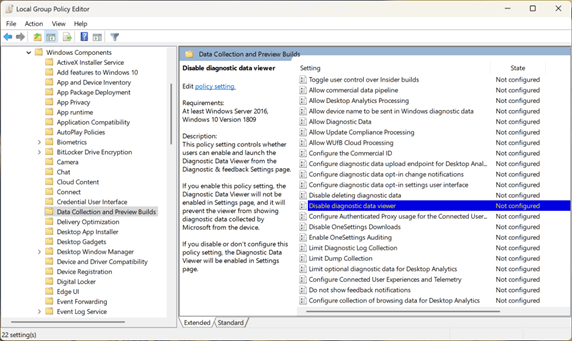
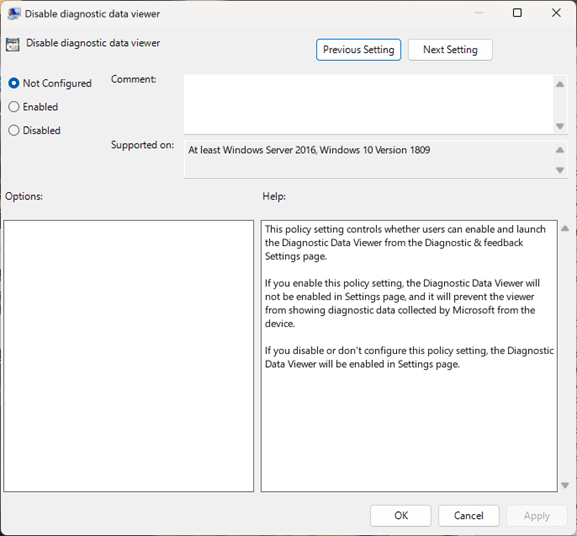
- Scroll to Disable diagnostic data viewer in the list of Settings and click on it
- To enable access to Windows diagnostic data, set the State of the Disable diagnostic data viewer setting to Disabled or Not configured (which defaults to disabled)
You will also need to install the Diagnostic Data Viewer from the Windows store.
To disable the Diagnostic Data Viewer using Local Group Policy:
- Follow the steps described immediately above
- Set the state of the Disable diagnostic data viewer setting to Enabled
How to enable or disable the Diagnostic Data Viewer with the Windows Registry Editor
It is also possible to utilize the Windows Registry Editor to enable or disable viewing diagnostic data:
- Open the Registry Editor
- Navigate to HKEY_LOCAL_MACHINE\SOFTWARE\Policies\Microsoft\Windows\DataCollection
- If the DisableDiagnosticDataViewer DWORD value does not exist, create it by selecting Edit > New > DWORD (32-Bit) Value from the toolbar
- Rename the new DWORD value DisableDiagnosticDataViewer
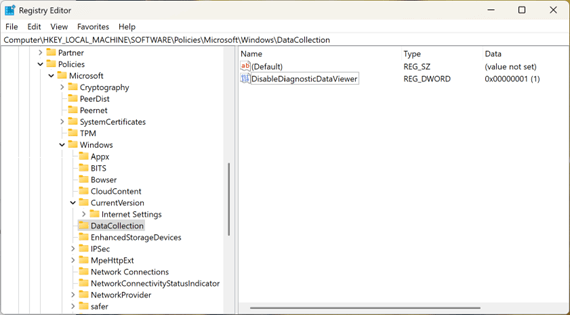
- To disable the Diagnostic Data Viewer, click on the DisableDiagnosticDataViewer value and set its Value data to 1, then press OK
- To enable the Diagnostic Data Viewer, set its value to 0
How to view Windows Diagnostic Data logs
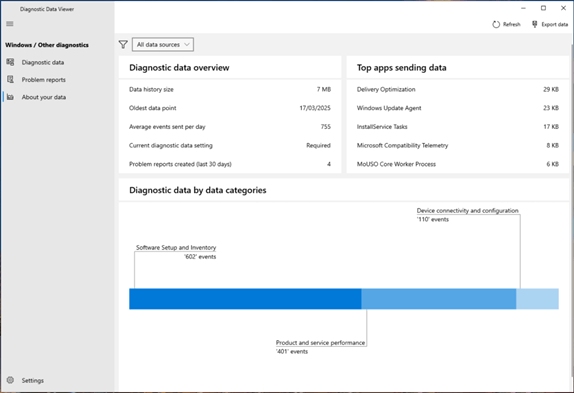
To view the diagnostic data that has been collected:
- Open the Windows Diagnostic Data Viewer from the Privacy & security section of the Settings app, or from the Start menu
- If diagnostic data viewing is disabled, you will receive a warning that you need to enable it to view telemetry

- If it is enabled, you will be able to view the diagnostic data that has been collected, including diagnostic data, problem reports, and a summary of your data.
How to delete/clear Windows diagnostic data
While you cannot prevent consumer versions of Windows (including Pro and Home editions) from collecting diagnostic data and can only block it using external tools, you can delete the data from your device and request that Microsoft remove the data from their systems.
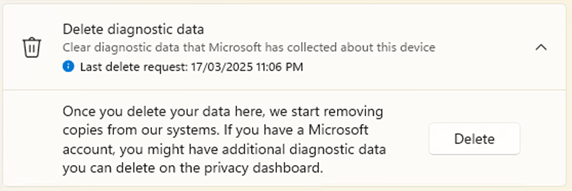 You can do this by opening the Settings app, navigating to Privacy & security (just Privacy on Windows 10), and then Diagnostics & feedback. From there, under Delete diagnostic data, there is the option to delete the diagnostic data Microsoft has collected about your device. Clicking the Delete button will delete the data from your device, and signal to Microsoft that they need to remove copies of that data from their systems (which may not happen immediately). This only applies to the data collected to this point in time, so you may wish to do this periodically.
Managing user and customer privacy in enterprise and education
Enabling or disabling the Windows Diagnostic Data Viewer does not affect the collection of required telemetry data, which is mandatory in consumer versions of Windows. While Enterprise and Education versions of Windows give you the option to completely disable diagnostic data, many organizations choose to deploy additional tools to monitor and block the collection and sending of potentially sensitive information.
Endpoint management and security by NinjaOne gives you the tools to deploy firewall and security policies to secure your important proprietary and user data, as well as monitor for potential cybersecurity breaches.


