This step-by-step tutorial will demonstrate how to configure scheduled maintenance in Windows 10. It includes instructions for enabling and disabling scheduled system maintenance, as well as an explanation of what scheduled system maintenance is, how it works, what tasks it performs, and why you may want to disable it.
What is scheduled maintenance in Windows 10?
System maintenance is a troubleshooting tool available in Windows 10 (retired in Windows 11) that performs a number of maintenance tasks to help keep your PC running smoothly, including:
- Freeing disk space by automatically deleting old troubleshooting history logs, as well as error reports and other system logs 30 days or older.
- Correcting the system clock if it is set to the incorrect time by syncing with a time server. This fixes issues with validating SSL certificates, system updates, Windows activation, and other system functions that require that the time be set accurately.
- Removing unused and broken desktop shortcuts and icons. If there are more than 4 broken desktop shortcuts, all are automatically removed.
- Scans for, and repairs, disk errors that may be causing disk space to be incorrectly reported, and also lead to performance and data integrity issues.
- Defragments hard disks and optimizes SSDs that support TRIM.
- Checks for and installs Windows Updates.
- Records any issues found in the event viewer for further troubleshooting.
By default, scheduled system maintenance is run daily while your Windows device is idle.
How to enable or disable scheduled maintenance in Windows 10
There are several ways to configure scheduled maintenance in Windows 10. Note that all of these methods require that you be logged in as an administrator.
Turning on or off scheduled system maintenance from the Control Panel
To configure scheduled system maintenance using the Windows Control Panel, follow these steps:
- Right-click on the Start button and click Run
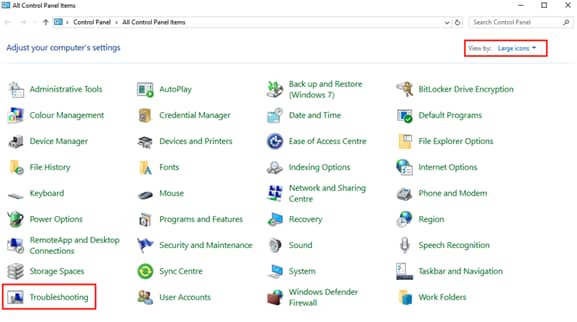
- Type control into the Run dialog and press the ENTER key to open the Control Panel
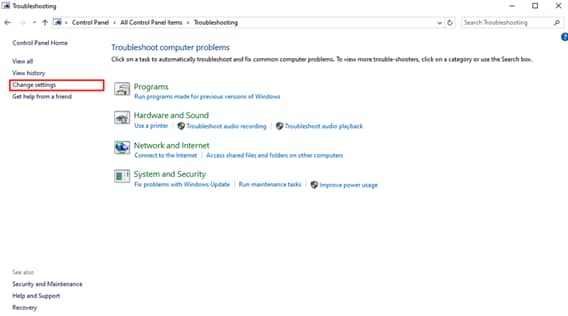
- Ensure View by: is set to Large icons and then select Troubleshooting
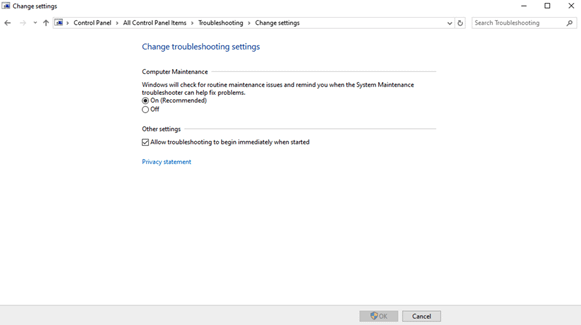
- Click Change settings in the left sidebar
- Change the selected value under System Maintenance from On or Off
Enabling or disabling scheduled system maintenance using the Windows Registry Editor
You can also change the settings for scheduled system maintenance using the Windows Registry Editor (be sure to back up your registry settings and also perform a full system backup first, in case you make a mistake):
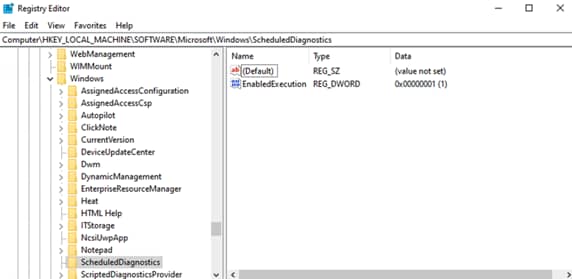
- Open the Registry Editor by right-clicking on the Start button, selecting Run, and entering regedit followed by the ENTER key
- Navigate to the key HKEY_LOCAL_MACHINE\SOFTWARE\Microsoft\Windows\ScheduledDiagnostics
- Change the value of EnabledExecution to 0 to disable automatic scheduled system maintenance, or 1 to re-enable it
Configuring Windows scheduled system maintenance using the Local Group Policy Editor
Finally, the Local Group Policy editor can be used to turn Windows scheduled system maintenance on or off:
- Open the Local Group Policy Editor
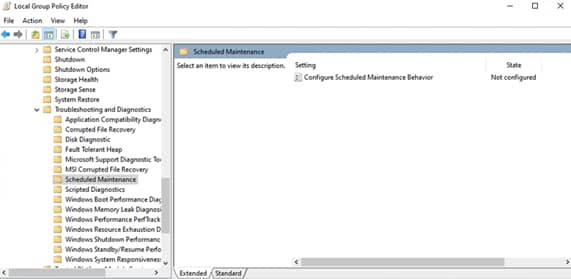
- Navigate to Computer Configuration\Administrative Templates\System\Troubleshooting and Diagnostics\Scheduled Maintenance
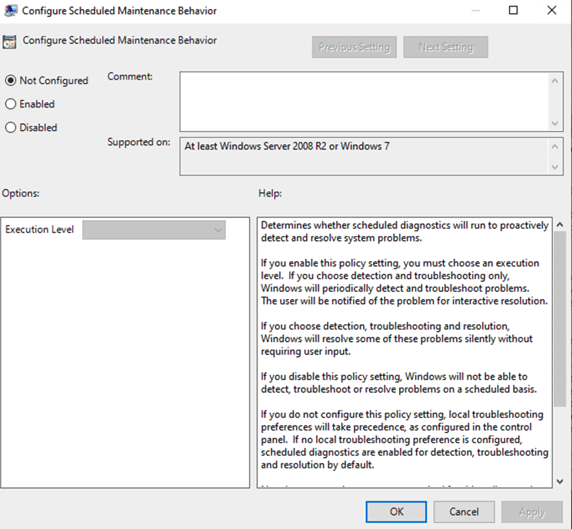
- Change the value of the Configure Scheduled Maintenance Behavior setting to Disabled to turn it off, or Not Configured to leave it on using its default settings
You can also set the above value to Enabled and then choose an Execution level: Troubleshooting Only will check for problems but not attempt resolution before user confirmation, while Regular will enable the default behavior.
How to run Windows system maintenance manually
You can manually run the Windows system maintenance tool by following these steps:
- Open the Control Panel and navigate to System and Security > Security and Maintenance
- Expand the Maintenance section and click Start Maintenance
- System maintenance will run in the background, and display “Maintenance in progress” in the Maintenance section until it has completed successfully
If you have disabled automatic scheduled system maintenance, or want to manually perform the tasks it performs individually, you should regularly use the following tools to ensure your PC is optimized and has the latest feature updates and security patches:
- You will need to manually check for broken or unused shortcuts on your desktop
- The chkdsk /f /r command can be run from an elevated Command Prompt to check for disk errors
- The Defrag and Optimize Drives tool can be found in Windows Tools in the Start menu
- Right-clicking on the Start button, selecting Run, and entering the command cleanmgr can be used to clean up temporary files, old Windows Update Files, and to empty the Recycle Bin
- Running perfmon /rel from the Run dialog can be used to find apps that are affecting system reliability
- Windows Updates should continue to run automatically, independent of whether scheduled system maintenance is turned on or off
Why would you configure scheduled system maintenance?
You may want to disable scheduled maintenance in Windows if you want full control over your system. You may also consider disabling it if you find that it is interrupting you while you use your computer (though it should not run while your PC is not idle, it may take a moment to pause when you start using your PC or affect the performance of tasks like video encoding that you leave running in the background).
It should be noted that while scheduled system maintenance may temporarily impact performance while it is running, overall it should have a positive impact on the performance of your PC.
It is generally recommended to leave scheduled system maintenance enabled (the default), so that you do not have to perform maintenance tasks manually to keep your PC running smoothly and identify any problems that may be lurking in the background (such as the symptoms of hard disk failure).
Maintaining and configuring Windows 10 and Windows 11 devices at scale
Configuring Windows scheduled maintenance settings, as well as performing maintenance tasks themselves, should be done regularly to ensure enterprise devices are secure against known cybersecurity threats and functioning properly so that employees can be as productive as possible.
NinjaOne provides a comprehensive Remote Monitoring and Management (RMM) solution that gives you full oversight of your IT infrastructure and end-user devices, ensuring you are alerted to performance, maintenance, and security issues before they impact your business.

