Key Points
How to Find and Remove Bloatware in Windows 11
- How to detect bloatware:
- Look for apps you didn’t install or use
- Watch for apps that run in the background unnecessarily
- Avoid apps that display ads or request payment for basic features
- Manual removal steps:
- Go to Settings > Apps > Installed Apps and uninstall unwanted apps
- Open Microsoft Store > Library to remove store-installed apps
- Advanced removal methods:
- Group Policy Editor: Disable cloud content to reduce suggested app installs
- PowerShell scripts: Remove built-in apps or prevent reinstallation
- File Explorer: Delete leftover shortcuts in
%localAppData%Packages
- Prevent bloatware reinstall:
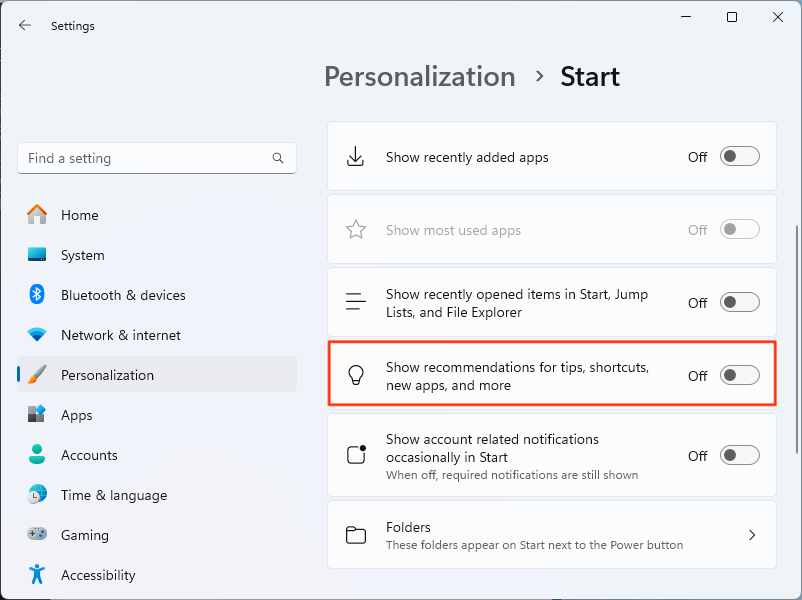
- Turn off Start Menu > Show recommendations in Settings > Personalization > Start
- Review and uncheck bundled apps in third-party installers
Figuring out how to find and remove bloatware from Windows 11? We need to know that Windows 11 ships with a significant amount of bloatware, both from Microsoft and from the manufacturer. Even after you’ve cleaned it up, new, unwanted apps can arrive from system updates and bundled with other software that you install.
Bloatware (a combination of ‘bloat’ and ‘software’) are apps that you don’t want or need installed on your computer. Unnecessary programs take up disk space, make your computer run slower, and may even be used to spy on you for advertising purposes. Here’s how to find and remove bloatware from Windows 11.
Access your endpoints and remove bloatware remotely using NinjaOne!
What is bloatware?
Bloatware refers to software that users did not install willingly and negatively impacts the device’s performance. It does not offer any benefit to users and instead consumes storage space, degrades performance, and uses up unnecessary battery power. In addition, bloatware opens a device up to exploitation through unpatched security vulnerabilities.
Types of bloatware
1. Junkware
Junkware typically takes the form of utility apps such as music, gaming, calendar, or weather apps. Some manufacturers pre-install junkware on devices to provide extra functionality even if users would prefer to use other software..
2. Trialware
Some manufacturers install software that gives the user a free trial when they first boot up their device. Once the trial period is over, this type of bloatware aggressively reminds the user to purchase a subscription in order to continue using the app.
3. Adware
Adware refers to programs that create constant pop-ups to advertise a product or service to users. These pop-ups can disrupt workflows and even manipulate system settings, such as changing a Homepage.
4. Toolbars
Unwanted toolbars, such as on internet browsers, slow down a software’s performance and can even pose security risks by changing settings without the user’s consent.
How do I detect and remove bloatware
What ‘bloatware’ means differs from user to user, but broadly, it’s any app that is installed on your Windows 11 device that you don’t want or use. Some users will find a few of the pre-installed apps on their PC useful, while others will never even open them.
However, there are a few things you should look out for when identifying bloatware:
- Does it ask for a subscription for functionality that is already included in Windows or available for free (for example, pushy antivirus subscriptions)?
- Does it run continually in the background without providing any benefit to you?
- Does it display ads?
- Does it record your activity for advertising purposes?
If you use applications that do these sorts of things, consider finding alternatives that are more respectful of your time, privacy, and wallet.
Common examples of Windows bloatware include:
- Antivirus and VPN software that was installed by your computer manufacturer: These will often push you for a subscription, but don’t offer any major advantages over Windows’ built in antivirus.
- Communication apps: Instant messaging and video calling apps are often included on new PCs, though most users already have their favorite and don’t need more.
- Productivity software trials: Office and creative software is often bundled in and will try to sign you up for a subscription.
- Music and video streaming platforms: Like software trials, these clog up your system and may encourage you to sign up for their service.
- Games: Video games are great. Most of the ones included with your PC are thinly disguised gambling apps riddled with ads.
As bloatware has a habit of creeping back onto your system through updates (and sometimes riding along inside the installers for other programs you actually need), you should periodically check for any unwanted applications, and remove them using the steps in this article.
How to debloat Windows 11 manually
The first place you should check for bloatware to remove is in the Windows Settings app. Open the Settings app from the Start menu, then click on Apps in the left sidebar, and then Installed Apps.
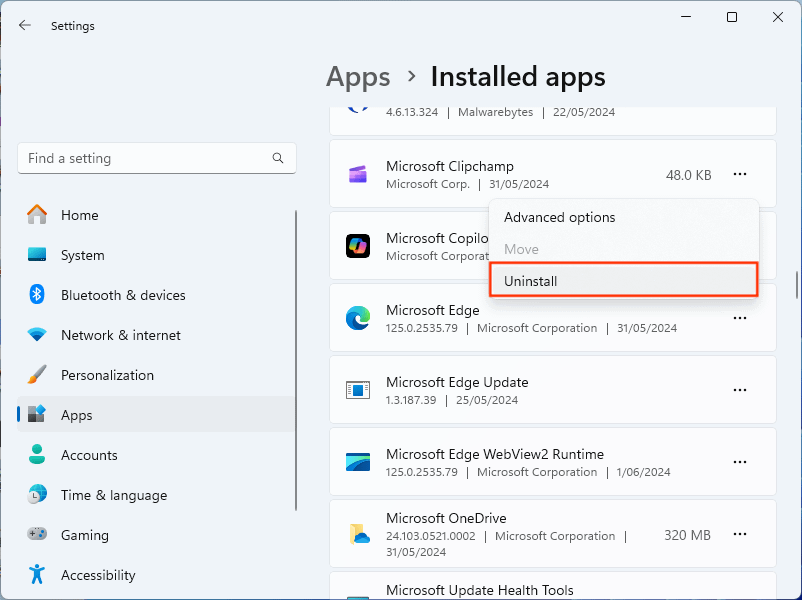
From here, click on the dots next to each app to see the options for uninstalling them.
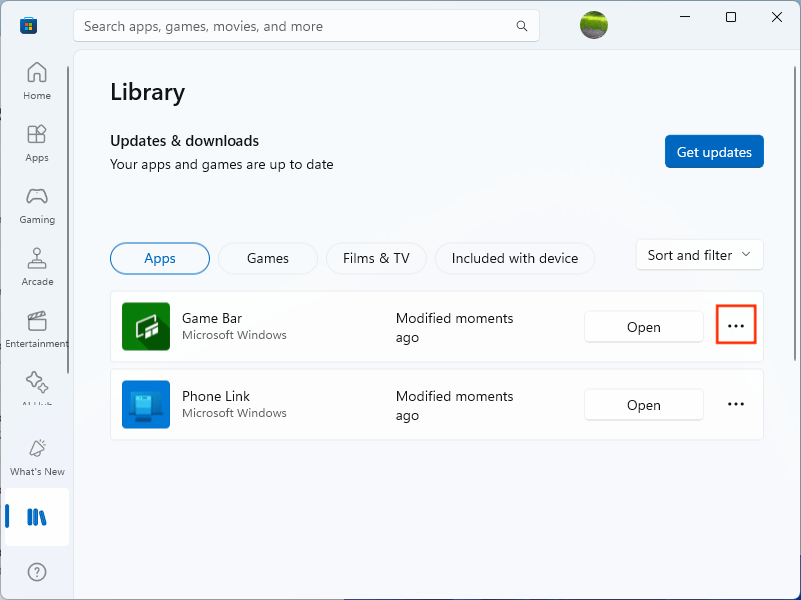
The next place to check for bloatware is in the Microsoft Store app. Open it from the Start menu, then click on Library in the left sidebar.
Again, click on the dots next to each listed app to see if it can be uninstalled (some may not let you if they are part of Windows 11).
Using Group Policy and PowerShell to remove bloatware
You can use a Local Group Policy (the settings usually used by system administrators to control corporate computers) to enforce some rules that should reduce the appearance of bloatware on your Windows 11 computer. This is probably unnecessary for most users, but if you want to give it a shot, follow these steps:
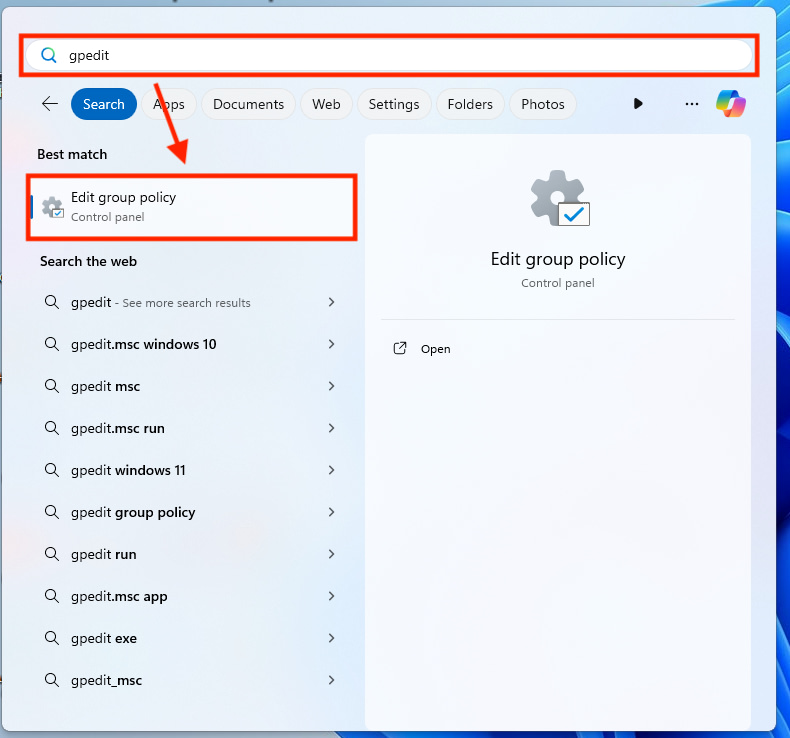
Open the start menu and search for gpedit and then open the Edit Group Policy search result.
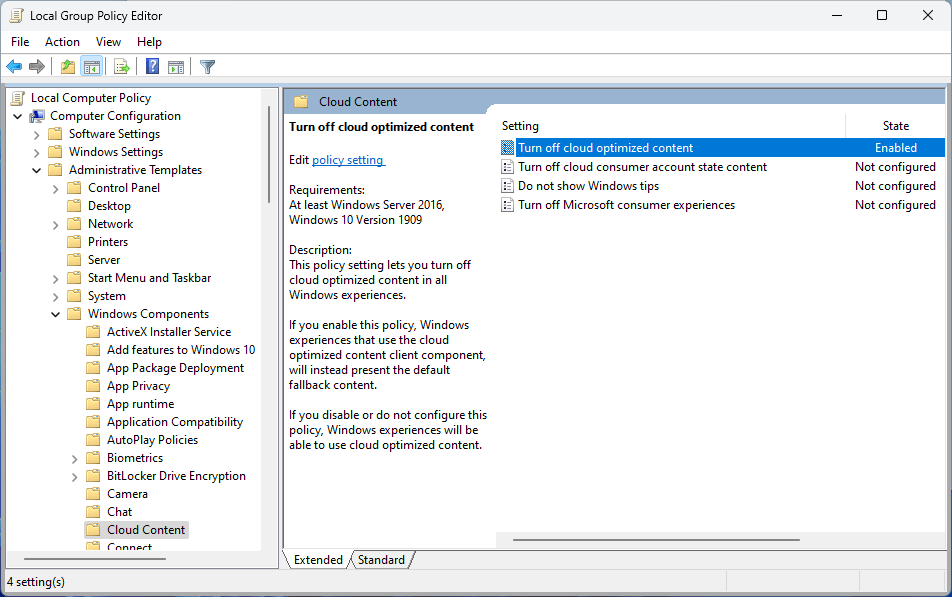
Then, navigate to Computer Configuration/Administrative Templates/Windows Components/Cloud Content in the left sidebar of the group policy editor, and change the value of Turn off cloud optimized content to Enabled by double clicking on it.
Finally, to remove any existing shortcuts, navigate to the directory %localAppData%PackagesMicrosoft.Windows.StartMenuExperienceHost_cw5n1h2txyewy (you can copy and paste this address into the Explorer address bar or Start menu Run prompt) and delete the LocalState folder from this directory.
PowerShell can also be used to update Windows 11 configuration options to remove and discourage the installation of bloatware and other Windows features that tend to get in the way. Below is a script to do so that you can adapt to remove or disable the built-in Windows 11 software and features you don’t need.
As with any script, you should carefully review it before running it, so that it doesn’t remove anything or perform any action that you don’t expect it to.
# Function to prompt the user for confirmation

function Confirm-Action {

param (

[string]$Message

)

$confirmation = Read-Host "$Message (y/n)"

return $confirmation -eq 'y'

}

# Function to remove a given app

function Remove-App {

param (

[string]$AppName

)

if (Confirm-Action "Do you want to remove $AppName ?") {

Get-AppxPackage -Name $AppName | Remove-AppxPackage

Write-Output "$AppName removed."

} else {

Write-Output "Skipped removing $AppName"

}

}

# List apps to remove (The below example contains some default Windows apps, feel free to add your own, or remove entries)

$appsToRemove = @(

"Microsoft.3DBuilder",

"Microsoft.BingWeather",

"Microsoft.GetHelp",

"Microsoft.Getstarted",

"Microsoft.Microsoft3DViewer",

"Microsoft.MicrosoftOfficeHub",

"Microsoft.MicrosoftSolitaireCollection",

"Microsoft.MicrosoftStickyNotes",

"Microsoft.MixedReality.Portal",

"Microsoft.MSPaint",

"Microsoft.Office.OneNote",

"Microsoft.People",

"Microsoft.Print3D",

"Microsoft.SkypeApp",

"Microsoft.WindowsAlarms",

"Microsoft.WindowsCamera",

"Microsoft.WindowsFeedbackHub",

"Microsoft.WindowsMaps",

"Microsoft.WindowsSoundRecorder",

"Microsoft.XboxApp",

"Microsoft.XboxGameOverlay",

"Microsoft.XboxGamingOverlay",

"Microsoft.XboxIdentityProvider",

"Microsoft.XboxSpeechToTextOverlay",

"Microsoft.YourPhone"

)

# Loop through app list and prompt for removal

foreach ($app in $appsToRemove) {

Remove-App -AppName $app

}

# Function to set a registry key value

function Set-RegistryKey {

param (

[string]$Path,

[string]$Name,

[string]$Value

)

if (Confirm-Action "Do you want to set $Name in $Path to $Value ?") {

Set-ItemProperty -Path $Path -Name $Name -Value $Value

Write-Output "Set $Name in $Path to $Value"

} else {

Write-Output "Skipped setting $Name in $Path"

}

}

# Disable telemetry in using the registry

Set-RegistryKey -Path "HKLM:\SOFTWARE\Policies\Microsoft\Windows\DataCollection" -Name "AllowTelemetry" -Value 0

Write-Output "Windows Debloat completed"
Preventing bloatware installation
In addition to using group policy to try and prevent bloatware from being installed with Windows 11 updates, turning off Start menu ads and recommendations will both reduce the number of unwanted app icons in your start menu, and make it less likely that you unintentionally install an unwanted app.
To do this, open the Settings app, click on Personalization in the menu to the left, and click Start and turn off Show recommendations for tips, shortcuts, new apps, and more.
You should also carefully review the options presented when using third-party installers to install software. Uncheck any components or bundled apps you don’t want to install, and scroll through the user agreements to make sure that you are only consenting to installing the software you intend to.
Ninite is a fantastic tool for installing popular free software packages. It installs and updates a wide range of productivity and system tools, and strips out all unnecessary bloatware that is often included with them.
Streamline device management with automated bloatware removal with NinjaOne.
Risks and considerations in bloatware removal
There are a few considerations (and risks) when removing software from your Windows computer. Often, removing an app will only remove it for the current user, so if you have multiple users, you may have to debloat each account. Some bloatware will also show up again in the same account (OneDrive in particular, has a habit of coming back even if you’ve uninstalled it multiple times).
You should be careful when uninstalling applications if you are unsure of their purpose: some may include drivers for your device that will stop it from working properly if they are removed or make your system unstable. You should also make sure that you aren’t paying for any of the software you are removing (for example through a subscription), and if you are, cancel your subscription before removing it. If you have paid for software and think you might want to use it again one day, make sure you have a copy of the software license or login details to restore your purchase before uninstalling.
If in doubt, you should contact your local IT professional to help you debloat your computer. Your computer contains your whole digital life, so it’s a small price to pay to make sure that it’s operating correctly.
Maintenance best practices and optimizing Windows 11 post-bloatware removal
There are a few best practices you can follow to keep your Windows 11 system optimized and running just as quickly as the day you bought it:
- Regularly perform a disk cleanup to remove temporary files and increase available disk space.
- Keep an eye on your computer’s performance, and if it seems to be running slower than usual, investigate and identify which program could be the cause.
- Remain vigilant and regularly check for any unwanted apps that may have been installed automatically.
- If your computer is becoming unusable due to bloatware or malware, consider resetting it to remove all installed software or contacting an IT professional to help you do so without losing any of your files.
Once you’ve finished removing bloatware from Windows 11 (whether manually, or using group policy or PowerShell), you might wish to clean up your own files to reclaim some extra disk space. If you’re having trouble finding them, check out our guide for showing hidden files and folders in Windows 11.
Managing bloatware on Windows 11 systems at scale
While removing bloatware from a device can significantly boost its performance, organizations and managed service providers (MSPs) may find that debloating at scale can be challenging and time-consuming. In addition, end-users can render their devices unusable if they uninstall the wrong software. This is why IT departments and MSPs should consider investing in software such as NinjaOne Windows endpoint management.
NinjaOne stands out for how easy it is to learn and use the platform and its world-leading customer support. With NinjaOne, administrators gain full control over the software deployment on Windows devices, allowing them to manage applications and uninstall bloatware. Technicians can manually remove and whitelist applications or automate software management processes across your entire IT environment. Optimize Windows device performance and productivity with G2’s #1 endpoint management software.
Key Points
How to Find and Remove Bloatware in Windows 11
- How to detect bloatware:
- Look for apps you didn’t install or use
- Watch for apps that run in the background unnecessarily
- Avoid apps that display ads or request payment for basic features
- Manual removal steps:
- Go to Settings > Apps > Installed Apps and uninstall unwanted apps
- Open Microsoft Store > Library to remove store-installed apps
- Advanced removal methods:
- Group Policy Editor: Disable cloud content to reduce suggested app installs
- PowerShell scripts: Remove built-in apps or prevent reinstallation
- File Explorer: Delete leftover shortcuts in
%localAppData%Packages
- Prevent bloatware reinstall:
- Turn off Start Menu > Show recommendations in Settings > Personalization > Start
- Review and uncheck bundled apps in third-party installers
FAQs
How do I uninstall unnecessary programs from Windows 11?
You can get started with removing bloatware by opening the Windows Settings app. Next, click on the Apps from the dropdown menu on the left. Navigate the list of installed apps and uninstall anything unnecessary by clicking on the three dots on the upper right. For apps that launch and run in the background after your device starts up, select Startup instead of Installed Apps. Toggle the button to “Off” to prevent the apps from launching whenever you boot up your Windows device.
Is uninstalling bloatware from Windows 11 safe?
Generally, debloating is safe, provided that the user knows what programs are essential to the system running. Users could delete drivers or programs that cause other apps to have issues or make the system unusable. Consider using backup software before debloating Windows 11 to ensure that critical data is not lost if something goes wrong. Businesses may find that investing in IT tools that provide visibility of all their hardware and software, such as IT asset management (ITAM) solutions, can be a safer alternative to having users manually remove bloatware and improve device performance.
Does removing bloatware in Windows 11 improve performance?
Yes, uninstalling bloatware removes unnecessary strain on your system resources. Debloating frees up RAM and improves responsiveness and device performance. In addition, removing bloatware also frees up storage space that can be utilized for more vital files or software. Since bloatware can create pop-ups and disrupt workflows, debloating also helps declutter user interfaces and improve IT efficiency.

