

This guide demonstrates how to split an install.wim file in Windows 10 and Windows 11 using the DISM tool. .wim files contain Windows installation images, and can become larger than the 4 GB maximum supported by a bootable Windows Preinstallation Environment (Windows PE), requiring that they be split.
Step-by-step guide: Splitting install.wim with DISM
The following tutorial steps will guide you to splitting an install.wim file using the DISM command line too.
Installing the Windows ADK and DISM tool
To split a .wim file in Windows, you will need to install the DISM tool, part of the Windows ADK (Assessment and Deployment Kit):
- Download the latest Windows ADK from https://learn.microsoft.com/en-us/windows-hardware/get-started/adk-install
- Once downloaded, run adksetup.exe
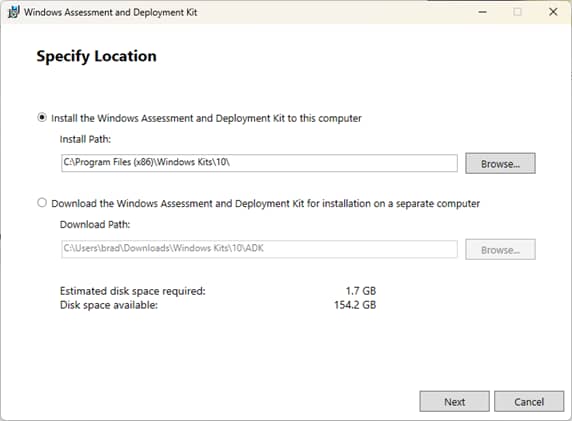
- Click through the installation wizard, choosing to install the ADK to this computer, and accepting the terms by pressing Next until you reach the Select the features you want to install screen
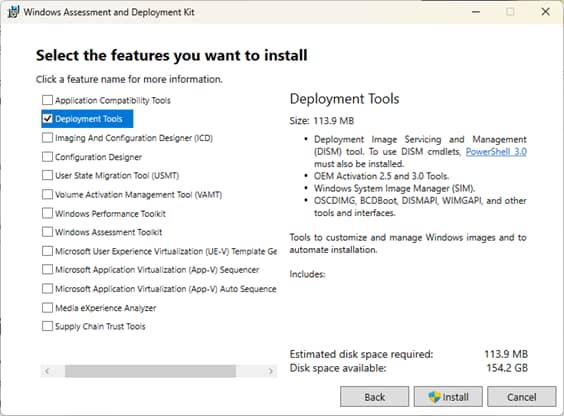
- Check to install the Deployment tools (Which includes the DISM tool) and then press Install
- Click the Close button when the installation has completed
How to split a .wim file using the DISM command line tool
To split an install.wim (or any other .wim) file, open PowerShell as an administrator and enter the following command:
Dism /Split-Image /ImageFile:”C:\path\to\install.wim” /SWMFile:”C:\path\to\split\install.swm” /FileSize:100
Replacing:
- C:\path\to\install.wim with the path to the .wim file you will split
- C:\path\to\split\install.swm with the path to the output directory to save the split .wim file as a set of multiple .swm files
- FileSize:100 with the maximum size for each part of the split image in megabytes (MB), with a maximum size of 4700 MB

Once the .wim file is successfully split, multiple .swm files will be created containing the split data. They should be kept together in the same directory as they cannot be used individually.

Splitting an install.wim file that is too large for a FAT32 USB drive
When building custom Windows deployment images with included software, drivers, and other customizations, it’s common for the installation image to far exceed the size supported by bootable FAT32 USB drives. This requires splitting a big install.wim file specifically to fit on the FAT32 file system.
While the maximum size that the DISM tool can split .wim files into is 4700 MB, the maximum size of an individual file supported by FAT32 is 4 GB. Splitting a .wim file into 4000 MB parts will put them under this file size limit:
Dism /Split-Image /ImageFile:”C:\path\to\install.wim” /SWMFile:”C:\path\to\split\install.swm” /FileSize:4000
Note that you cannot modify the contents of a set of .swm files without recombining them into a .wim file and modifying it using the DISM tool.
How to deploy/install Windows using a split install.wim file
Before you deploy a Windows image to a device, you should make sure that you have backed up any data on it that you want to keep, as it will be permanently erased by the process. You should also disconnect any external storage devices so that you don’t accidentally wipe those instead of the intended internal storage.
- Create a Windows Preinstallation Environment (Windows PE) USB drive
- Copy the directory containing the .swm files created by splitting your .wim file to the Windows PE USB drive
- From within Windows PE, repartition your hard drive in preparation for applying the Windows installation image you have prepared, making a note of the drive letter you want to write the image to
- Run the DISM /Apply-Image command using the paths to your .wsm files and your partition to install Windows using the image:
Dism /Apply-Image /ImageFile:”C:\path\to\split\install.swm” /SWMFile:”C:\path\to\split\install*.swm” /index:1 /ApplyDir:N:\
The above example DISM command includes the path to the install.swm image file, as well as the path to the additional split .swm files that complete the set (specified with the wildcard or *), starting at the index 1 (meaning the additional .swm files are numbered 2, 3, etc.). The ApplyDir option specifies the volume to write the image to (which you noted during the repartitioning step above), in this case the N: drive.
The exact details of how you partition your hard drive will depend on your device, how much storage you have, and the size of your Windows installation image. You will need at least the following:
- To choose GPT partitioning for modern UEFI devices, or MBR partitioning for legacy BIOS devices
- A 100MB EFI System Partition (GPT) or 500MB System partition (MBR), formatted to FAT32
- A primary partition large enough to fit your deployed Windows image (ideally, use any remaining disk space), formatted to NTFS and marked as active
Once you have written the split install.wim Windows image to the volume, you will need to make it bootable by running bcdboot N:\Windows on UEFI devices using GPT partitioning, or bcdboot N:\Windows /s S: (replacing S: with the drive letter for the 500MB system partition) on devices using MBR partitioning.
You can then remove your bootable WinPE USB drive and reboot your system.
What is an install.wim file and why do you need to split it?
A .wim file contains an image of a Windows operating system partition, created using the DISM tool. These files are commonly named install.wim (the file name used for the Windows image provided on Windows installation media) and are used to replicate a Windows installation on another machine. This is usually done to speed up deployment by bundling drivers, applications, and configuration into a pre-made Windows installation, avoiding the need to individually install and configure PCs that need to be set up the same way.
.wim images are often deployed using the Windows Preinstallation Environment running from a FAT32 formatted USB drive. As FAT32 has a file size limitation of 4GB, it is frequently necessary to split an install.wim file into smaller pieces, as even default Windows installations (before you bundle additional apps, drivers, and files) are larger than that.
Alternative methods for Windows image deployment
There are a number of alternatives for Windows image deployment. For the purposes of deploying machines with the same configuration (regardless of operating system), there are open-source solutions like CloneZilla and RescueZilla and commercial solutions like Acronis True Image.
Efficiently deploying Windows images in education and enterprise environments
Using bootable Windows PE USB drives and ISO images that contain install.wim or split install.wsm images can speed up the deployment of pre-configured Windows environments. However, it is often not sufficient in enterprise or education environments where devices are spread across remote working or different campuses, and is not well suited for the common purpose of restoring devices to a known good state from backups.
Image backup software by NinjaOne remotely backs up and restores images of full Windows installations, with granular snapshots that let you revert devices to a known good state at a specific date and time. New devices can be automatically enrolled and configured (including the installation of third-party software) with NinjaOne Endpoint Management, potentially removing the need for custom Windows deployment images entirely.
With NinjaOne’s suite of IT management tools, you have a complete view of your infrastructure and devices, and can monitor and preemptively resolve problems with built-in automation and remote access.


