

This guide provides step-by-step instructions to uninstall a printer driver in Windows 10 and Windows 11. It demonstrates how to remove a printer driver using the Windows Settings app, the legacy Control Panel, and the Print Management console.
Step-by-step: how to uninstall a printer driver in Windows 10 and Windows 11
The below steps explain how to uninstall a printer driver in Windows. Before you begin, you should back up your system, and optionally back up your printers and drivers in case you need to restore them later.
How to check installed printer drivers
You will need to be logged in as an administrator to completely uninstall printer drivers.
Before you uninstall any printer drivers, you should check which printers are currently configured that may be using them.
To see which printers are currently installed using the Settings app, follow these steps:
- Right-click on the Start button and click Settings
- Navigate to Bluetooth and devices > Printers & scanners (Windows 11) or Devices > Printers & scanners (Windows 10)
- Installed printers will be listed
You can also use the device manager, though it is best that printers are managed using the Settings app or the Print Management console:
- Right-click on the Start menu and select Device Manager
- Expand Printers, Print queues, and WSD Print Provider to see which printers are installed
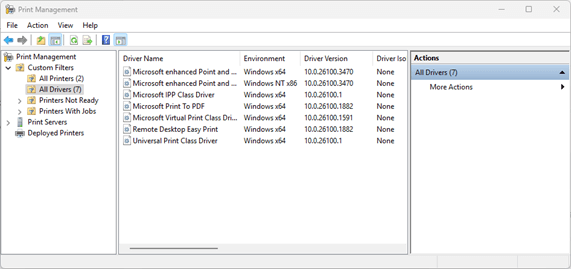
These methods, however, do not show drivers that may be present on your system for printers that are not currently configured. For this, you need to use the Print Management console:
- Right-click on the Start button and click Run
- Enter the command printmanagement.msc into the Run dialog and press Enter
- Expand Custom Filters and click All Drivers
- The list of installed printer drivers will be listed, including those for printers that aren’t currently set up
Before continuing, it is recommended that you remove/delete the printer from the Settings app or use the Print Management console before attempting to uninstall the driver.
Method 1: Uninstalling printer drivers using the Settings app
The simplest way to remove a printer driver is by using the Settings app:
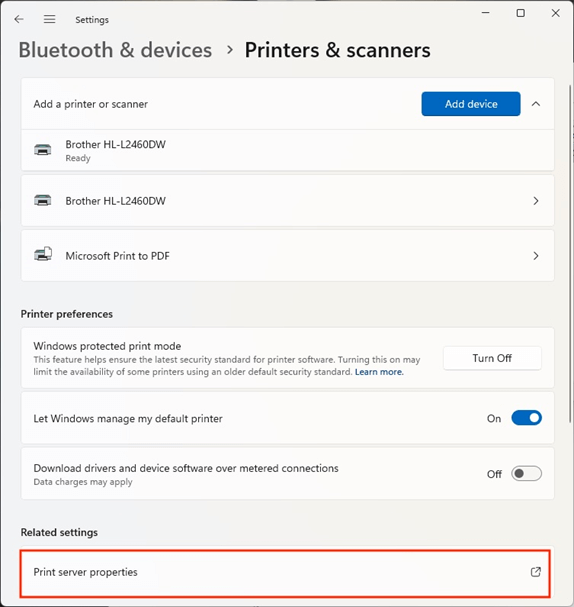
- Open the Settings app from the Start menu
- Navigate to Bluetooth and devices > Printers & scanners (Windows 11) or Devices > Printers & scanners (Windows 10)
- Click on Print Server Properties
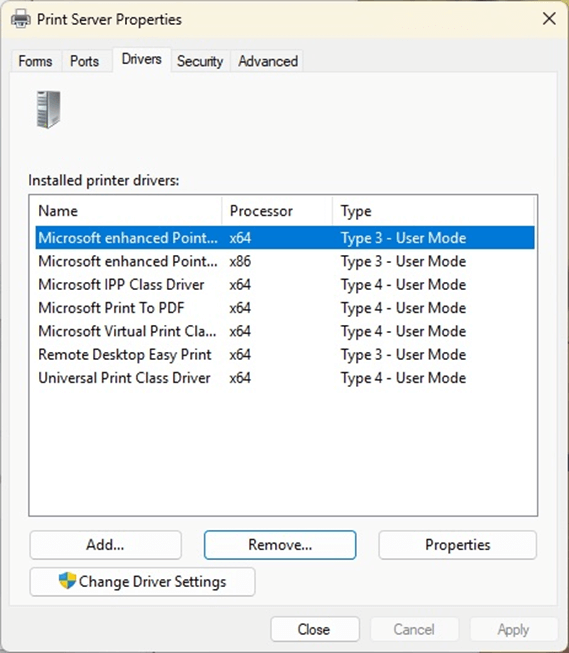
- Click on the Drivers tab in the Print Server Properties window
- You may need to click Change Driver Settings to allow drivers to be uninstalled
- Select the driver you want to completely uninstall from the list, and click Remove… (you can hold the Control key to select multiple drivers to uninstall)
- Select Remove driver and driver package and click OK, then Yes when prompted to confirm
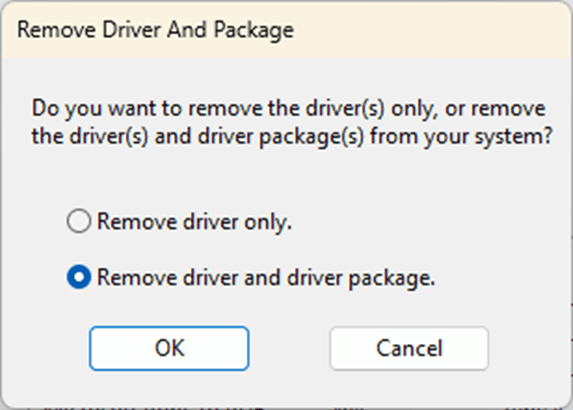
- You will then be presented with the changes that will be applied (including the driver package files that will be deleted)
- Press Delete to apply the change
- Press OK when the process has completed and close the Print Server Properties window
Method 2: Uninstalling printer drivers via the legacy Control Panel
You can also access the Print Server Properties for your PC via the legacy Control Panel:
- Right-click on the start button and click Run
- Enter the command control and click OK
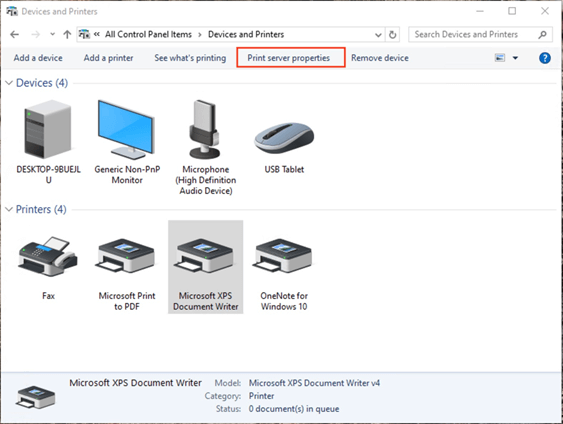
- (Step 3) In the Control Panel, click Devices and Printers
- In Windows 11, you will be taken to the Settings app and can continue using the steps described above, following from step 3
- In Windows 10, select any displayed printer and then click Print server properties from the toolbar, then continue from step 3 in the above instructions for using the Settings app
Method 3: Completely removing a printer driver using the Print Management console (advanced users)
To remove a driver using the Print Management console (available only in the Pro and Enterprise versions of Windows 10/11):
- Follow the steps described above for listing the installed printer drivers using the Print Management console
- In the All Drivers section, right-click on the driver you want to remove and click Remove driver package…
- The list of packages that will be deleted will be listed, press Delete to confirm and apply the change
- Press OK to close the dialog when the process has completed
Troubleshooting printer driver uninstallation issues
Generally, printer drivers don’t take up much space, and unless you’re a mobile worker who regularly adds and removes printers that will never be seen again, there’s not much need for manual maintenance. However, if you are experiencing issues that may be caused by corrupted or outdated drivers and want to ensure that printer drivers are completely re-installed, uninstalling your existing drivers first may be necessary.
If you encounter ‘driver in use’ errors (for example, from a ‘stuck’ printer), restart your Windows PC in Safe Mode (make sure this is just ‘Safe Mode’ and not ‘Safe Mode with networking’ — the print spooler is not disabled in the latter) and follow the steps described above to completely remove the driver while the print spooler isn’t running.
If you’re uninstalling drivers for a printer that you intend to keep using, make sure you have a backup of your existing drivers (or their installation file/media) before you remove the driver. You should also verify that your device is functioning correctly after installing updated drivers before discarding your old ones.
Managing Windows printers in enterprise and education environments
Managing printers in an enterprise is an ongoing headache for IT teams. Remote monitoring and management (RMM) by NinjaOne integrates with your existing Windows infrastructure, giving you an overview of all of your Windows devices and allowing you to take inventory of networked hardware (including printers). This can assist with the planning and deployment of printer policies for users and reduce the burden they place on support team members. Printer driver and software updates can also be centrally tested and deployed, and user issues can be diagnosed and resolved using our included remote access tools.


