This guide provides detailed instructions on viewing and clearing troubleshooting history and details in Windows 10. It also explains what troubleshooting history logs contain, how to find where they are stored, and why you may want to clear them.
Note that Microsoft is phasing out Windows built-in troubleshooters in Windows 11, so these instructions do not apply to Windows 11 PCs.
What is Windows troubleshooting history?
Troubleshooting history is a Windows 10 feature that displays the recorded details and actions taken by Windows troubleshooters — built-in Windows tools that can assist you with detecting and resolving system issues.
Windows includes troubleshooters for helping to resolve issues with installing and uninstalling software, fixing hardware issues (for example, with printers and audio devices), resolving network and internet connectivity issues, and performing system maintenance tasks, as well as fixing problems with Windows Update.
When Windows troubleshooters check something or attempt to resolve an issue, the details and results are logged in the troubleshooting history so that you can see what actions were taken, and why.
Why clear Windows troubleshooting history logs?
It is not necessary for most users to clear Windows troubleshooting history logs: Windows does a pretty good job of managing its log files, and will delete some log files if disk space becomes low enough. However, if you are critically low on disk space, encountering issues with troubleshooting tools, or want to ensure there is no information left behind in the logs, it can make sense to clear them.
How to view troubleshooting history in Windows 10
To view the troubleshooting history in Windows 10, follow these steps:
- Right-click on the Start button and click Run
- Enter control into the Run dialog and press OK
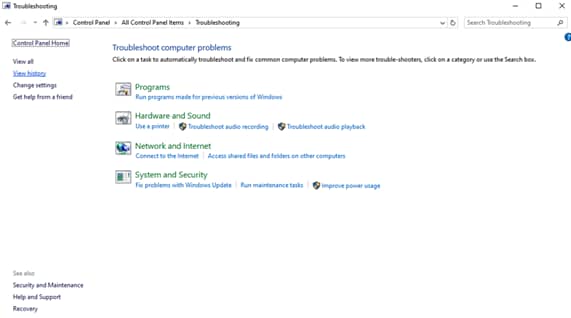
- Set View by: to Large icons and then click Troubleshooting
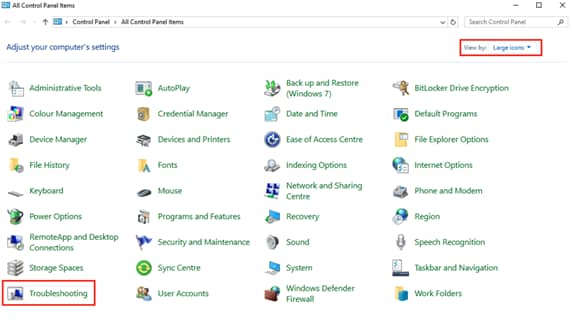
- Select View history from the sidebar to the left
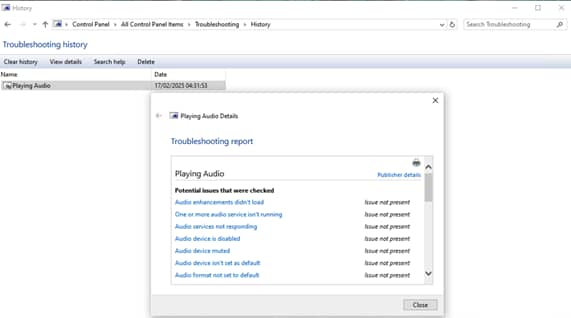
- Click Include trouble-shooters that were run as an administrator to ensure all troubleshooting history items are displayed
- Double-click on the name of a troubleshooting history item to view the details
The Windows Event Viewer can also be used for a more detailed view of your computer’s system logs to assist with troubleshooting:
- Right-click on the Start button and click Run
- Type eventvwr.msc and press the OK button to open the Windows Event Viewer
- You can filter entries by their log level, to identify Critical, Error, and Warning entries that may indicate problems with your Windows 10 system
To assist with troubleshooting system issues, you can also check the Reliability History in Windows 10 (this tool remains available in Windows 11 also). This tool provides information about the stability of your system, and displays a graph of stability, and lists events (such as recent Windows updates) that may be affecting it.
How to clear troubleshooting history in Windows 10
To completely clear the Windows troubleshooting history and delete all history entries, repeat the steps above to open the Windows Event Viewer and then click the Clear history button in troubleshooting history.
You can also delete individual history entries by right-clicking on them and selecting Delete.
You can view or delete the files associated with a Windows troubleshooting history entry by right-clicking on it and selecting Open file location, or export it by selecting Save As…
Additional tips for managing Windows logs
By default, Windows will run various troubleshooting tasks as part of its scheduled system maintenance. It is recommended to leave this automatic maintenance enabled so that your PC is always optimized without you having to manually intervene.
Windows will automatically clear some of its own log files if disk space drops below a certain level, so it is generally only necessary to manually clear the troubleshooting history (and other log files) if there is specific information you wish to remove from your Windows 10 PC.
Monitoring and clearing Windows logs for multiple devices
While Windows 10 troubleshooting tools are effective for home users, they are clumsy to use at scale in enterprise and education environments. Viewing troubleshooting history in Windows, monitoring for system issues, and managing logs for more than a handful of devices can be challenging. This is compounded by inexperienced users and devices that may be spread across different locations.
Remote monitoring and management (RMM) by NinjaOne offers you a unified web interface for monitoring all of your Windows, Apple, Android, and Linux devices. You can be alerted of issues before they affect users, troubleshoot problems, deploy updates and security patches, and view logs, all in one place.
NinjaOne also allows users to self-service and provides remote access tools when direct intervention is required to fully resolve IT problems.

