

Key Points
How to Set Up or Remove a kiosk Account with Assigned Access in Windows 10 & 11
- Kiosk mode (Assigned Access) allows you to restrict a device to a single app for public or specialized use.
- Kiosk mode applies automatically on user login and disables access to other apps or system settings.
- Restarting the device after setup or removal helps apply the new preferences consistently.
- Kiosk can be set up via Settings in both Windows 10 and Windows 11 devices.
- Removing a kiosk involves selecting the configured kiosk account and clicking Remove kiosk in the Assigned Access menu.
Kiosk mode refers to configuring a device for public use by locking it to a single application, usually for use in a public environment. In addition to computers, you can configure a digital kiosk for your iPadOS or iOS and Android endpoints by using the Assigned Access feature in Windows Pro, Enterprise, and Education versions.
If you’re taking these steps for the first time, this guide offers several methods to complete this action in managed environments.
For a more information, watch How to Change the Kiosk App in Windows 10.
Gain broad visibility over your kiosk devices with NinjaOne MDM.
Methods for setting up or removing a kiosk
Use the table to choose and quickly navigate to your preferred activation steps.
📌 Prerequisites:
- Download the latest software version and security updates.
- Consider accessibility features when choosing the dedicated kiosk device.
Click to Choose a Method | 💻 Best for Individual Users | 💻💻💻 Best for Enterprises |
| Method 1: Set up a kiosk in Windows 10 via Settings | ✓ | ✓ |
| Method 2: Set up a kiosk in Windows 11 via Settings | ✓ | ✓ |
💡 Tip: Check out the Things to look out for section to optimize your action plan and manage risks.
Method 1: Setting up a kiosk in Windows 10 via Settings
📌 Use cases: General configuration, RDP
- Open Settings from Search 🔎 or press Win + I.
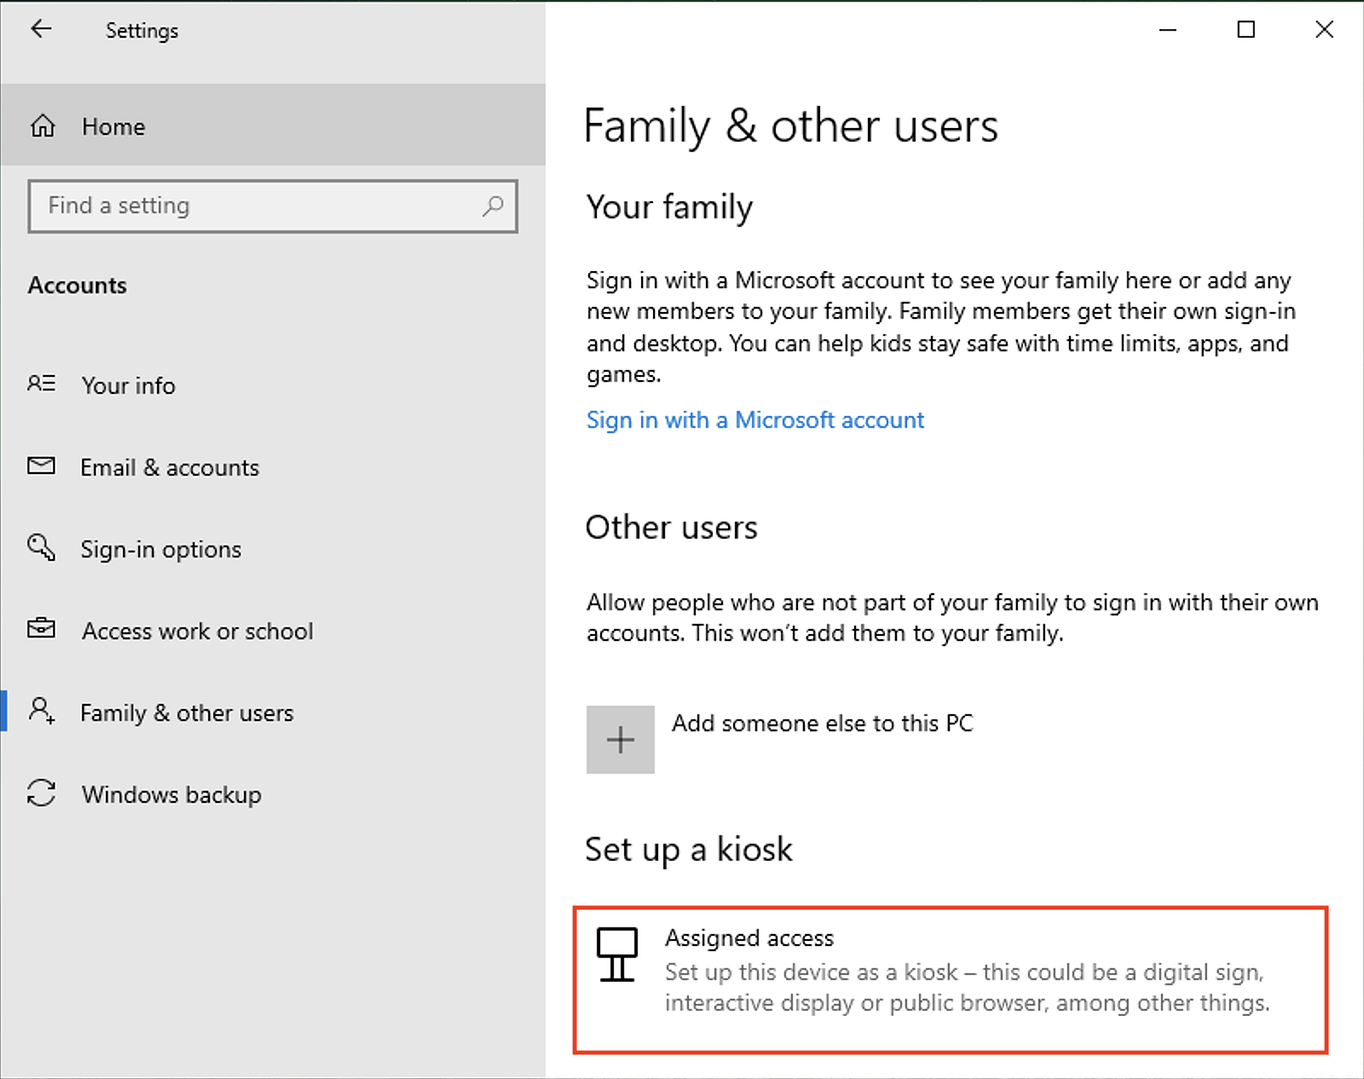
- Navigate to Accounts → Family & other users in the sidebar.
- Under Set up a kiosk, click Assigned Access and then Get Started.
- Enter a name for the new kiosk user account or leave it as default (kiosk).
- Choose the single kiosk app that the account will be restricted to accessing.
- Press Close to complete the process and create the single-app account.
For example, if you choose Microsoft Edge as the web browser, you can configure it as a public browser, limit its functionality to prevent misuse, restrict it to a certain website, and reset the browser after a period of inactivity. Depending on the chosen app, you will then be able to configure the website URL to access along with other options.
💡Note: You can navigate back to the same location in the Settings app at a later time to adjust the settings for your kiosk.
Method 2: Setting up a kiosk in Windows 11 via Settings
📌 Use cases: General configuration, RDP
- Open Settings from Search 🔎 or press Win + I.
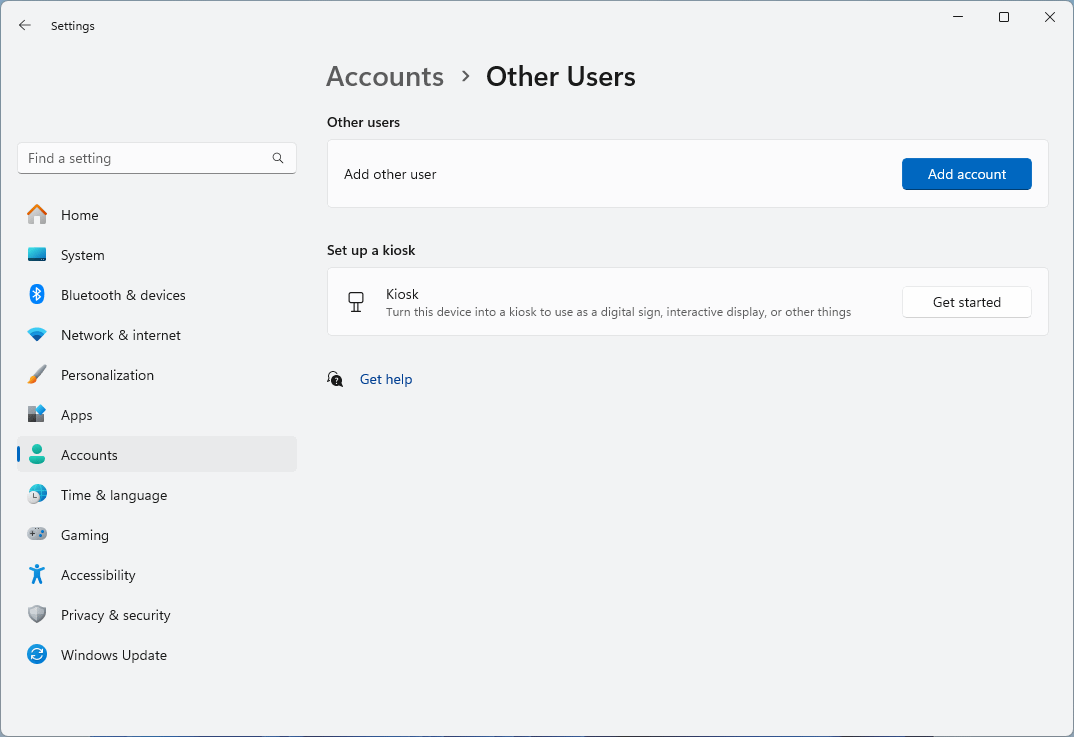
- Navigate to Accounts → Other users in the sidebar.
- Click the Get started button that appears next to Set up a kiosk.
- Enter a name for the new kiosk user account or leave it as default (kiosk).
- Choose the single kiosk app that the account will be restricted to accessing.
Press Close to complete the process and create the single-app account.
For example, if you choose Microsoft Edge as the web browser, you can configure it as a public browser, limit its functionality to prevent misuse, restrict it to a certain website, and reset the browser after a period of inactivity. Depending on the chosen app, you will then be able to configure the website URL to access along with other options.
💡Note: You can navigate back to the same location in the Settings app at a later time to adjust the settings for your kiosk.
Exiting Assigned Access/kiosk mode in Windows
After logging into a kiosk account, you must press Ctrl + Alt + Delete to log out. This allows you to log in as an administrator for system maintenance or to remove the kiosk account.
How to remove a kiosk account
Kiosk mode is useful for locking down a public-facing endpoint to a single app, but you may need to remove the kiosk when repurposing or updating the device. Here’s how to remove a kiosk account in just a few steps.
To remove a Kiosk account in Windows 10, follow these steps:
- Open Settings from Search 🔎 or press Win + I.
- Navigate to Accounts → Family & other users in the sidebar.
- Click on Assigned Access under Set up a kiosk.
- Select the username for the kiosk account (default is Kiosk).
- Click the Remove kiosk button.
To remove a Kiosk account in Windows 11, follow these steps:
- Open Settings from Search 🔎 or press Win + I.
- Navigate to Accounts → Other users in the sidebar.
- Click on the kiosk account name listed under Set up a Kiosk (default account name is Kiosk)
- Expand the section under Kiosk info and click the Remove kiosk button to continue.
This video outlines ‘How to Set Up or Remove a Kiosk Account with Assigned Access in Windows 10 & 11’ clearly.
⚠️ Things to look out for when setting up a kiosk
Missing something? Consider these scenarios and tips for handling errors, preventing system issues, and reinforcing policies.
Risks | Potential Consequences | Reversals |
| Not testing the kiosk account and restrictions before deployment | Users may have been granted access to unintended apps or settings | Sign in to the kiosk account after setup to confirm behavior and restrictions |
| Forgetting to enable auto sign-in | Manual sign-in may be required each time, locking out public users | Configure automatic sign-in using netplwiz or Group Policy |
| Disable removable media, webcams, and other unnecessary peripheral devices | Risk of malware introduction or data exfiltration via USB drives or webcams | Disable via Device Installation Restrictions or BIOS settings |
Utilize NinjaOne MDM to effectively manage devices in kiosk mode.
Creating secure Kiosks for enterprise and education
Kiosk mode setup is a common task for Windows 10 and Windows 11 system administrators in education and enterprise environments. Setting up public web kiosk terminals presents unique security and maintenance challenges: devices must be physically secure, as well as carefully configured and monitored to ensure that they are operational, not being misused, and that they do not become a cybersecurity attack vector.
Configuration tasks such as managing kiosk users using Assigned Access, configuring firewall and security software, disabling cameras and external storage, and troubleshooting user issues require additional tools to be done efficiently and effectively.
MDM kiosk management by NinjaOne lets you manage your public-facing Windows 10 and 11 (as well as Android and iOS) devices, including internet kiosks, through a unified web interface that lets you manage and monitor the security and functionality of devices. Deploy private apps, monitor for misuse, and resolve issues remotely wherever your devices are located. In the event that a device is compromised or stolen, you can immediately lock it down to prevent its further use.


