

In this guide, we show you the steps on how to save Remote Desktop Connection settings to Remote Desktop Protocol (RDP) files in Windows.
For IT professionals, system administrators, and remote workers, saving RDP settings into an RDP file simplifies the connection process by storing frequently used configurations. This reduces repetitive setup, minimizes human errors, and enhances productivity.
💻Remotely manage and control Windows, Mac, and Linux endpoints with NinjaOne.
Discover NinjaOne Remote Access today. →
Before You Start: Understanding Remote Desktop Protocol (RDP) file
Remote Desktop Connection (mstsc.exe) is the primary Windows tool for initiating remote sessions. It provides various settings that users can configure to optimize performance, security, and usability.
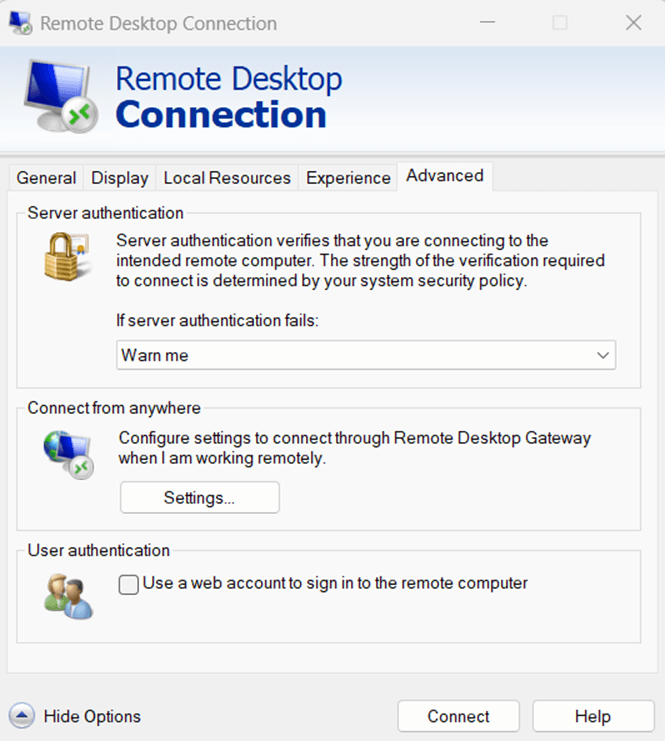
Key settings include display configuration, where users can adjust screen resolution and multi-monitor support; local resources, which manage clipboard sharing, printer redirection, and drive access; and security settings, which enforce authentication methods such as Network Level Authentication (NLA). Understanding these options helps users tailor RDP connections to their specific needs.
Steps to save remote desktop connection settings to an RDP file
To save Remote Desktop Connection settings for future use, follow these steps.
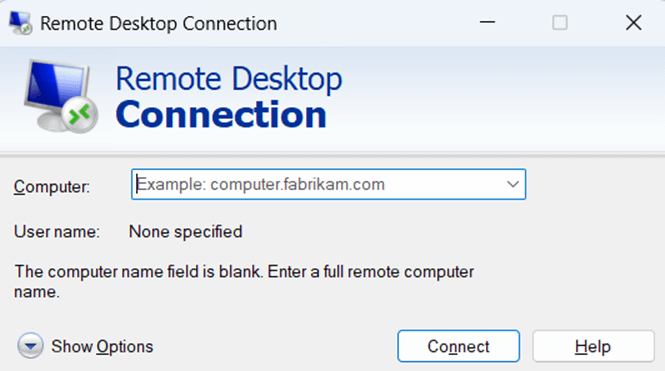
Step 1: Open the Remote Desktop Connection application
Simultaneously press the Windows key + R, type “mstsc”, and press “Enter” to launch the Remote Desktop Connection application. Alternatively, search for “Remote Desktop Connection” in the Start menu.
Step 2: Configure the necessary settings
Enter the computer name or IP address of the remote machine. Under the “General” tab, provide a username if needed. Adjust display settings, local resource redirection, and security preferences according to your requirements.
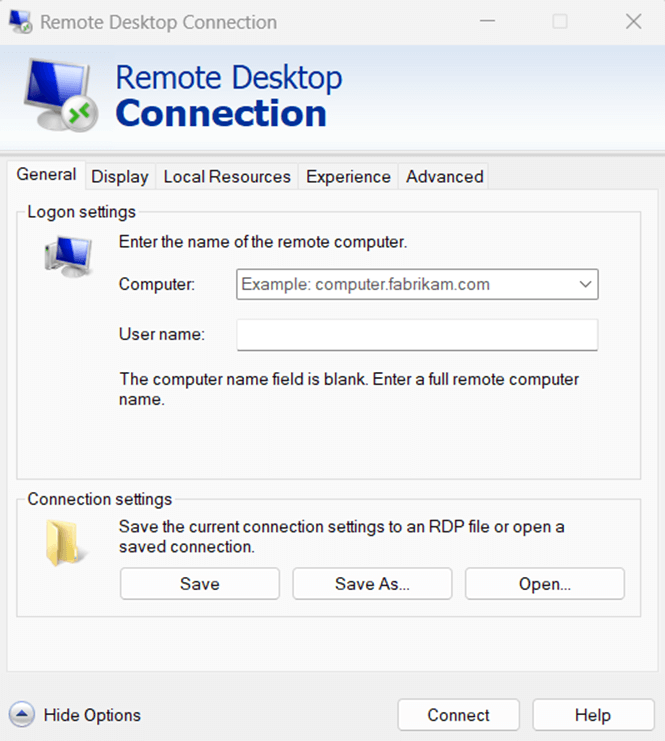
Step 3: Access advanced settings
Click on the “Show Options” button to expand additional configuration settings. Here, you can specify connection preferences, such as audio redirection, remote printing, and authentication settings.
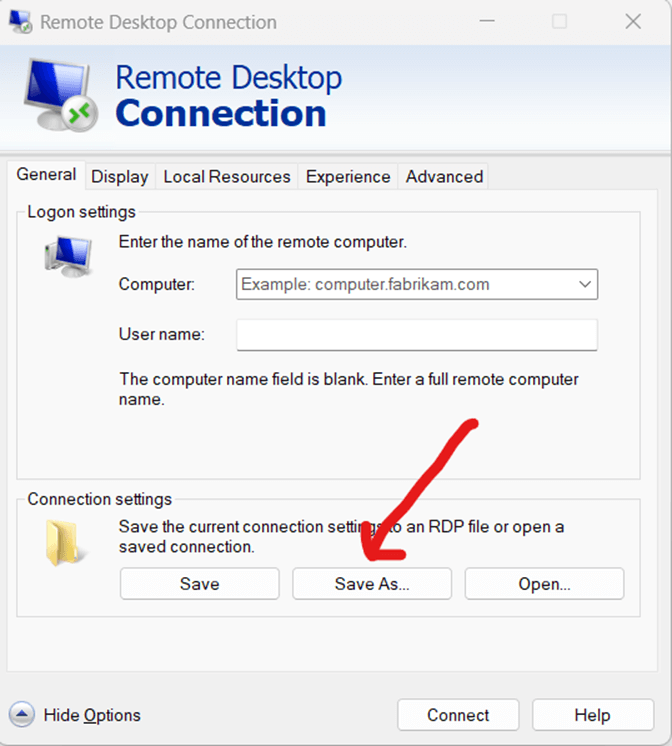
Step 4: Save the configured settings as an RDP file
Under the “General” tab, locate the “Connection settings” section and click “Save As.” Choose a location and enter a filename for the RDP file, then click “Save.” This file can now be used to quickly initiate a remote session without re-entering settings.
Step 5: Verify and use the saved RDP file
Locate the saved .rdp file and double-click to launch the remote session. Ensure that all settings are applied correctly. If modifications are needed, open the file in the Remote Desktop Connection tool, adjust the settings, and save the file again.
How to edit an RDP file manually
RDP files can be edited manually to adjust settings without reopening the Remote Desktop Connection tool. Simply open the .rdp file in Notepad or another text editor to view and modify its parameters.
Key parameters include:
- full address:s: , which defined the target computer
- username:s: , which specifies the default username
- screen mode id:i: , which controls full screen or windowed mode.
When making changes, ensure correct syntax to avoid corruption.
Automating RDP connection with saved credentials
Automating the RDP process can save time for users who frequently connect to the same machine. Windows allows storing credentials in an RDP file, though security implications should be considered.
To enable credential saving, add the “enablecredsspsupport:i:1” parameter in the .rdp file. Group Policy settings can also be adjusted to allow or prevent credential storage (gpedit.msc > Computer Configuration > Administrative Templates > System > Credentials Delegation). Alternatively, use command-line options like “mstsc myconnection.rdp /v:hostname” to launch a session automatically.
Security best practices for using RDP files
- Avoid storing credentials in RDP files: While storing login details makes access convenient, it poses a significant security risk if unauthorized users gain access to the file. Instead, use credential management strategies or require manual entry upon connection. Consider using tools like NinjaOne Credential Exchange to run scripts on Windows or Mac using custom credentials.
- Enable Network Level Authentication (NLA): NLA ensures that only authenticated users can establish an RDP session, adding an additional security layer against unauthorized access attempts.
- Use Group Policy to enforce security settings: Administrators can restrict RDP settings through Group Policy to prevent users from weakening security configurations and ensure consistency across all connections.
- Encrypt and protect RDP files: Storing RDP files in encrypted locations or using file encryption tools can help prevent unauthorized access, particularly in enterprise environments.
- Limit RDP access via firewall rules and VPNs: Restricting RDP connections to specific IP ranges or requiring VPN access can reduce exposure to threat actors.
The right remote access solution streamlines business operations and saves your company money in the long run.
→ Read this remote access best practices guide.
Troubleshooting common issues with RDP files
Issue: RDP file not opening
- What it is: The RDP file fails to launch the remote session when double-clicked.
- Why it happens: This can occur due to file corruption, missing parameters, or security settings preventing execution.
- How to resolve it: Check the file integrity by opening it in a text editor. Verify that essential parameters such as full address:s: are correctly defined. If the issue persists, recreate the RDP file.
Issue: Credentials not being saved
- What it is: Users are prompted for credentials even though they previously selected “Remember me.”
- Why it happens: Windows Group Policy may be configured to prevent credential saving for RDP sessions.
- How to resolve it: Open gpedit.msc, navigate to Computer Configuration > Administrative Templates > System > Credentials Delegation, and enable the relevant policies.
Issue: RDP file settings not applying
- What it is: The RDP session launches, but specific settings (such as screen resolution or local resources) do not apply.
- Why it happens: Some parameters may be overridden by Group Policy or missing from the RDP file.
- How to resolve it: Open the .rdp file in Notepad, confirm that the necessary parameters are present, and re-save the file.
Issue: Display resolution problems
- What it is: The remote session appears in an incorrect resolution or does not support full-screen mode.
- Why it happens: The desktopwidth:i: and desktopheight:i: parameters may be incorrectly set.
- How to resolve it: Edit the .rdp file to include appropriate values for desktopwidth:i: and desktopheight:i:, ensuring they match the desired resolution.
Issue: Connection errors or timeouts
- What it is: The RDP session fails to connect or frequently disconnects.
- Why it happens: Network issues, firewall restrictions, or misconfigured security settings can cause connection failures.
- How to resolve it: Ensure the remote machine allows RDP connections (Win + R, type sysdm.cpl, go to the “Remote” tab). Check firewall settings to allow RDP traffic and verify network connectivity.
Why you need to save Remote Desktop credentials
Saving Remote Desktop credentials streamlines the connection process and is especially beneficial for IT administrators or remote workers who frequently access multiple machines. Knowing how to save Remote Desktop credentials minimizes repetitive logins, reduces human errors, and enhances productivity.
That said, it’s crucial to balance convenience with security by using encrypted storage methods, enforcing authentication policies, and restricting access to sensitive credentials.
Frequently Asked Questions (FAQs)
1. How to save RDP settings for remote access in an enterprise environment?
Organizations can use Group Policy and centralized configuration management tools to distribute pre-configured RDP files to ensure consistency across all remote users.
2. How IT admins can manage RDP files for multiple users?
IT admins can maintain a shared repository of RDP files with predefined settings and enforce security policies to prevent unauthorized modifications.
3. How do we go about automating RDP connections with saved credentials?
Automation can be achieved by modifying RDP files, enabling credential storage (if security policies allow), and using command-line scripts for quick execution.
4. How to create an RDP file for multiple remote computers?
Users can create multiple RDP files, each configured for a different remote machine, and store them in a centralized location for easy access. Alternatively, scripts or batch files can be used to automate connections to multiple machines.


