

This is a straightforward guide on “Show Cloud Content” in search results. To recap, Windows Search is a powerful tool that helps users quickly find files, applications, and settings on their devices. More than likely, you’ve used Windows Search before, but you may not be aware that you can also use the feature to display cloud content, such as data within OneDrive and Office 365. While this feature offers convenience by integrating cloud storage into your workflow, some users may prefer to disable it for privacy, security, or organizational reasons.
Manage Windows client endpoints at scale with NinjaOne’s Windows RMM.
Steps to manage cloud content in search
If you decide to modify this setting, follow these steps:
Option 1: Using Windows Settings
- Open the Settings menu by pressing Windows + I.
- Click on Search in the left-hand menu.
- Select Permissions & History from the options.
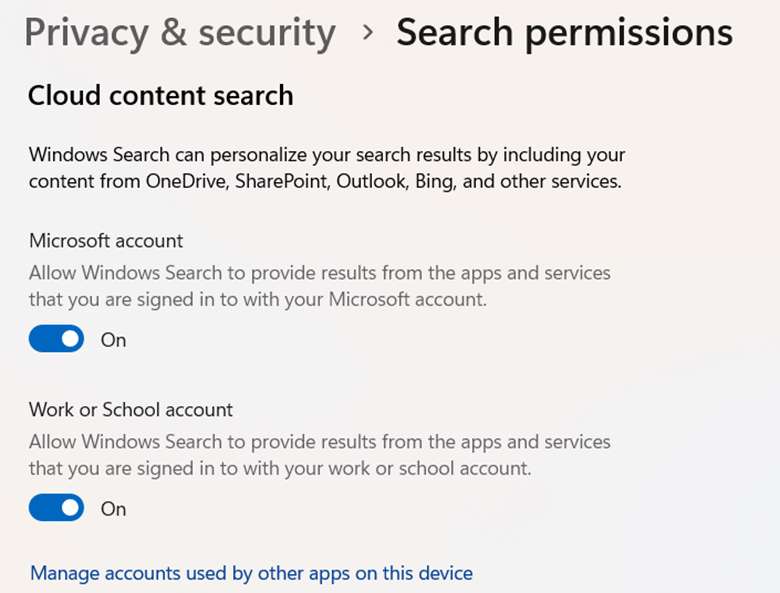
- Scroll down to the Cloud content search section.
- Toggle the switch On or Off for:
- Microsoft Account (personal OneDrive, Outlook, etc.)
- per(Office 365, SharePoint, etc.)
- Close the Settings window to apply the changes.
Option 2: Using the search interface
- Click on the Search bar in the taskbar or press Windows + S.
- Click on the three-dot menu in the top-right corner.
- Select Search settings.
- Adjust the Cloud content search toggle as per your preference.
Option 3: Using the Registry Editor
For those comfortable modifying system settings, the Windows Registry can be used to enable or disable this feature.
- Press Windows + R, type regedit, and press Enter.
- Navigate to: HKEY_CURRENT_USER\Software\Microsoft\Windows\CurrentVersion\Search.
- Locate or create the ConnectedSearchUseWeb and ConnectedSearchEnabled keys.
- Set their values to 1 (Enable) or 0 (Disable).
- Restart your computer for changes to take effect.
Option 4: Using Group Policy Editor (For IT Admins)
On enterprise-managed devices, IT administrators can modify this setting via Group Policy:
- Open Group Policy Editor by typing gpedit.msc in the Run dialog (Windows + R).
- Navigate to Computer Configuration > Administrative Templates > Windows Components > Search.
- Find Allow Cloud Search and double-click it.
- Choose Enabled or Disabled, then click Apply and OK.
What is the “Show Cloud Content” feature?
This feature allows you to manage cloud content in Windows. “Show Cloud Content” in Windows shows documents you have stored online – making it much easier to access files without manually opening a browser or cloud storage application.
For example, if you save Word documents in your Office 365 account, enabling this setting ensures those files appear in search results alongside locally stored documents. This can be a huge time-saver for those who frequently work with cloud-based files.
Should I enable cloud content in Windows Search?
While the ability to search for cloud content can be useful, it may not be ideal for every user. Here are some reasons why you may want to choose to enable or disable this feature:
Reasons to enable:
- Convenience and productivity: This feature makes retrieving cloud files significantly easier without manually opening OneDrive or Office 365, reducing time spent searching for important documents.
- Seamless integration: By integrating cloud and local files into a single search interface, users can maintain a smoother and more efficient workflow across different platforms and devices.
- Multiple device access: If you frequently switch between multiple devices, enabling this setting ensures you can quickly find and access files stored in your Microsoft Cloud account from any Windows device.
- Automatic updates to documents: Cloud-based files are always updated, ensuring you always have access to the latest version of a document without the need to sync files manually. This is especially useful for hybrid workforces.
- Collaboration: If you work with colleagues or teams, enabling cloud search makes it easier to find shared documents and work on collaborative projects without opening multiple applications.
Reasons to disable:
- Privacy: Some users may not want their cloud-stored documents appearing in search results, especially on shared computers where other users might see private files.
- Security: Organizations can enforce strict IT policies regarding cloud access, and disabling this feature can help minimize the risk of unauthorized file access.
- Reducing search clutter: If you primarily work with locally stored files and rarely use cloud services, keeping cloud results in searches can make it harder to find the files you need quickly.
- Performance: Searching for cloud-stored content requires internet connectivity and may slow down the search process. This may be challenging on slower networks or when working with large volumes of cloud files.
- Compliance with data regulations: Some businesses and industries have strict compliance rules about where and how data is stored. Disabling cloud search ensures files are accessed in line with regulatory requirements.
⚠️ We offer resources on maintaining compliance with GDPR, HIPAA, PCI, FIPS, and even CMMC.
Impact of disabling cloud content in Windows search
You may be wondering if there are any operational impacts when you manage cloud content in Windows. The short answer is yes, but these impacts are not necessarily bad or harmful, depending on the reasons you want to enable/disable “Show Cloud Content” in search results. Let’s look at some of them:
- Search speed: Disabling cloud content can improve search speed since Windows will only scan local files instead of cloud storage.
- Search accuracy: With cloud content disabled, searches may become more limited, potentially making it harder to find important files stored online, which can disrupt workflow efficiency.
- Privacy and security: Turning off cloud content enhances privacy by ensuring that cloud-stored documents don’t appear in search results. This reduces the risk of unintended file exposure on shared devices.
- Network dependency: Enabling cloud search requires an internet connection. If you’re offline, your search results may be incomplete or less useful than those from a local-only search.
- IT and compliance management: In enterprise environments, enabling or disabling cloud content search can impact compliance with data governance policies.
Looking for extra protection for your Windows systems?
Troubleshooting common issues
In general, configuring “Show Cloud Content” in Search Results is simple, but some issues may occur, including:
| The issue | Description | Why it happens | How to resolve it |
| Cloud content not appearing in search | Windows Search does not show cloud-based files. | Sync issues or incorrect account settings | Ensure that OneDrive and Office 365 are properly synced and that account permissions allow cloud search. |
| Search performance is slow | Searching takes longer than expected. | Background sync processes or large cloud data indexing | Disable cloud search or optimize sync settings. |
| Unable to toggle the settings | The cloud content toggle is grayed out. | IT policies restrict changes | Check Group Policy or Registry settings. |
| Files missing from Search Results | Some cloud files do not appear in search. | Indexing issues | Ensure cloud storage locations are indexed in Windows Search settings. |
| Changes not taking effect | The setting does not update after toggling. | System lag or incorrect configurations | Restart your computer or sign out and back in. |
Managing Windows cloud content settings
The “Show Cloud Content” option in Windows Search is a useful tool, but it’s not meant for everyone. Whether you choose to enable or disable it depends on your workflow, security needs, and privacy preferences. By following the steps outlined in this guide, you can customize Windows Search to suit your individual needs and ensure you’re only seeing the results that matter the most to you.
Frequently Asked Questions (FAQs)
1. Does disabling cloud content affect OneDrive functionality?
No, disabling this setting only affects search results. You can still access OneDrive files manually.
2. Is this setting available in all Windows versions?
The option is available in Windows 10 and 11, but older versions may not support it.
3. What if my search results aren’t updating after changing the setting?
Restart your PC and ensure your account sync settings are up to date in OneDrive or Office 365.


