Picture this, a user calls in needing help, but they aren’t at their usual computer and they don’t know the system name of the machine they are using. You can search by username and often find them. But surely there has to be a better way. There certainly is! In the most recent release (6.0), NinjaOne added the ability for end users to run scripts from the SysTray. In this NinjaOne01 blog, we’ll explore just a few of the ways to take advantage of this new feature!
To find a user’s device with a SysTray script, you’ll need a custom field to search against and a script to update that custom field. You’ll also need to build a “Clear field” command into the script, so you don’t have to manually clear it every time it’s used.
The first step is to create a new custom field by navigating to Administration>Devices>Role Custom Fields.
Note: You can also use a global custom field, but we suggest a role-based custom field.
- Click Add in the top right corner
- Fill in Label and provide a Name. The Name is what the field is referred to internally and how we will access it in our script. We set the label to ‘HandRaised’ and the field name will autofill with that same name. But you can change the field name if you want.
- Note: You can use any name you like as our script uses parameters to identify the custom field to be used.
- Set the field type to Text.
- Then click “Create.”
- Fill in Label and provide a Name. The Name is what the field is referred to internally and how we will access it in our script. We set the label to ‘HandRaised’ and the field name will autofill with that same name. But you can change the field name if you want.
- On the next screen, we will need to set some permissions.
- Technician: Set this to the permissions that work best for your business. Ours is set to “Read Only” to prevent accidental changes.
- Automations: For our script to work, Automations need Read and Write privileges
- Note: You can change the rest of the settings as you like. They aren’t needed for this example, so we have not changed them.
- Click “Save” when you’re done.
- Next, assign the newly created custom field to a role.
- Go to Administration>Devices>Roles.
- Mouse over the role to which you want to add the custom field.
- Click “Edit” to the right of the Role.
- Click “Add” in the Custom Fields section and select the field you created earlier.
- Then, click “Save”

Now that we have a custom field, we need a script to update it. NinjaOne’s very own Jeff Hunter built a really cool script that updates a custom field with a hand emoji, and automatically clears it after 3 minutes. We can then use the device grid to search for devices with that symbol in the custom field. Of course, you can always write your own script if you prefer.
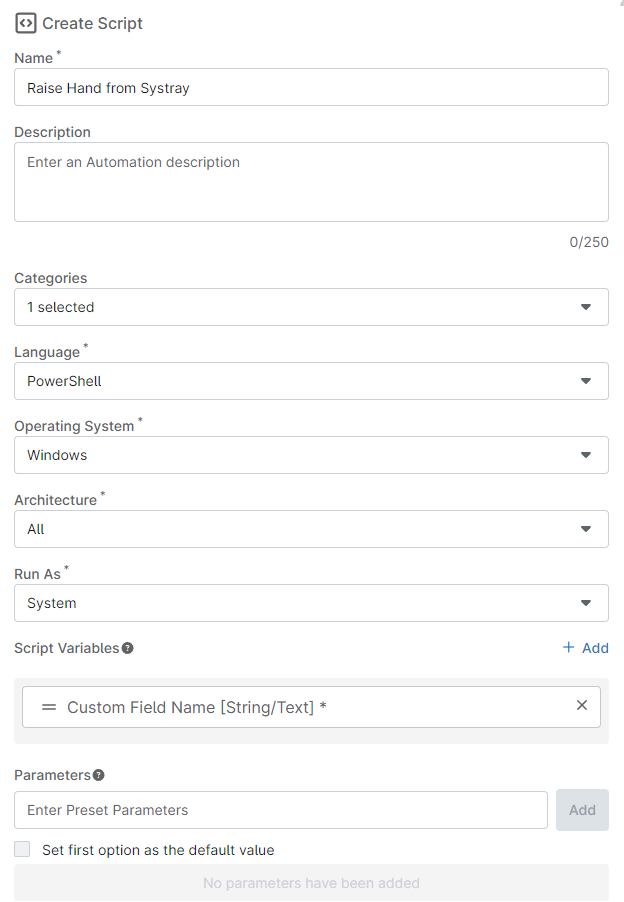
To add a script, go to Administration>Library>Automation and click “Add.”
- On the left, either add your own script or copy and paste ours.
- On the right, fill in the Name, optional description and category.
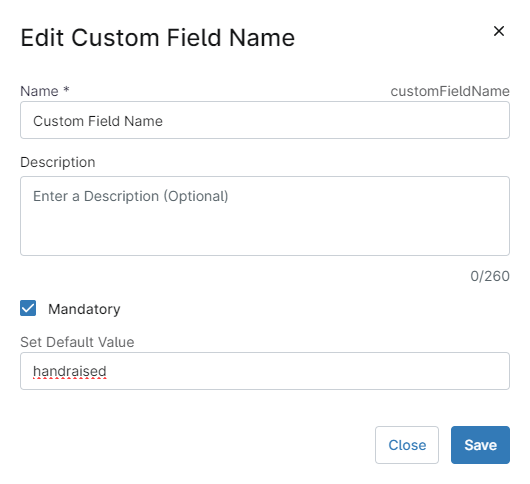
- If you’re using our script you will need to add a script variable.
- Under Script Variables on the right click “+ Add.”
- Fill in the name as “Custom Field Name.”
- Check the box for “Mandatory.”
- Finally, fill in the “Set Default Value” with the name of your custom field. In this example we used “handraised.”
- Click “Save” when you’re done to return to the script editor.
The Script:
$CustomFieldName = $env:customFieldName

$Message = '✋'

# Function to check if a command exists
function Test-CommandExists {
    param (
        [Parameter(Mandatory = $true)]
        [string]$CommandName
    )
    return (Get-Command $CommandName -ErrorAction SilentlyContinue) -ne $null
}

# Check if Ninja-Property-Set cmdlet exists
if (-not (Test-CommandExists -CommandName 'Ninja-Property-Set')) {
    Write-Error "Ninja-Property-Set cmdlet not found. Please ensure it is installed and accessible."
    exit 1
}

# Function to set custom field
function Set-CustomField {
    param (
        [Parameter(Mandatory = $true)]
        [string]$FieldName,

        [Parameter(Mandatory = $true)]
        [string]$Value
    )
    try {
        Ninja-Property-Set -Name $FieldName -Value $Value -ErrorAction Stop
        Write-Host "Custom field '$FieldName' set to '$Value'."
    } catch {
        Write-Error "Failed to set custom field '$FieldName'. Error: $_"
        exit 1
    }
}

# Function to clear custom field
function Clear-CustomField {
    param (
        [Parameter(Mandatory = $true)]
        [string]$FieldName
    )
    try {
        Ninja-Property-Set -Name $FieldName -Value "" -ErrorAction Stop
        Write-Host "Custom field '$FieldName' cleared."
    } catch {
        Write-Error "Failed to clear custom field '$FieldName'. Error: $_"
        exit 1
    }
}

# Set the custom field with the message
Set-CustomField -FieldName $CustomFieldName -Value $Message

# Wait for 3 minutes
Write-Host "Waiting for 3 minutes..."
Start-Sleep -Seconds 180

# Clear the custom field
Clear-CustomField -FieldName $CustomFieldName
Once you’re done with the script and variables, click “Save” in the top right of the script editor. Now you’ll need to create the new SysTray, or add the script to an existing SysTray. Go to Administration>General>Branding and open the SysTray tab.
- If you want to add a new SysTray click the “+ Add” button in the top right.
- To edit an existing SysTray hover over it in the list, click into the radial button, and then edit.
- Fill in a name, optional description, add an icon for the SysTray itself and then finally “Add Menu Item” toward the bottom.
- Set the Type to “Automation.”
- Add an optional icon. We used the hand emoji from the script.
- For Operating system, select “Windows” because our script is built for Windows.
- Finally add an automation.
- Click “+ Add automation.”
- Select your script from the list.
- In the next menu you don’t need to change any settings, just click “Apply.”
Now any device in an organization that has that SysTray will be able to run our script and raise its hand! To make best use of this, let’s create a device group so that we can easily find devices with their hand raised.
To create the device group, go to Devices from the main NinjaOne dashboard.
- Click “Additional Filters +.”
- Scroll down to or search for “Custom Fields.”
- Click “Add” to the right of “Custom field value must meet all conditions.”
- Pick your custom field label in the first drop down. For our example, this is “Hand Raised.”
- In the second drop down select “Contains.”
- Finally, add the hand emoji used in our script to the text box below the two drop down boxes. Then click outside of the box.
- This will pull any devices with the hand raised.
- In the top left click, “Save” to create a custom group. This group can be loaded with the Load Group option in the top right of the search grid so you can easily search later.

To test that you’ve set up the device group correctly, run the script on a device. Then return to the search grid and load your group. After a moment, the device should appear in the search group. Now if you ever receive one of those calls where the user doesn’t know the device name, you can instruct the user to click the SysTray icon and select “Raise Hand” to easily find their device!
Our next example is the common use case in which we allow users to deploy software all on their own. At the helpdesk, we get a lot of requests for software installations and with NinjaOne there are several ways to handle those tickets. We can perform ad hoc installs with installation automations, or we can run automated installs with scheduled tasks that we might set to run once immediately.
But what if the installation is for software that not everyone needs? How can we solve that with the SysTray automations? The simple answer is by adding an installation automation to the SysTray. It works just like our earlier automation, but let’s take a look at the full process.
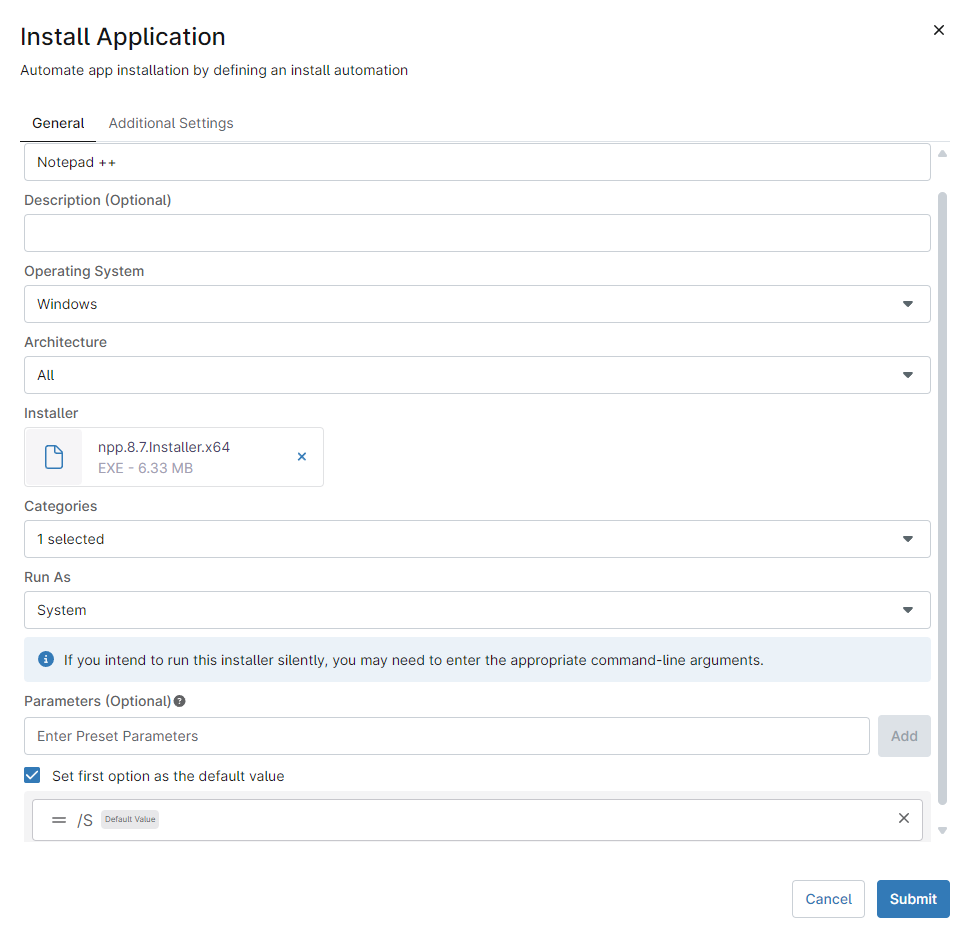
First, build an Install Automation. We included a screenshot of an example automation that silently installs Notepad ++.
- Navigate to Administration>Library>Automation.
- Click “+ Add.”
- Select “Installation” in the “App Automation” section.
- In this dialog box, we’ll add the details of our install automation
- Start with a name and option description.
- Select the appropriate Operating System.
- Assign an automation category.
- Select what account the automation should run as.
- Finally, add any required parameters.
- Generally, you’ll want to use a /S or similar parameter to force a silent install.
- You can find install parameters for install in the documentation for the software you are installing.
- Click “Submit” when you’re done.
With the automation built, we just need to add it to the SysTray! This works just like in our first example, but this time we’ll select our installation automation.
- Navigate to Administration>General>Branding.
- Open the SysTray tab.
- You can either:
- mouse over an existing SysTray and click the three dots then “Edit” to edit an existing SysTray item, or
- click “+ Add” to create a new one.
- In the SysTray edit screen click “Add Menu Item.”
- Set the Type to “Automation.”
- Add a label.
- Add an optional icon. For app installations, we suggest using the app icon.
- For Operating System, select “Windows” since our script is built for “Windows.”
- Finally add an automation:
- Click “+ Add automation.”
- Select your script from the list.
- Make sure your desired “Run As” user is correct and select any parameters needed.
- Click “Apply.”
- Once all of your settings for the SysTray Menu Item are complete, click “Save Changes.”
- Cick “Save Changes” again on the Configure SysTray menu and you’re done.
Now your users can simply install Notepad ++ from the SysTray! No ticket required!
Obviously, you’ll want to be careful with this because you may not want all users to have the ability to install all programs in your stack for licensing or other reasons. In those cases, you’ll want to use one of the other deployment options mentioned earlier like scheduling an installation task, or even using conditions to trigger an installation.
The options of the new SysTray Automations feature are nearly endless and these are only a few of the options available. We’d love to hear how you’re using this new feature, tell us your use cases in our Discord or on the Dojo!


