

With Windows 10 going end of life in October of 2025, everyone is looking for the most efficient way to check for Windows 11 upgrade readiness. There are many ways to check if your systems are ready for Windows 11.
Microsoft offers a tool that performs a Windows 11 readiness assessment. The downside is that it only checks one machine at a time. So, you would have to manually run Microsoft’s PC health check app on every individual computer to determine if it’s compatible with Windows 11. This is clearly an incredibly time-consuming process.
Automated Windows 11 compatibility check
Imagine a world where you could have your endpoint manager check if your systems meet the Windows 11 system requirements and provide a simple list of machines that aren’t ready for Windows 11. Now you can stop imagining because that world is real! With NinjaOne you can use a script from the template library (or directly download our windows 11 compatibility check PowerShell script) and custom fields to easily automate your Windows 11 readiness check!
Getting started
To get started, we need a custom field. For this, you could use a global custom field, but for this example we are using a role custom field.
1. Navigate to Administration > Devices > Role Custom Fields
2. Click ‘Add’ in the top right, then select field
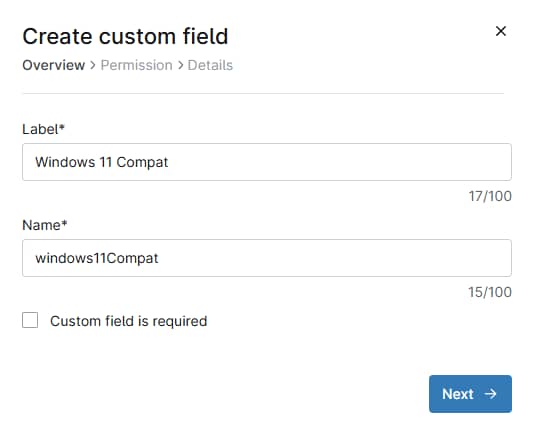
3. Select ‘Text’ from the custom field type drop down, then click continue
4. Enter the label
a. Note: The name will autofill but be sure to note it because you’ll need the name later when you set up the script.
5. Click next
6. Set permissions:
a. Technician should be set to at least read only
b. Automation must be set to read/write
c. Then click next
7. Enter optional Description, Tooltip text, and Footer text
8. Finally click ‘Create’
Now it’s time to assign the custom field to Windows desktops and laptops.
1. Navigate to Administration > Devices > Roles
2. Scroll down to ‘Windows Desktops and Laptops’
3. Hover over the role and click Edit on the right side.
4. Then click Add in the Custom Fields pop-up menu, and select Field
5. Select your custom field from the drop down, then click Add.
6. Finally click Save.
If you have other roles that are not children of the Windows Desktops and Laptops role that contain windows devices you want to check, be sure to add the custom field to those roles as well.
Configuring the scripts and groups
Once all of the roles with Windows 10 computers have the Custom Field added, you’ll need to import and configure our script that checks for Windows 11 compatibility.
1. Navigate to Administration > Library > Automation
2. Click ‘+Add’ on the right then click import from template in the drop down
3. Scroll down to, or search for ‘Check Windows 11 Upgrade Compatibility’ and click on it
4. Review the script as needed
5. Click import in the top right corner
You will also need to make a few dynamic groups, one to schedule our script, and one to check for devices that are incompatible. For the first group,
1. Navigate to Devices
2. Click More filters, and select OS from the list
a. TIP: You can search ‘OS’
3. Select Windows 10 from the new drop down
4. Click Role, and select all the roles you assigned your custom field to
a. In this example we used ‘Windows Desktops’ and ‘Windows Laptops’
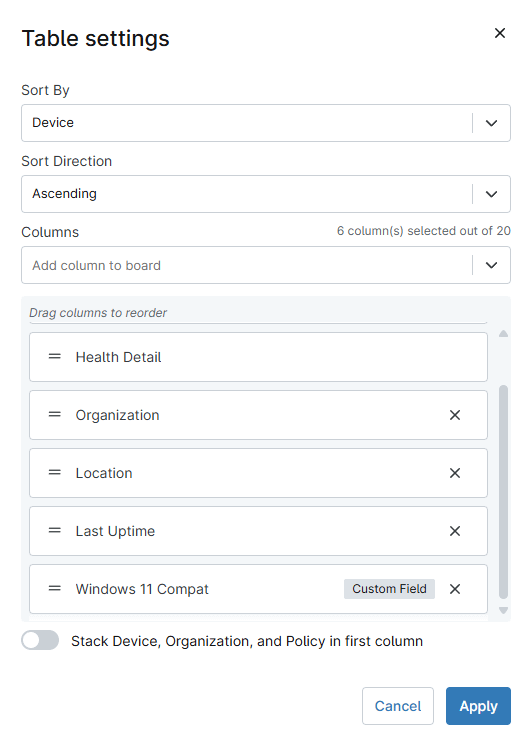
5. Click the cog wheel on the far right
6. In the ‘Add column to board’ type the name of your custom field and click it from the drop down, to add a column to the group that shows the results from the script
7. Click Apply
8. Click Save group to the right of the filters
9. Name your group and give it an optional description
10. Set Permissions for the group
a. For this group private is okay because it’s only needed for creating the schedule, but you can allow other roles to access it as needed for your environment
11. Finally click Save
Once you’ve completed the above steps, you will have one more group to create. This additional group will be used to check the compatibility status of your Windows 10 devices, so you will want to make it available to any technicians who will need to be able to see this information. To do this, check that the custom field value is NOT ‘Capable’ and that the custom field exists. This will give you a list of devices that are not ready to upgrade to Windows 11.
1. Navigate to Devices
2. Click More filters the select Custom Fields
3. In the top section ‘Has all conditions’ click Add and select your custom field
4. Set Condition to ‘Does not equal’
5. Set text to “Capable” then click Add
6. Click Add again and select the same custom field
7. Set Condition to ‘Exists’ and click Add
8. Click Apply
9. Click the cog wheel on the far right
10. In the ‘Add column to board’ type the name of your custom field and click it from the drop down, to add a column to the group that shows the results from the script
11. Finally click Apply
The Device group will be empty at this point but that’ is okay, it will fill after you run the script! Save this group just like you did the last one, making sure to give it a unique name, and any required technician permissions.
Scheduled automation
You’re almost done! You just need to set up a scheduled automation to check your computers, for Windows 11 upgrade compatibility.
1. Navigate to Administration > Tasks
2. Click ‘New Task’ in the top right
3. Give the task a name, optional description, and set the schedule
4. On the right in the Automations section click Add
5. Select the Check Windows 11 Upgrade Compatibility script you imported in the section above
6. In the ‘Custom Field Name’ section enter the name of your custom field (not the label)
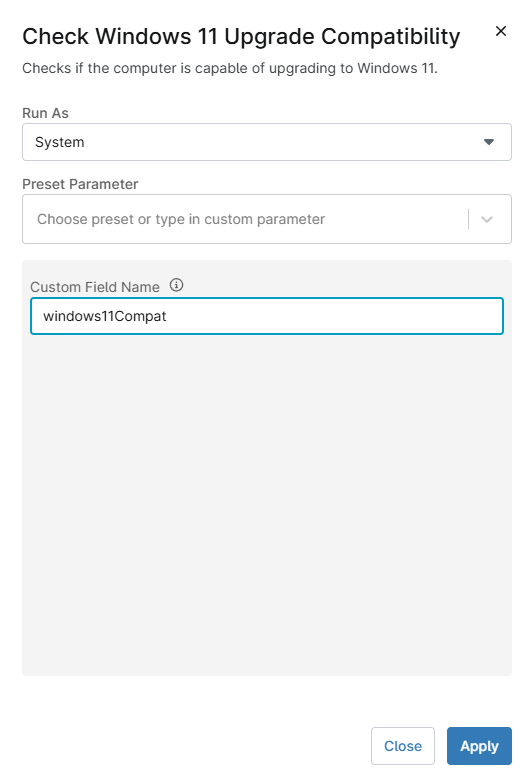
7. Click Apply
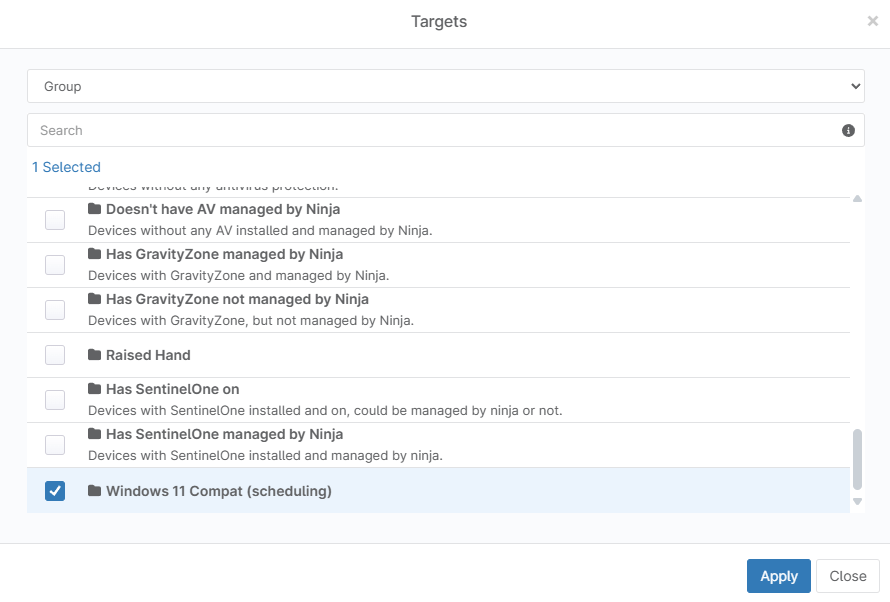
8. Under Targets click Add in the top right
9. mSelect Group from the top drop down, and then select the first group you created for scheduling the script
10. Click Apply, then in the top right click Save
Run the script
Now that you have your script scheduled and groups created we’re all set! Once the script has run you can go to the second group you created for status reporting, and see any devices that are not ready to upgrade to Windows 11. To do this navigate to Devices, select ‘Load group’ in the top right and select the group you created to show incompatible devices. You can even click the down arrow button in the top right to download a CSV list of the devices in the group.
Optionally you could create a third group to check for devices that are capable, or you could set the condition to ‘exists’ in the second group to show all results from the script. This could be especially useful when you start upgrading devices to Windows 11, as you can export the table to a CSV to create a checklist. Groups are also dynamically updated so if you updated a device to Windows 11 it will fall out of the group. Similarly, if you resolve the incompatibility with Windows 11, when the script next runs the device would be removed from the group that shows incompatible devices.
Windows 11 upgrade readiness
With this you should be able to easily track devices that need work before they can upgraded to Windows 11, create reports for management, and easily track your Windows 11 upgrade plan.


