

Modern provisioning in IT refers to defining your desired settings and software to meet your organizational goals. It’s the process of setting up your IT infrastructure, including hardware, networks, and virtual machines, among others, to make it available to systems and users. Device provisioning is a subset of this, often used to set up devices within the Internet of Things (IoT), including mobile devices.
The importance of device provisioning cannot be overstated. It’s the first step in setting the right environment for your workload requirements. Effective device provisioning ensures that all employee devices, from laptops to phones, are set up and coordinated correctly from the start.
You may be researching the steps needed to apply a device provisioning package using a bootable USB. This is particularly important if you want to create efficient, repeatable processes that scale or when considering mobile device management for your organization.
In this article, we’ll cover how to create a bootable USB with OSDCloud, a free PowerShell module, with a NinjaOne agent installed. Using zero-touch provisioning, the NinjaOne agent automates various time-consuming processes, such as deploying patches, installing applications, pushing settings, and more. This process also plays a key role in golden image management—empowering your IT team to maintain its security posture even in different cloud environments and footprints.
NinjaOne enables zero-touch device provisioning while providing the advantages of ongoing endpoint management.
Table of Contents
- Definition of terms
- Device provisioning with NinjaOne
- Streamline device provisioning with NinjaOne
- Frequently Asked Questions (FAQs)
Definition of terms
First, let’s define some key terms related to device provisioning that you need to know.
- Bootable USB. This is a USB drive that contains a bootable operating system or software.
- Thin image. A barebones image of an operating system directly from Microsoft.
- NinjaOne agent. This software component facilitates various IT management tasks.
- OSDCloud. This solution deploys Windows 10/11 x64 over the internet using the OSD PowerShell module. It first boots to WinPE where the OSDisk is partitioned. The Windows Operating System is downloaded from Microsoft Update before being expanded on the OSDisk.
- Zero-touch provisioning. This automatically sets up devices, allowing IT professionals to install network devices without manual intervention. It is most beneficial when you want to quickly deploy network devices on a larger scale.
Device provisioning with NinjaOne
1. Prepare the environment
Before initiating the provisioning process, ensure you have the necessary tools and resources.
Requirements:
- Windows ADK: The Windows Assessment and Deployment Kit (ADK) allows IT personnel to assess their Windows systems and components before they are deployed to users. You can download it at the official Microsoft site.
- WinPE add-on for Windows ADK: Windows Preinstallation Environment (WinPE) is an operating system used to install, deploy, and repair Windows editions.
- Windows configuration designer: This is used to create the provisioning package that deploys the NinjaOne agent. Find it at the official Microsoft site.
- USB thumb drive that is at least 32 GB in capacity
- The target device must be hardwired to an Ethernet for an Internet connection
- NinjaOne agent MSI file
- VS code with the PowerShell extension installed. You can download the Visual Studio Code here.
Resources:
- Commands to boot USB
- Examples of startup scripts
- OSDCloud documentation: Full details can be found on the official OSDCloud website.
2. Create a bootable USB
After downloading and installing the prerequisites, create a provisioning package for the NinjaOne agent. For additional instructions, refer to the official OSDCloud website.
- Insert the USB drive into your computer.
- Open VS code and execute the included example build Powershell script. Note that you may want to modify the parameters of what is being installed for your specific needs.
- To install the NinjaOne agent, you will need to go to “Provisioning Commands” > “Primary Context” > “Commands”> “Install.” Then, you can configure the commands as necessary. See Figure 1.

(Figure 1 – Configuring provisioning commands)
- You will be prompted to select the USB drive you want for the bootable media.
- Create a folder on the USB drive’s WinPE partition. Create another folder nested inside called “Automate”. Create another folder labeled “Provisioning,” and include the NinjaOne agent MSI file. Your file address should now look like this (AutomateProvisioning).
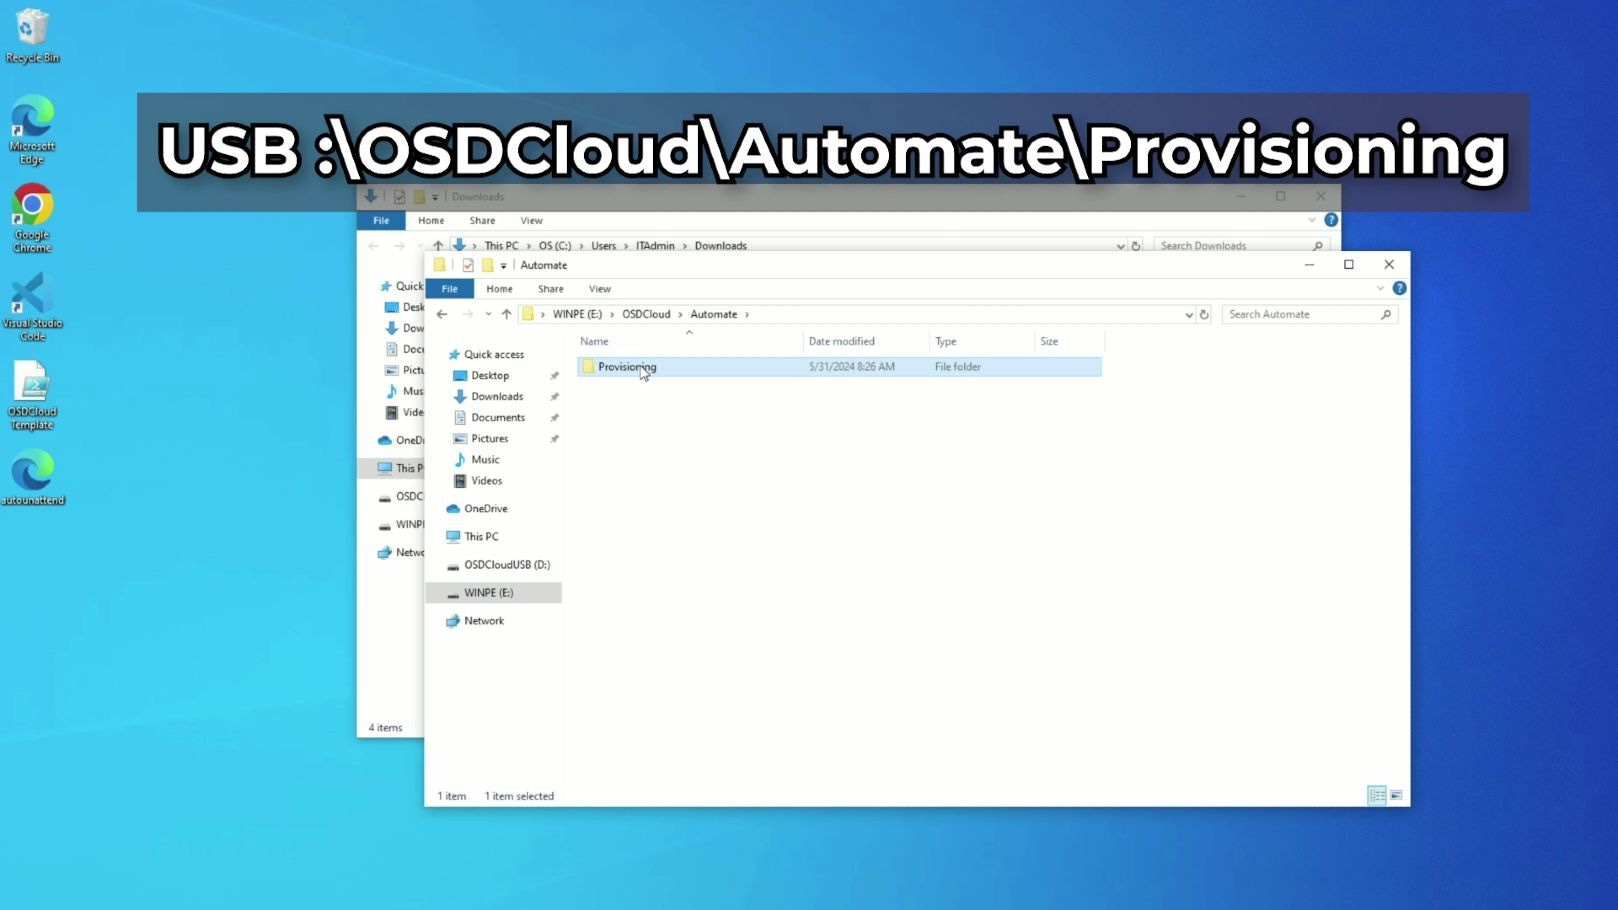
(Figure 2 – Automate provisioning file view)
- An optional, but frequently used step would be to include an unattend.xml answer file to help automate aspects of the Windows Out-of-Box Experience, or OOBE. This site allows options to be configured and an XML file to be generated. Rename this file to “unattend.xml” and place it directly on the WinPE partition of the USB drive.
3. Initiate the provisioning process
Eject the USB drive (now a bootable USB) from your computer and insert it into the target device. Note: this should be connected via Ethernet.
- Boot the target device and access the boot selection menu by pressing F12.
- Select the USB drive from the menu and proceed. The process will be zero-touch from this point forward.
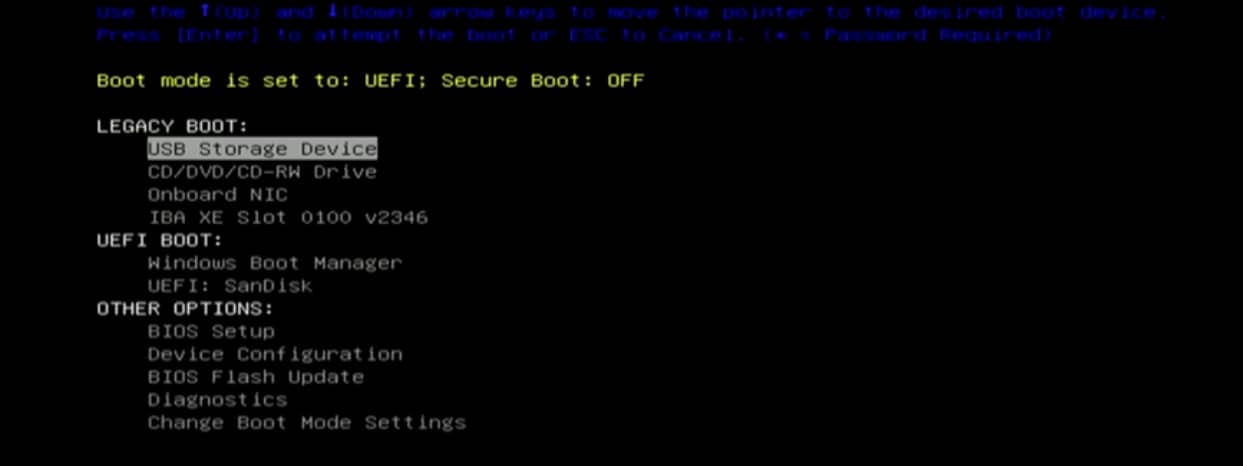
(Figure 3 – Booting the target device.)
- The selected version of Windows will be downloaded from Microsoft and installed on the computer. If applicable, utilize the “unattend.xml” file for OOBE automation.
- The provisioning package will then automatically install the NinjaOne agent.
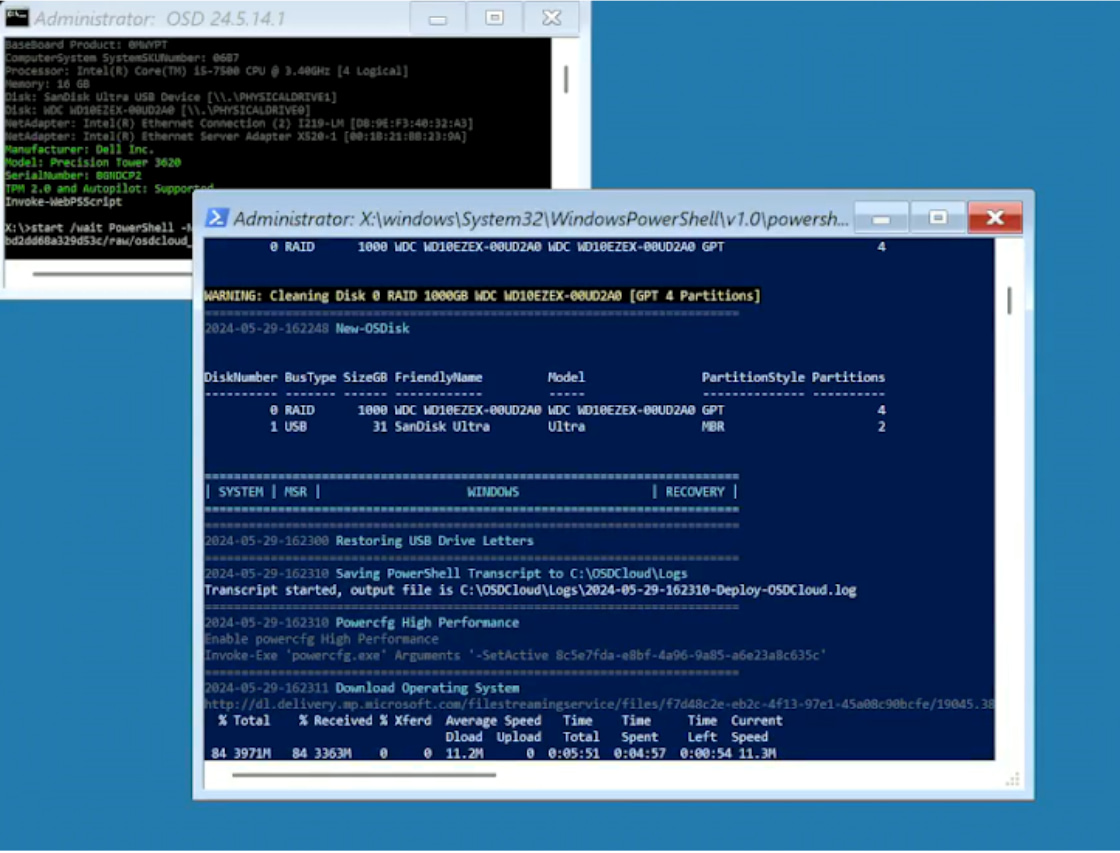
(Figure 4 – NinjaOne install from provisioning package.)
4. Begin device provision phase handled by NinjaOne
Once Windows is installed, the device provisioning phase transitions to NinjaOne.
- NinjaOne begins delivering configurations to the device, including application deployment, AV/EDR installation, endpoint hardening settings, patch management, and more.
- This automated approach ensures consistency, improves efficiency, and reduces manual intervention, making device management more scalable.
- It’s worth noting that while NinjaOne does not deliver the image itself to a device, it streamlines device provisioning and in this way, NinjaOne optimizes your workflow and enhances your ongoing endpoint management.
Streamline device provisioning with NinjaOne
NinjaOne, the trusted endpoint management company with 17,000+ customers worldwide, helps you establish a streamlined device provisioning workflow to improve operational efficiency and scalability. By integrating OSDCloud for Windows deployment, NinjaOne simplifies the initial setup process, ensures that your devices are correctly configured, and helps keep your devices compliant with organizational and other regulatory policies.
Healthily obsessed with your success, NinjaOne is single-minded in improving your overall device management strategy. If you’re ready, request a free quote, sign up for a 14-day free trial, or watch a demo.
Optimize device setup with NinjaOne’s streamlined zero-touch provisioning—automate deployment and get devices ready instantly.
Frequently Asked Questions (FAQs)
1. What is provisioning?
Provisioning prepares, sets up, assigns, and activates IT infrastructure components to meet your user requirements. It is a critical part of IT operations and ensures that computing resources are available when needed. There are three main approaches to provisioning:
1) Fully pre-provisioned: devices are fully configured before users receive them
2) Thin provisioning: only the absolutely necessary settings and apps are provisioned
3) Zero-touch provisioning: a device management tool that delivers apps and settings after users open the box.
2. What is the difference between provisioning and deployment?
Broadly speaking, provisioning is the act of getting a device ready for the user, whereas deployment is the whole process of getting a device to the user. Thus, provisioning is part of the deployment process, defining the settings and software you want on a device before implementing them.
3. What is the difference between provisioning and configuration?
In most provisioning scenarios, the next step is configuration. Provisioning prepares your hardware to do what it needs to do, and configuration is the process that sets it up to your specifications. For example, when you’re deploying applications to a device, you first need to provision your device by defining the needed settings and software. Once the software has been deployed, configuration sets up the specifications and ensures your applications suit your requirements.
4. What is device provisioning?
Device provisioning is a subcategory of provisioning. As its name suggests, it sets up a device to work in a desired way. This can range anywhere from replacing the entire operating system to providing specific functionality.


