
What are Groups, Organizations, and Locations within NinjaOne?
Groups
Grouping functionalities can be used by technicians with the appropriate permissions to filter your devices based on certain criteria. To learn more about filtering capabilities when searching for devices, access the Device Search grid by clicking Devices in the left navigation pane on NinjaOne console. The data in most of the default columns (i.e., Device, Health Detail, Organization, Location) are clickable, and will direct to different locations/actions:
- Device—navigate to the device dashboard.
- Health Detail—view information and take action.
- Organization—navigate to the organization dashboard.
- Location—navigate to the Location tab within the organization dashboard.
Organizations
Organizations allow you to configure the different customers/departments/etc. that you wish to onboard and manage with NinjaOne; it is the shell in which you will assign policies and other settings.
Locations
Locations can be used to further sort the devices under an organization some examples include when an organization has more than one office location, department, floor, etc. where devices may be located.
Does NinjaOne use groups, organizations and locations?
Yes, NinjaOne has groups, organizations, and locations. It provides functionalities that align with these concepts. Clients or customers are organizations. Groups refers to Saved Searches or Device Groups. The device location is utilized for incorporating device locations within the company.
Each location has its own policies which are automatically applied to devices residing there, in addition to defining a physical location for endpoints. This indicates that places can be conceptual rather than physical and can be seen as a group of endpoints with similar characteristics, such as accounting or engineering. Locations are also significant in the patching process, as they can have various patching policies, such as a WSUS server. It is all defined in this tab.
Using organizations, you can oversee several clients or Departments under different umbrellas. Groups allow you to organize devices for effective management by grouping them according to different parameters (OS, location, software, etc.). With locations, you may give specifics about the actual locations of devices for management and reporting needs. NinjaOne offers a number of capabilities that you may use to efficiently manage and organize your IT environment.
How to create groups, organizations and locations in NinjaOne?
Groups
Technician Permissions
Important Note: If the individual technician or technician role does not have a minimum of “View” permission enabled for Organizations > Default Access and Devices > Default Access, there will not be any data visible in the device search grid and therefore the Save function will be inactive.
Creating New Device Groups in Administration:
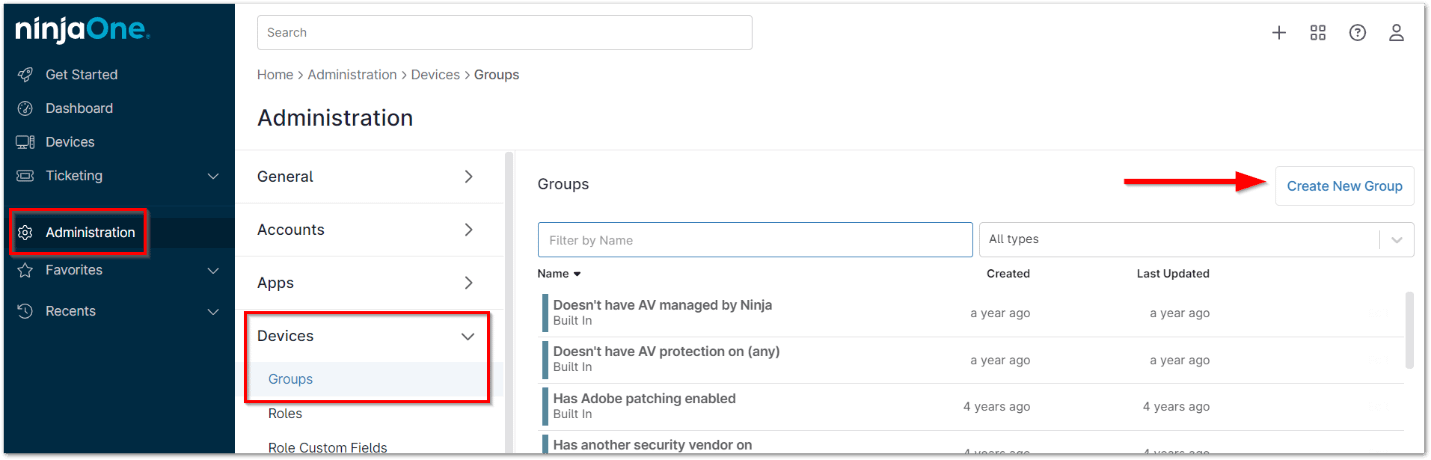
1. Navigate to Administration > Devices > Groups, and click Create New Group in the top right corner of the screen, which takes you to the Devices tab. (See below screenshot for reference)
2. Follow Steps 2–3 in the section below.
Creating New Device Groups in the Device Search Grid:
1. Click Devices in the left navigation pane.
2. Set your criteria into the available filters. When you have selected all data from the filter dropdowns that you want to set as a group, click Save at the top of the page. (See below screenshot for reference)
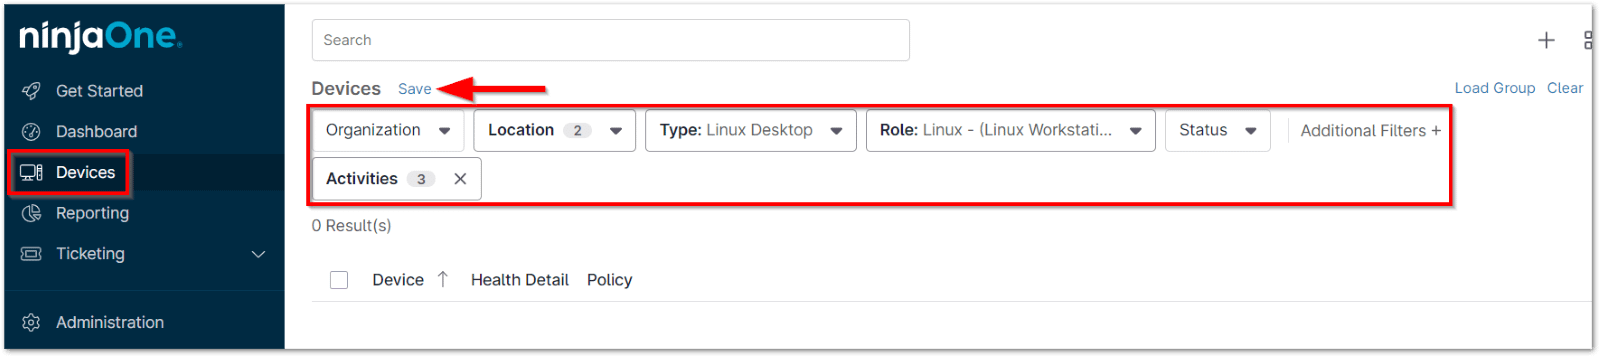
Important Note: Technicians will not see the Save option unless their “Create Device Groups” system permission is set to “Allowed” in their account or role editor).
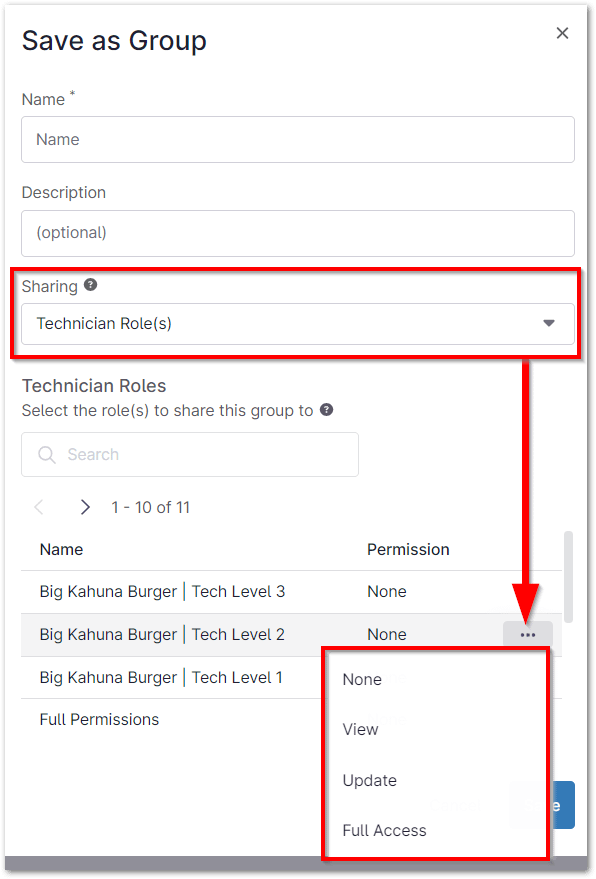
3. Enter a name for the group and an optional description in the resulting pop-up window.
4. Depending on your role assignment, select sharing options as applicable. (See below screenshot for reference)
Viewing Existing Groups:
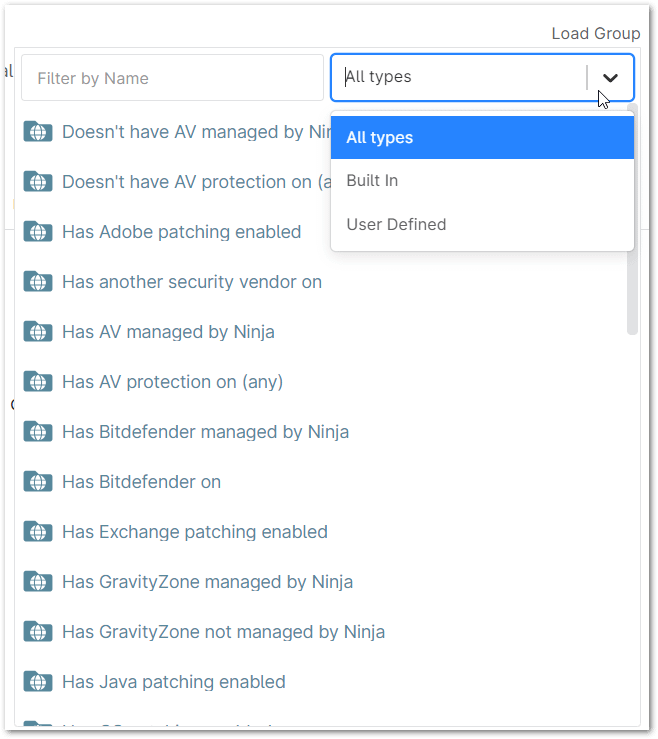
1. Navigate to the Devices tab and hover your cursor over Load Group in the top right corner. From here, you can type to filter the group list by name or choose to filter by the group type (all, built in, or user defined). (See below screenshot for reference)
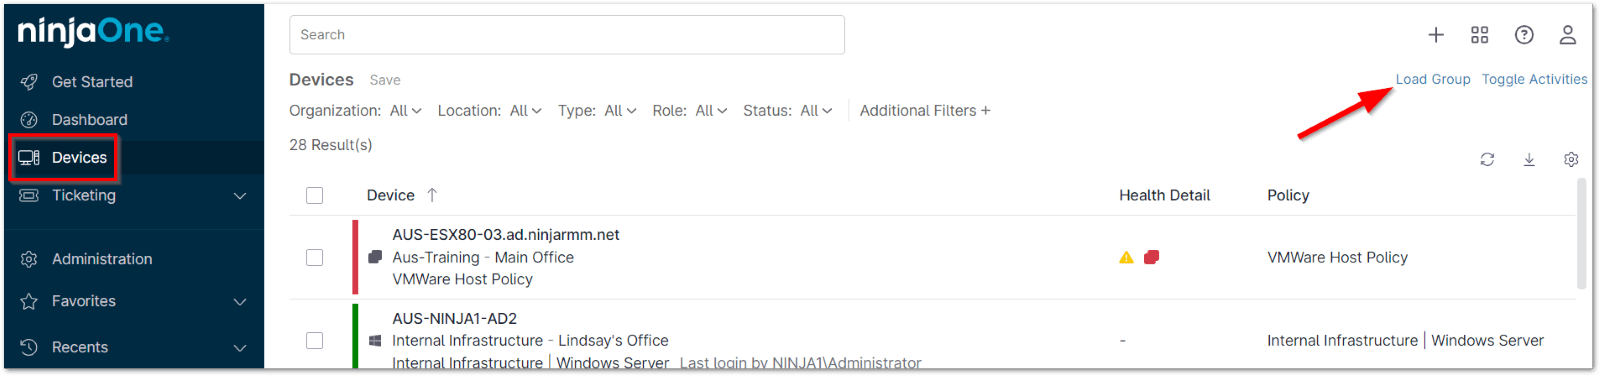
2. Select the group you wish to view by clicking it. (See below screenshot for reference)
Or follow these steps below.
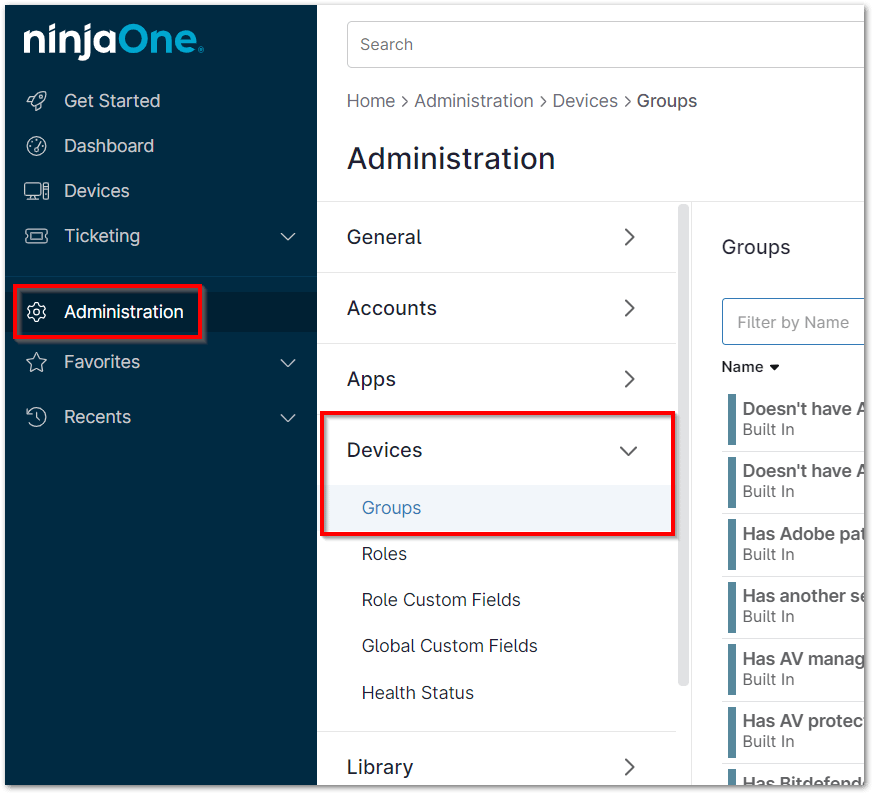
1. Navigate to Administration > Devices > Groups. (See below screenshot for reference)
2. Click on the group you wish to view from the list.
3. If you have system administrator privileges or are assigned to a role, you may have additional options to share the group.
Organization
Creating a New Organization:
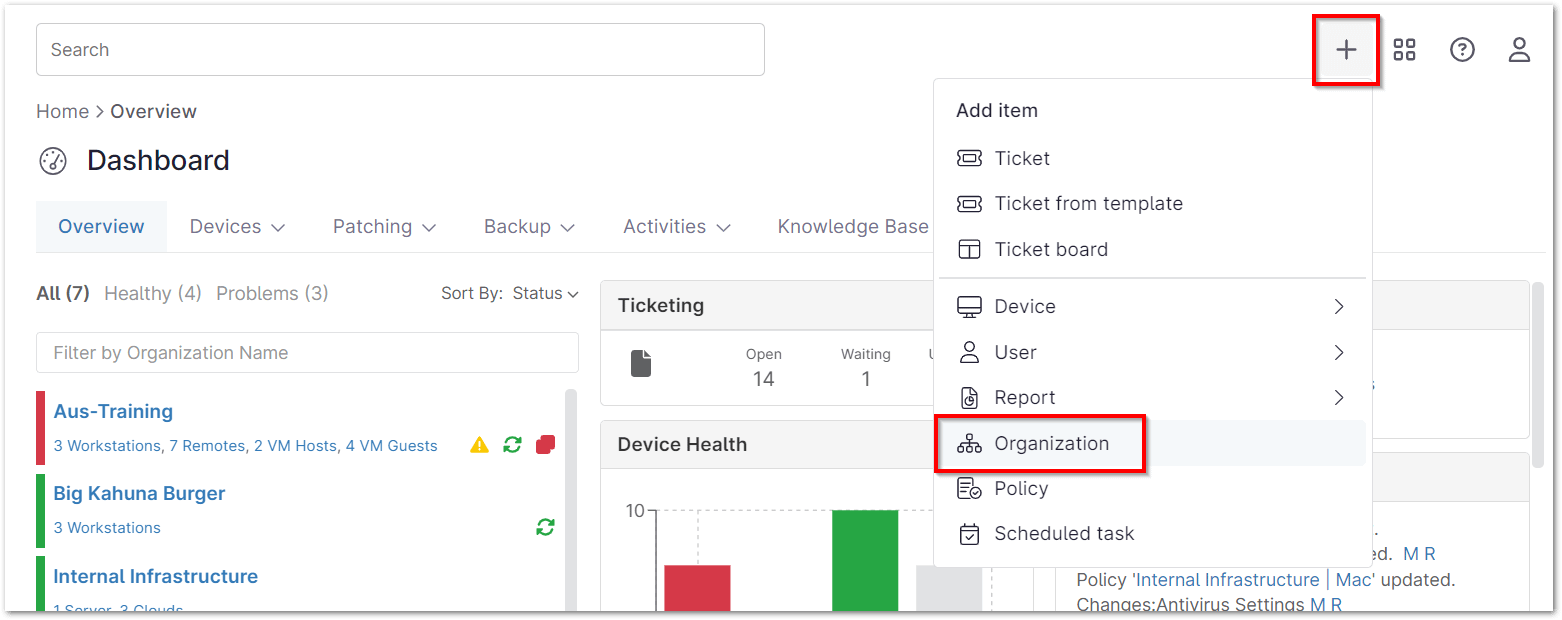
1. Click the + icon in the top right corner of the Ninja console and select Organization. (See below screenshot for reference)
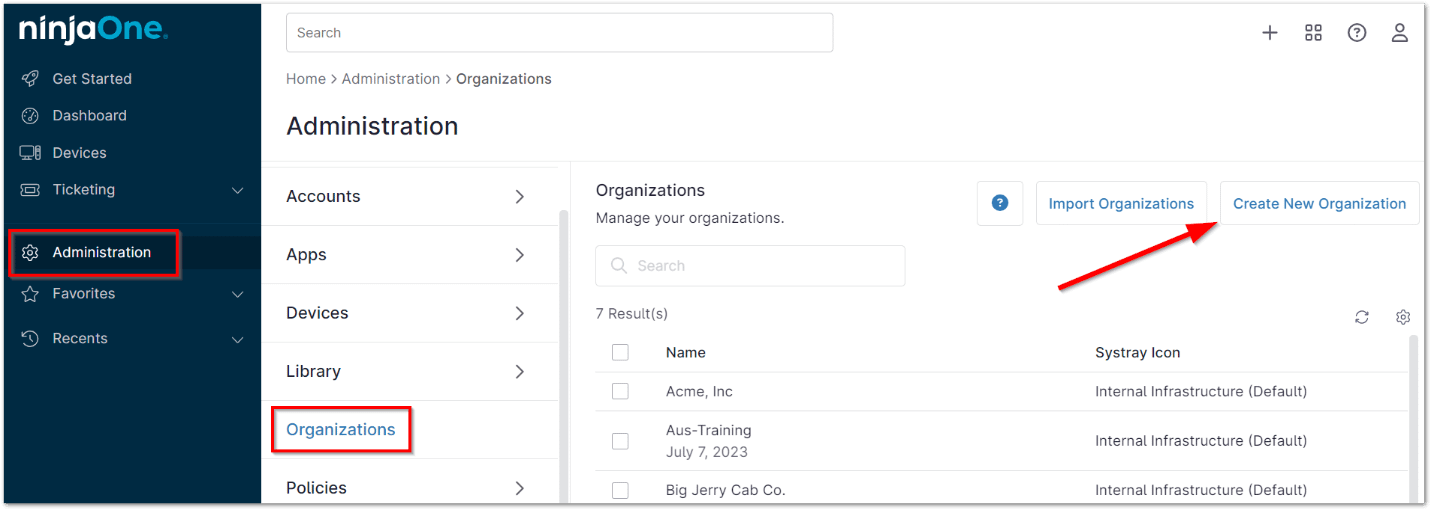
2. Click Administration in the left navigation pane and select Organization; then, click Create New Organization.
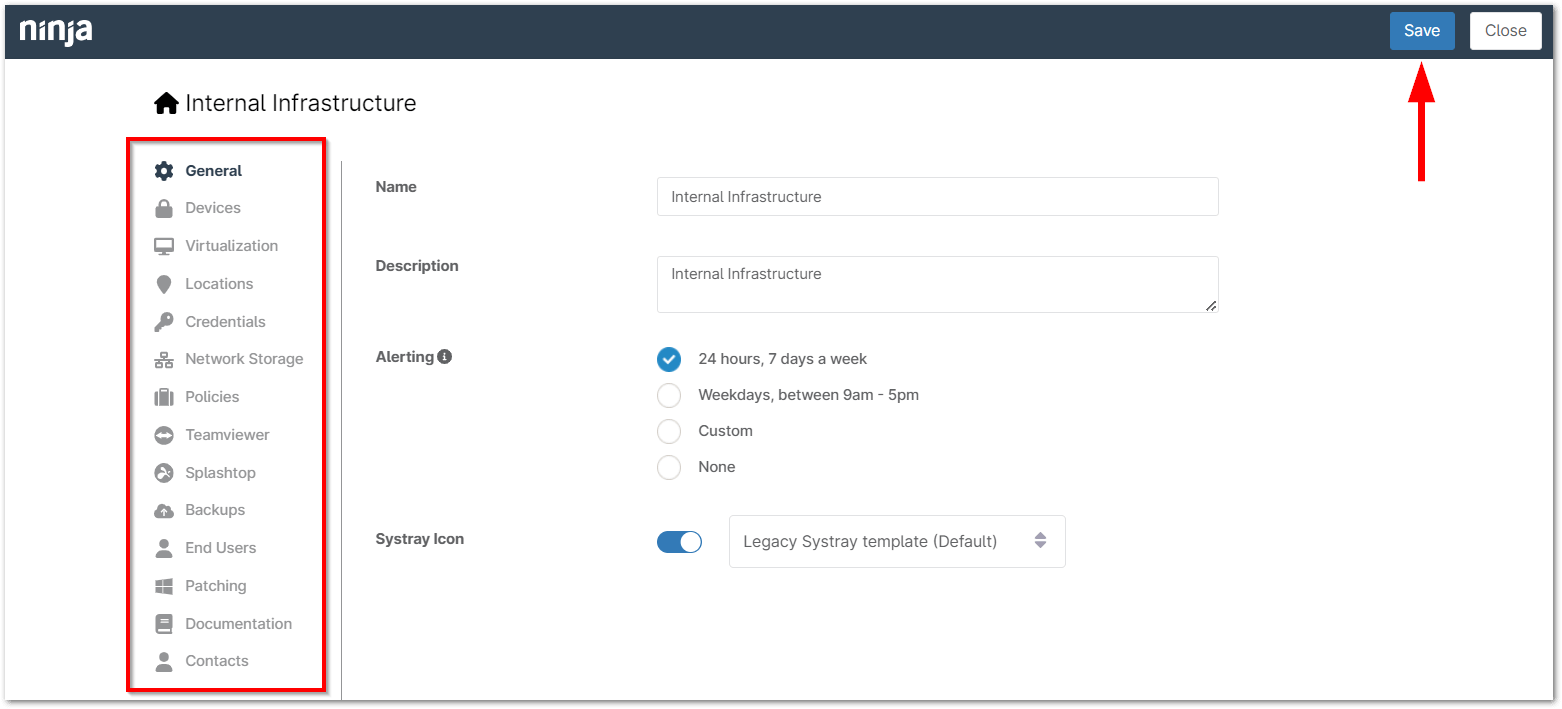
Configuring an Organization:
In the organization editor, you’ll notice at least 12 tabs in the left navigation pane (see table below). Your view may vary from the screenshot below depending on your enabled features and integrations.
Always click Save in the top right corner after making changes to any settings in the organization editor. A more detailed explanation of these settings can be found in the creating and configuring organizations document.
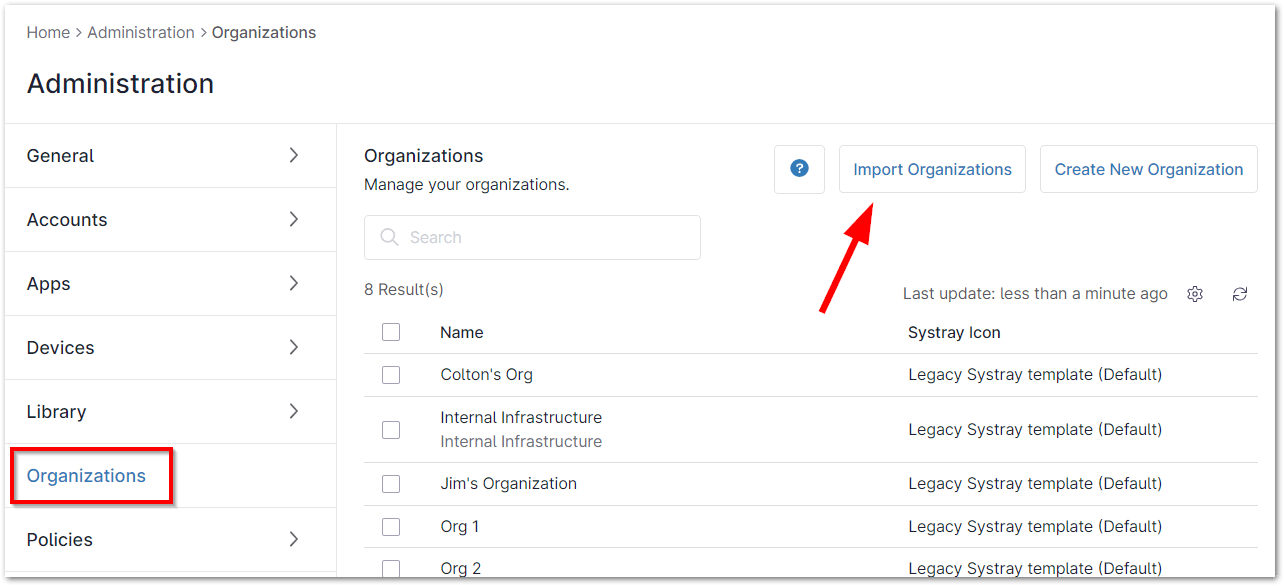
Importing Organizations:
1. Navigate to Administration > Organizations and click Import Organizations in the top right corner. (See below screenshot for reference)
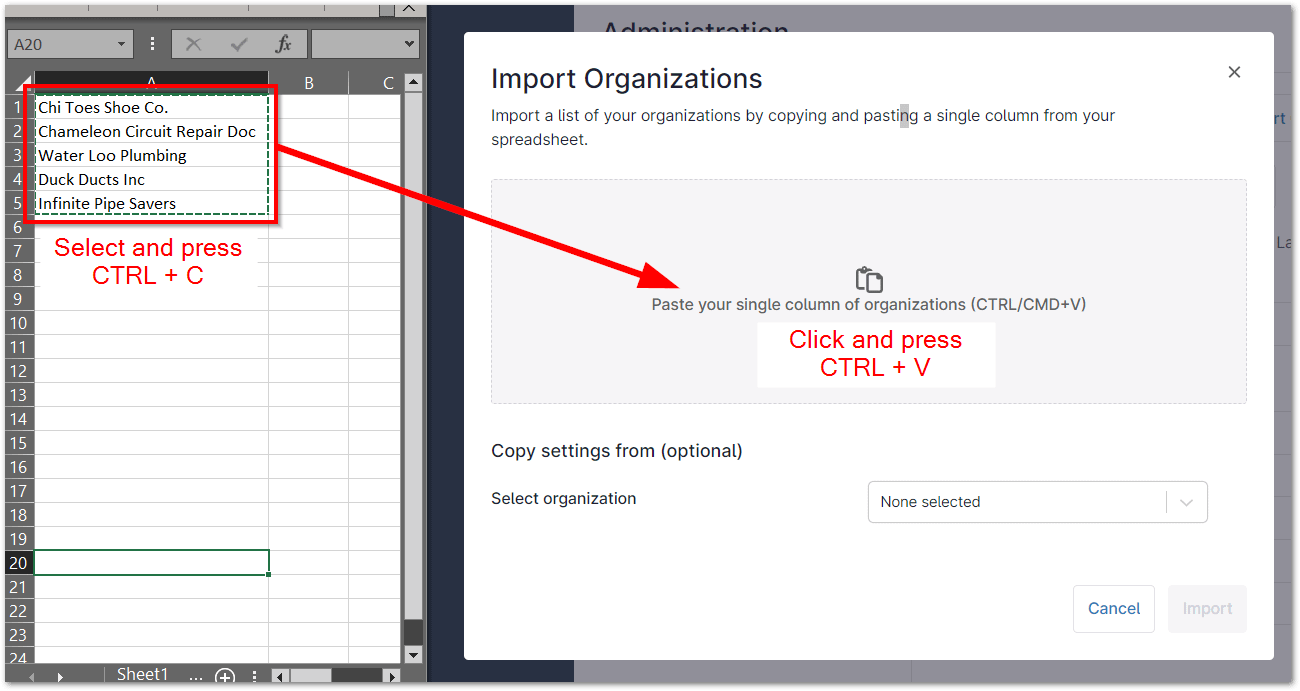
2. Copy the organization name from a CSV spreadsheet and paste it into the Import Organizations box. (See below screenshot for reference)
3. Next, you’ll have the option to copy settings from an existing organization. Select an organization to copy settings from to see the ability to choose which items to include. (See below screenshot for reference)
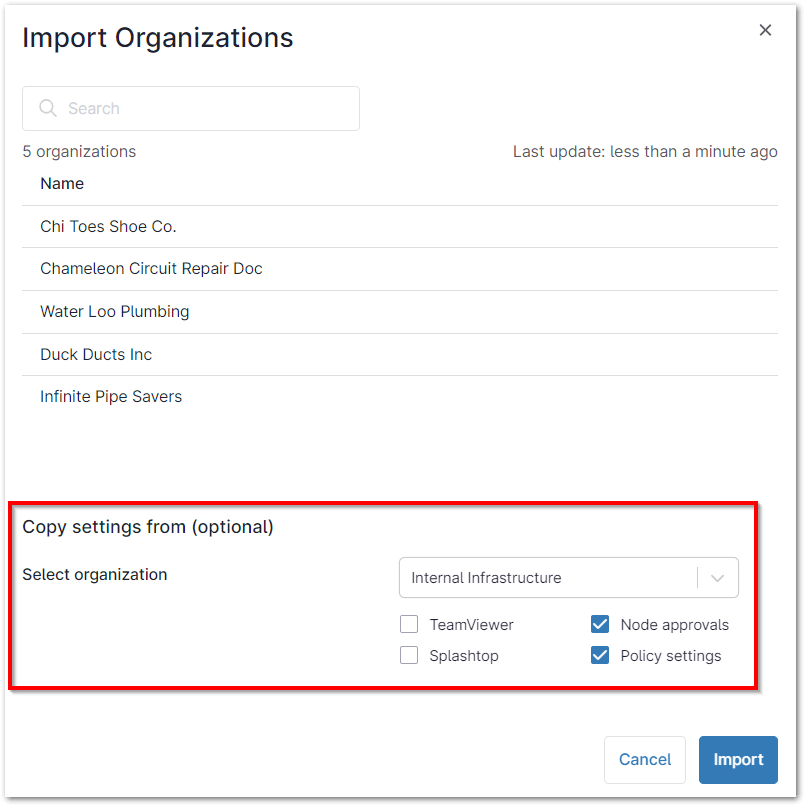
Important Note: The settings will be applied to all organizations being imported. To copy different settings for each organization, you must import them separately.
Editing Organizations:
NinjaOne allows you to control which columns display data in the Organizations tab under Administration.
Click the gear icon under the Create/Import Organization buttons to add or remove columns. (See below screenshot for reference)
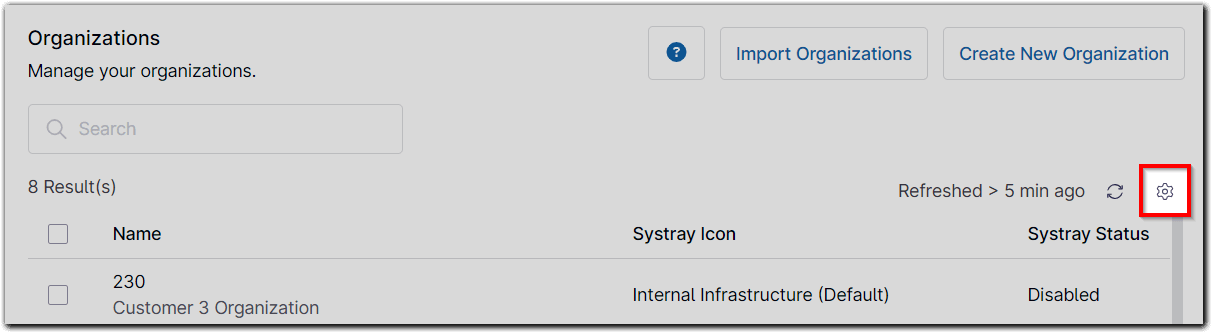
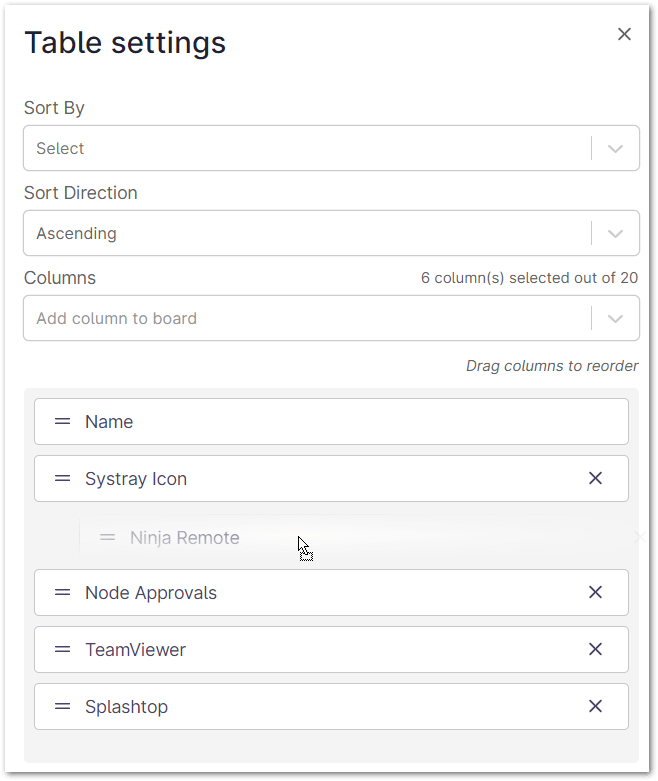
- Select which columns to add/remove from the Columns dropdown.
- Click and hold an added column, then drag up or down to change the display order.
- Click the X to the right of the column name to remove it.
Organization Settings
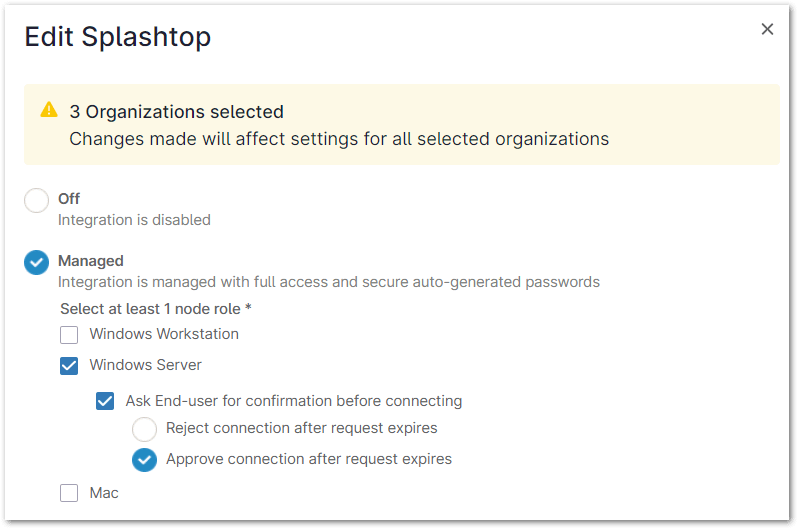
Technicians with system administrator privileges set to “Update” for organization access (see, User Permissions: Permission Options) can edit multiple organization settings at the same time. This feature enables remote access provider settings to be configured across organizations for TeamViewer, Splashtop, and NinjaOne Remote.
If turned on for an organization, secondary configuration can be completed to choose which types of devices may use the remote access tool (Windows workstation, Windows server, or Mac) and whether end user confirmation is required for connection.
To edit a single organization, click the organization name under Administration > Organizations.
To edit the organization settings of one or more organizations:
1. Check the box(es) for the organization(s) that need updating, and then click the Edit settings dropdown at the top of the organization list. (See below screenshot for reference)
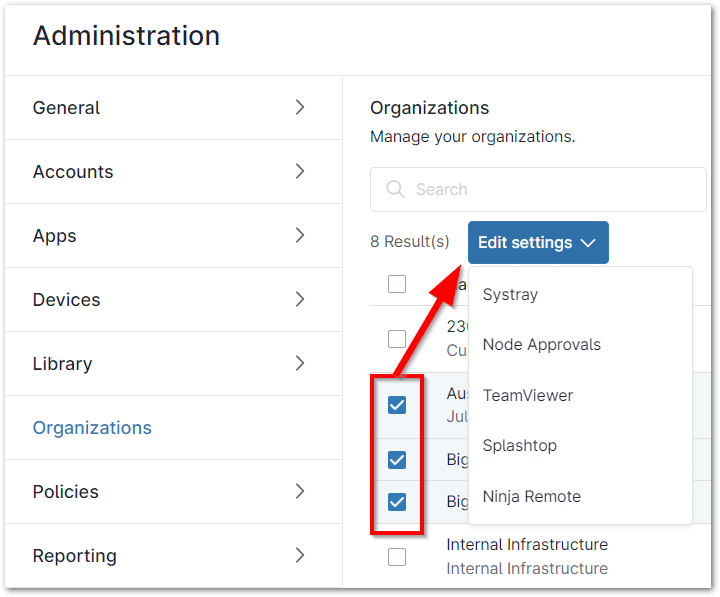
2. Select an option from the dropdown list to turn an integration off or manage access, enable systray templates, update node approvals, etc. (See below screenshot for reference)
3. Click Save.
Copying an Organization:
Navigate to Administration > Organizations and hover your mouse pointer over an organization you wish to copy and click the 3 dots on the right. The option to Copy appears alongside Edit and Delete on the right side. (See below screenshot for reference)
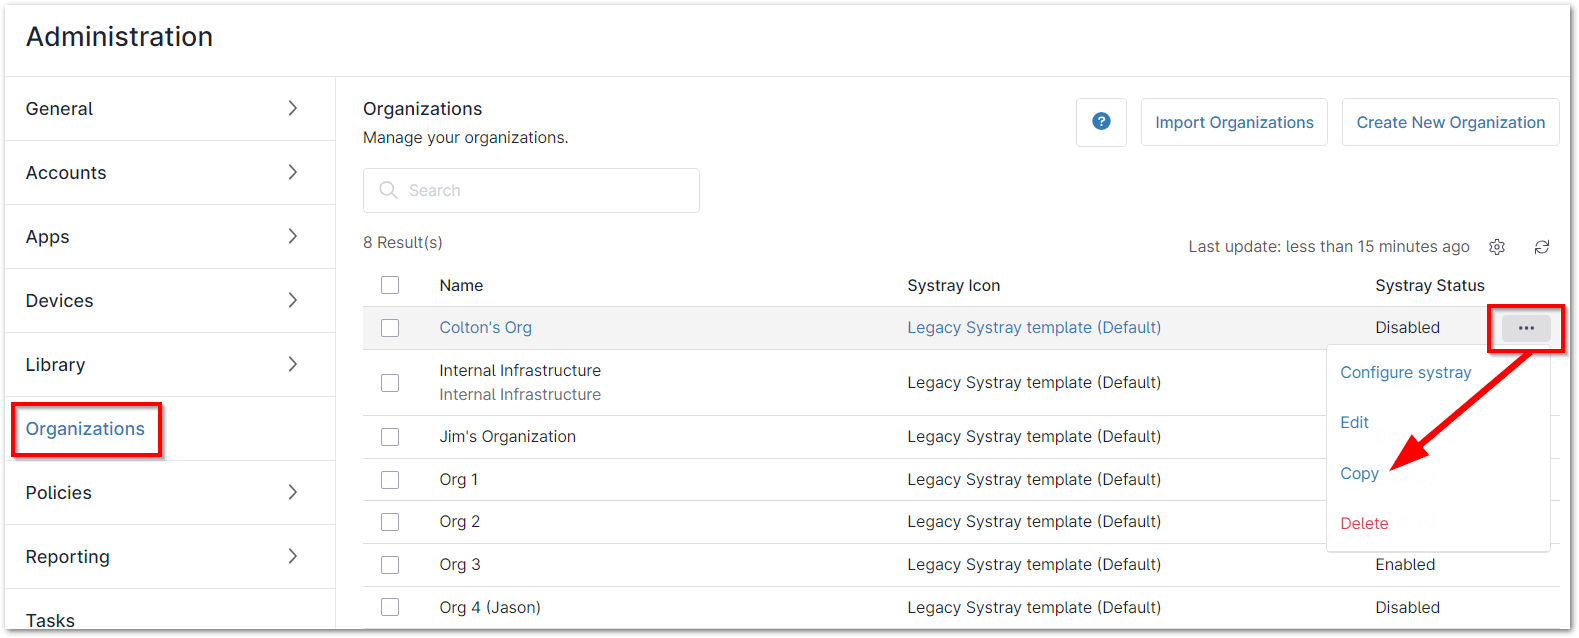
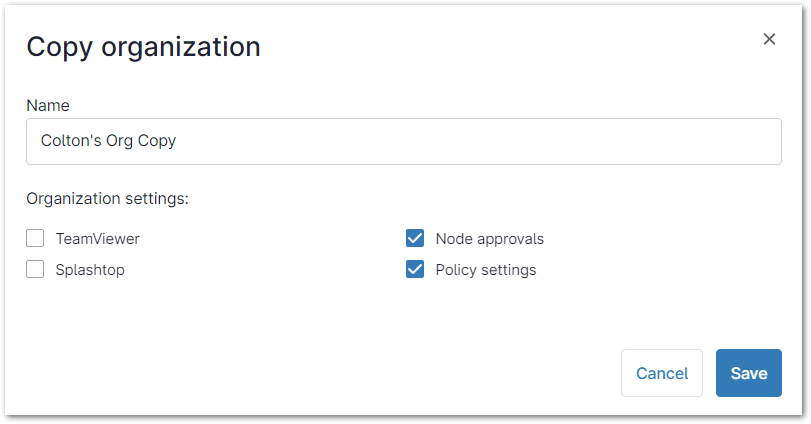
2. Click Copy. In the resulting window, you can change the name of this new organization as well as select which organization settings you would like to copy. Click Save to finish. (See below screenshot for reference)
Location
Creating a New Location:
Each organization has the default location of “Main Office”. This default location can be edited and renamed but cannot be deleted.
1. Open an organization editor (Administration > Organization), select the Locations tab and click Add Location. (See below screenshot for reference)
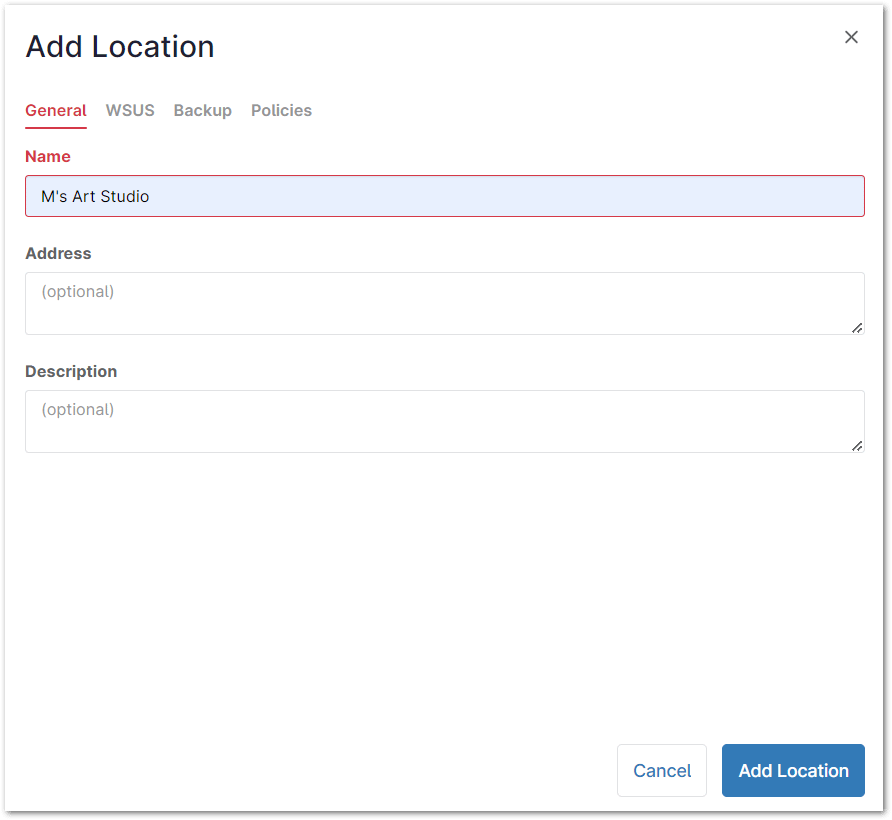
Important Note: Each location for an organization must have a unique name. If you attempt to add an organization with the same name as an existing organization, the incompliant field turns red (see screenshot above) and prevents completion of the process.
3. See the subsections below to configure WSUS, Backup, and Policy settings for the location.
4. Click Save in the bottom right corner of the window to finish adding the new location.
Editing or Deleting an Existing Location:
When editing a location, you can change any of the data within, including WSUS, Backup, and Policy settings.
If a user disables policies by location, saves and closes the editor, then enables policies by location again, all policies reflect their default status (i.e., they return to the state before they were enabled the first time).
Important Note: You cannot delete the default location automatically included when an organization is created.
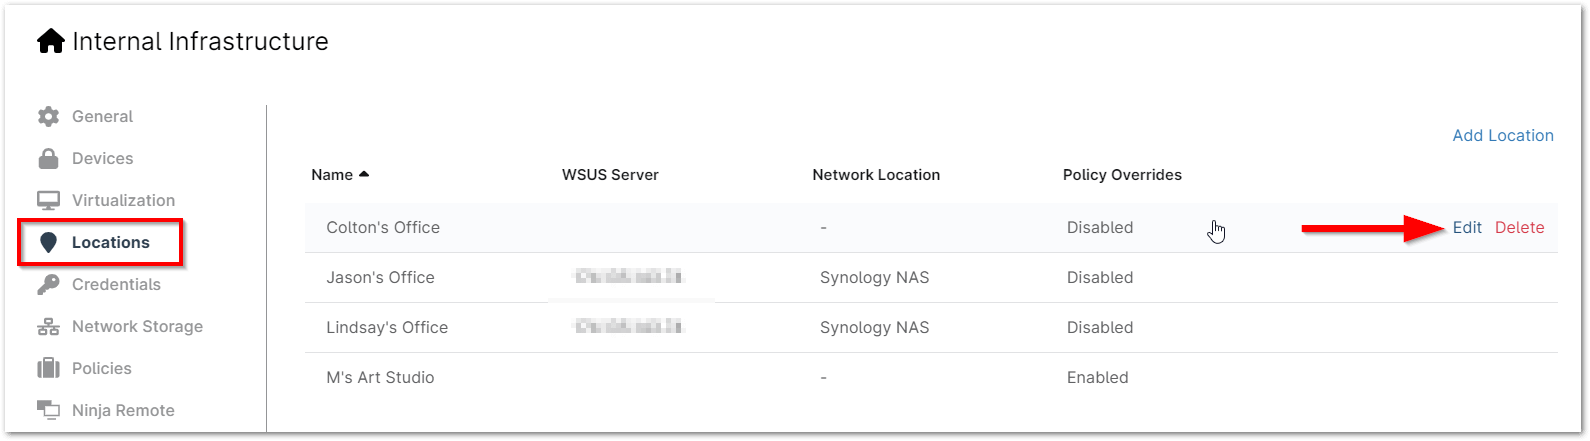
1. Open the organization editor (Administration > Organization), and select the Locations tab.
2. Hover your cursor over the existing location and click Edit or Delete. (See below screenshot for reference)
Moving Existing Devices to a New Location:
1. Navigate to the Devices tab in the left navigation pane and check the boxes for the device(s) that you wish to migrate to a new location.
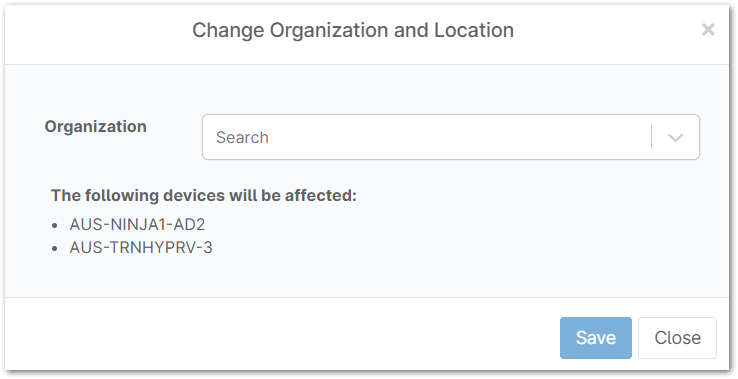
2. Hover your cursor over Configure and click Organization/Location. (See below screenshot for reference)

3. Select a new organization from the dropdown-list and then click Save. (See below screenshot for reference)
Adding New Devices to a Specific Location:
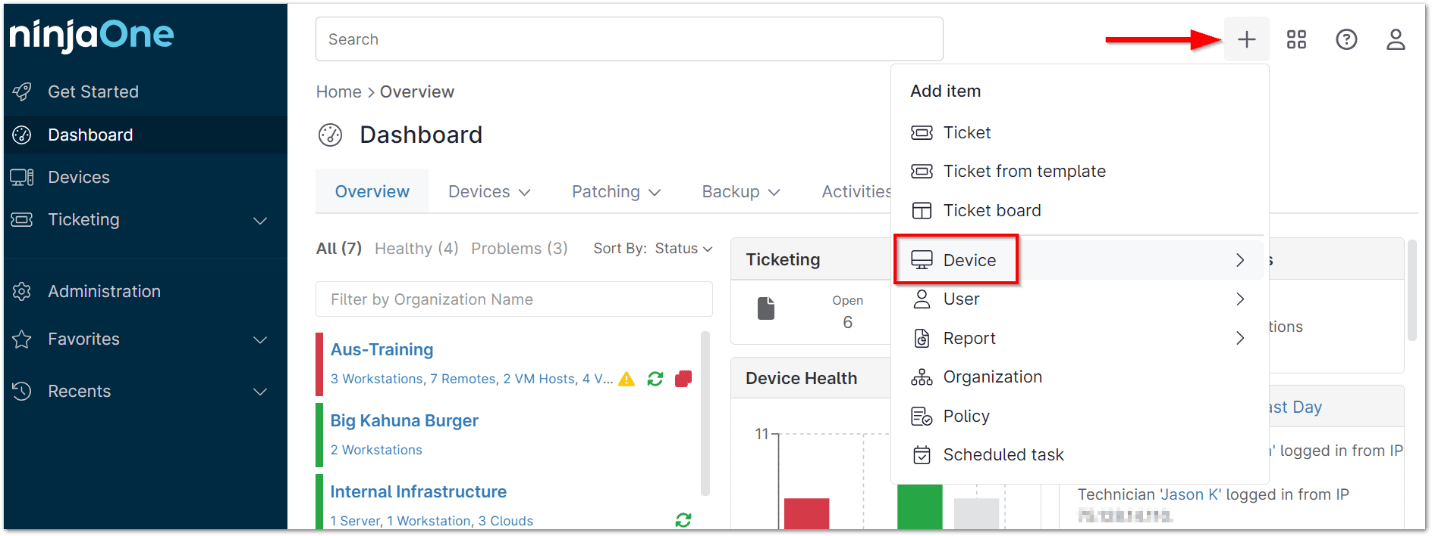
1. From anywhere in the NinjaOne console, click the plus sign (+) in the top right corner of the screen and select Add Device(s). (See below screenshot for reference)
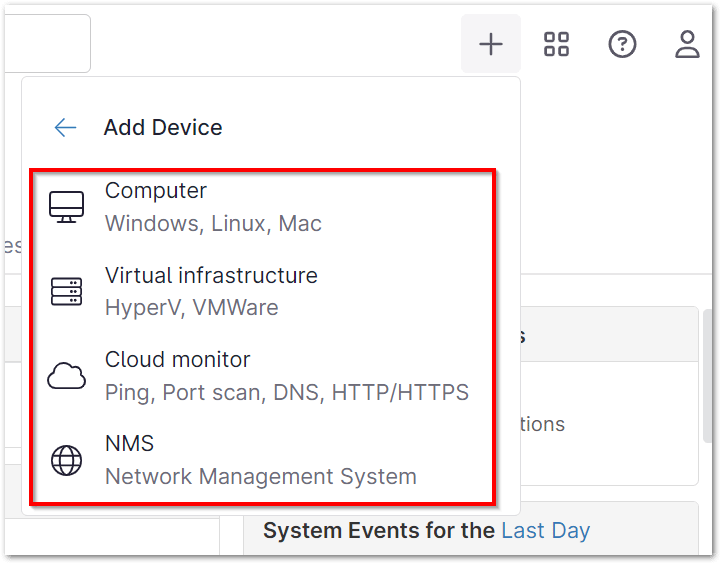
2. Select which type of device you would like to add. (See below screenshot for reference)
3. Select the organization and location. (See below screenshot for reference)
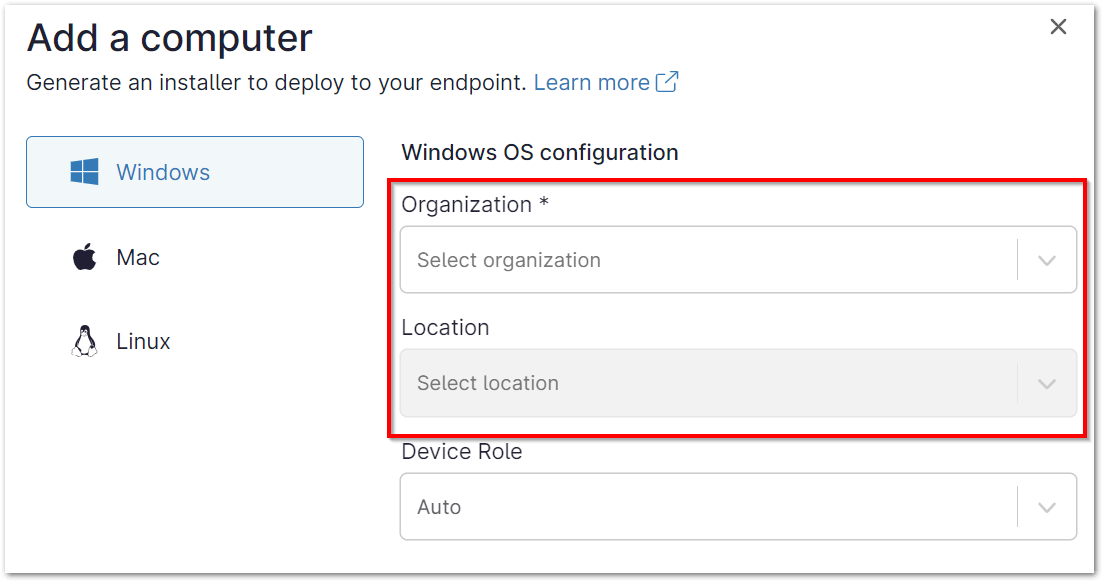 The generated installer automatically deploys devices to the specified organization and location when run.
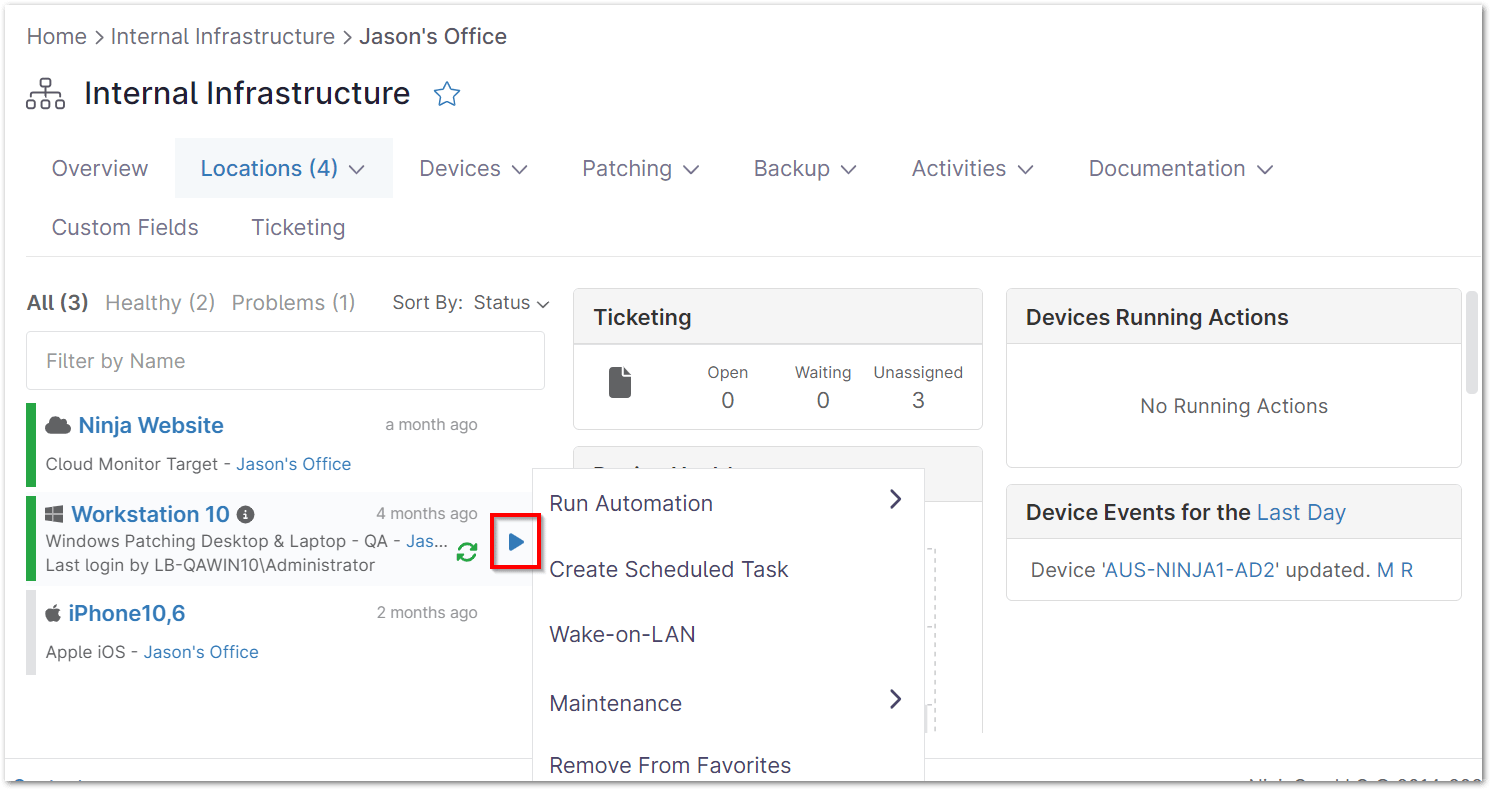
Viewing Devices by Location:
From the Locations tab on the Organization dashboard, you can act on devices at that location, view ticket summary, device health, running actions, and event logs.
1. Navigate to the organization dashboard, and hover your cursor over the Location tab. (See below screenshot for reference)

2. Select the location from the drop-list.
3. Hover your cursor over a device name to see action options. (See below screenshot for reference)
What are the benefits of using groups, organizations and locations in NinjaOne?
By effectively utilizing groups, organizations, and locations within NinjaOne, you can significantly enhance your IT management capabilities.
Benefits of using Groups include the effective coordination of devices with similar attributes such as operating system, location, and software. Application of policy to groups of devices. Generating reports by analyzing group membership. Automation can be utilized to streamline tasks for certain categories of devices.
Benefits of Organizations include the segregation of clients to effectively differentiate between various clients or for business units. Data isolation is used to guarantee data privacy and security by segregating client information. Producing customized reports for individual organizations.
Benefits of Locations include tracking devices to accurately pinpoint their whereabouts for management and troubleshooting purposes. Enforcing policies to implement location-based rules. Generating reports according to the location of the device.
Best Practices for Using Groups, Organizations, and Locations in NinjaOne
Groups
- Logical Grouping: Create groups based on device types (laptops, servers), operating systems,
- Regular Review: Periodically review group membership to maintain accuracy.
- Leverage Bulk Actions: Utilize group membership for efficient patch management, software deployment, and other bulk operations.
Organizations
- Clear Definitions: Establish clear criteria for creating organizations (e.g., clients, departments, subsidiaries).
- Consistent Naming: Use consistent naming conventions for organizations to improve organization.
- Regular Review: Ensure organization structure aligns with business needs and changes.
Locations
- Accurate Data: Maintain accurate device locations for effective management and reporting.
- Reporting: Utilize location data for generating reports on device distribution.