Antivirus (AV) state monitoring is a crucial aspect of endpoint security management. Staying informed about the status of your AV software—whether it’s actively running, disabled, or facing an issue—ensures that all endpoints remain protected against malware and other threats. AV state alerting notifies IT administrators about potential problems like outdated definitions, disabled AV agents, or uninstalled software.
With NinjaOne, you can automate AV status monitoring, address issues in real-time, and maintain a secure IT environment. This proactive approach minimizes vulnerabilities while improving IT efficiency and control.
How to Manage AV State Alerting with NinjaOne
NinjaOne streamlines AV state alerting by integrating with a wide range of antivirus (AV) providers, enabling real-time alert delivery. Here’s a step-by-step guide to setting up and utilizing this feature:
1. Access Agent Policies
- Navigate to the Administration section using the left-hand menu.
- Select Policies, then choose Agent Policies from the dropdown menu.

2. Create or Select an Agent Policy
- To create a new policy, click Create New Policy.
- Alternatively, select an existing policy from the list for editing.

3. Configure Antivirus Alerting
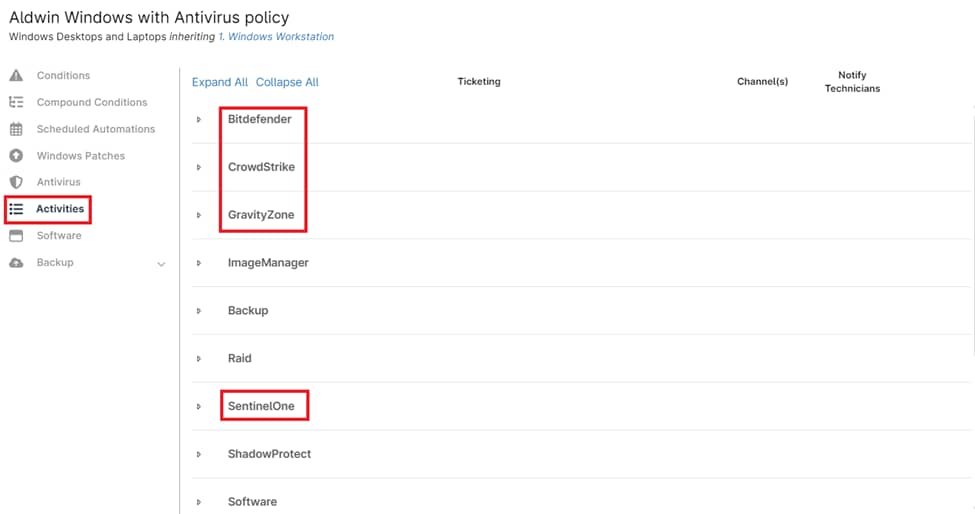
- On the Policy Editor page, navigate to the Activities section.
- Select the antivirus solution you wish to configure for alerting.
4. Configure Alert Settings
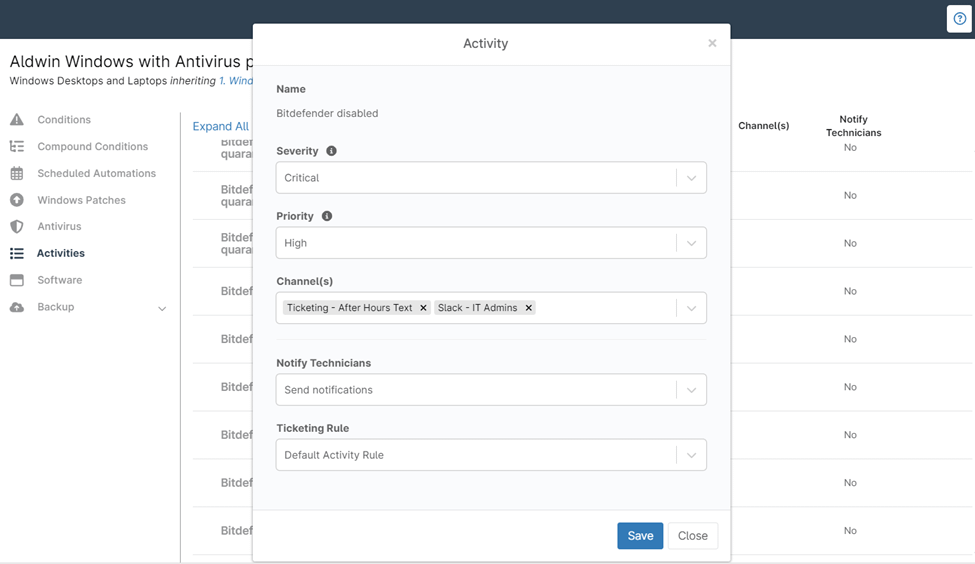
- Click on the activity for which you want to create an alert.
- Configure the following settings:
- Severity: Specify the criticality level of the alert (e.g., Critical, Major, Moderate).
- Priority: Assign a priority to determine the order of resolution for the alert.
- Channel: Select the communication channel for delivering the alert (e.g., Email, SMS, Slack).
- Notify Technicians: Choose whether to notify specific technicians or teams about the alert.
- Ticketing Rule: Define a ticketing rule to automatically create a support ticket when the alert is triggered, ensuring timely issue resolution and tracking.
5. Example Activities for Alerting
The activities you can configure alerts for may vary depending on the antivirus solution, but here is a list of the most common ones:
- Antivirus company associated with this device cannot be accessed
- Antivirus Device changed status to managed
- Antivirus Device changed status to unmanaged
- Antivirus Disabled
- Antivirus Enabled
- Antivirus Installation Failed
- Antivirus Installation Completed
- Antivirus Purge of Quarantined Files Failed
- Antivirus Quarantined Threats Purged
- Antivirus Scan Completed
- Antivirus Scan Failed
- Antivirus Scan Started
- Antivirus Threat Blocked
- Antivirus Threat Cleaned
- Antivirus Threat Deleted
- Antivirus Remove Threat from Quarantine Initiated
- Antivirus Remove Threat from Quarantine Completed
- Antivirus Remove Threat from Quarantine Failed
- Antivirus Threat Ignored
- Antivirus Threat Detected
6. Save and Apply the Policy
- Once you are satisfied with your configuration, click Save to apply the changes.
- After saving, click Close to exit the policy editor.
Note: Confirm that the policy is applied to the correct devices or organizations to ensure the alerts are triggered as expected.


