
Mac policies in NinjaOne refer to the specific guidelines and configurations applied to Apple devices running the macOS operating system. These policies are essential for ensuring that Mac devices are managed and secured according to Apple’s standards, while also meeting your organization’s specific requirements.
Mac policies in NinjaOne let you control your Apple devices. You can manage app distribution, network access, and data encryption. This helps keep your devices secure and compliant with your company’s rules. You can also automate tasks and monitor your devices easily. This makes it easier for your employees to use their Apple devices and keeps your company safe.
How to Configure macOS Policy in NinjaOne?
These instructions will help you create a new policy or modify an existing one using NinjaOne’s policy management:
1. Click Administration in the left navigation pane and select Policies. The Agent Policies page displays by default.
2. Select type of policy (Agent, NMS or VM Policy).
3. Click the Create New Policy button.

4. Click on “Agent Policies” from the list of policy categories. This will display the list of all existing agent policies on the right-hand side.
5. Then, to create a new Mac policy, click on the “Create New Policy” button located at the top-right corner of the Agent Policies page.
6. Lastly, to edit an existing Mac policy, locate the desired policy from the list and click on it.
Enable and Configure MacOS Patch Management
1. Navigate to the editor for a Mac policy (Administration > Policies) under which macOS patching should be enabled, and then select macOS Patching in the left navigation pane.
2. Ensure the Enabled toggle switch is activated.
3. Configure the Scan Schedule and Update Schedule to desired parameters.

4. Select Reboot Options and configure desired settings. There are two reboot options, and they include:
- Not Logged in User Reboot Options
- Reboot immediately—the device will reboot immediately.
- Attempt to reboot until successful—select a daily, interval, or weekly schedule at which you’d like the device to attempt to reboot.
- Logged In User Reboot Options
- Prompt to reboot until accepted—the end user will be prompted every ‘X’ number of minutes/hours/days until the reboot is accepted. There is also an option to force a reboot after x number of prompts.
- Notify user then reboot—the end user will be notified that their device will reboot, and then proceed to reboot after ‘X’ number of minutes/hours/days.
- Set a custom Reboot Dialog—For the two actions listed above, a custom message prompt can be created for users when a reboot is required after a patch cycle.
- Automatically reboot—the device will automatically reboot after ‘X’ number of minutes/hours/days.
Important Note: There is no ‘Do nothing’ reboot option for macOS Patching. This is by design, because macOS does not stage OS updates. A macOS patch cannot begin installing until the reboot.

5. Set up the policy schedule:
There are two schedule types: Scan Schedule and Update Schedule.
- Scan Schedule: The time the scan for available patches starts.
- Update Schedule: The time when the available patches are downloaded and then applied to the endpoint(s).
If you’d like the devices under this policy to correct a missed scan or update upon coming online, activate the applicable checkbox below the respective schedule.
Important Note: The default scan start time is 8am local time for the scan schedule so that it is different from the default update schedule time (5pm local). This only affects new policies.
- You can choose from five options when setting the schedule:
- Daily
- Weekly
- Monthly, Day of Month
- Custom (select the month and then day of the week)
- None
The first four schedule types can be configured with an optional duration limit. This allows you to set a limit on how long the scan/update actions will run before they are terminated.
- Under Days, you can select one or more days for the Weekly schedule, with a minimum of one being selected to a maximum of all seven. Devices will be patched only on the days selected. If no days are selected, an error message displays until the minimum requirement is met.

- The None scheduling option allows you to add a duration for running ad-hoc scans.
- Schedules can be set to run immediately, if missed. Simply activate the checkbox next to the setting you would like to enable. This option is not available if the schedule is set to None.

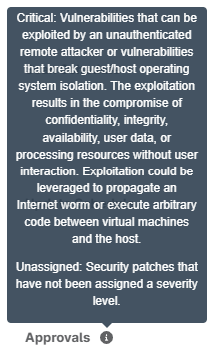
6. Next, configure the approval option for Critical and Unassigned patch types. These categories (Critical or Unassigned) are determined by how Apple classifies a patch.
7. Hover your mouse pointer over the information icon near the Approvals option. This provides more information on Critical and Unassigned patch types.
8. Click Save at the top of the screen.
Running a macOS Patch Cycle on Demand
1. Navigate to a device that has macOS patch management enabled at the policy level.
2. Hover the mouse pointer over the action/play button icon and navigate to OS Update from the drop-down menu.
3. Select Apply to run an OS patch installation cycle.

Options You Can Customize for NinjaOne Mac Policy Conditions
When configuring a condition within a NinjaOne Mac Policy, the following options are available:
- Condition: Choose the exact system metric or event that will activate the condition, like CPU usage, disk space limits, or other important factors.
- Name: Give an optional descriptive name to the condition so you can easily identify it within the policy.
- Severity: Select the severity level associated with this condition, ranging from none to high. This setting helps classify the urgency and potential effect of the condition.
- Priority: Set the priority level, which indicates the importance of the condition relative to others, guiding how quickly it should be addressed.
- Reset Interval: Set the time interval after which the condition will be reset if it is no longer true.
- Channel(s): Select one or more communication channels (e.g., email, SMS) where notifications will be sent if the condition is triggered.
- Notify Technicians: Choose if you want to send notifications to technicians when the condition happens. This option can be adjusted to match your notification preferences.
- Ticketing Rule: Specify whether a ticket should be automatically generated when the condition is met. This can be set off if no ticket creation is required.
- Automations: You can configure specific automations to execute automatically when the condition is triggered. These automations might include running scripts, restarting services, or performing other predefined actions to remediate or respond to the condition. Automations are configured by clicking “Add” in the “Automations” section, where you can define the exact response actions tied to the condition.
Benefits, Strategies and Best Practices for Mac Policy with NinjaOne
Improved Efficiency: Use NinjaOne to do things like update software and change settings automatically. This can help you deploy new software quickly and fix problems before they affect your users.
Enhanced Security: Manage your Mac devices centrally. Protect sensitive data and adhere to industry best practices and regulatory compliance requirements.
Leverage Automation: Use NinjaOne to automate tasks. This can help you manage your devices more easily and efficiently.
Continuously Review and Update: Keep your policies updated. Check them regularly and make changes as needed.
Strategic Implementation: Set up your Mac policies in NinjaOne. Test them to make sure they work correctly. Check if your devices follow these policies and take action if they don’t.
Enforced Monitoring: Check if your devices follow the rules. Use the data to find ways to improve your policies.