Topic
This article explains how to enable the SentinelOne integration with NinjaOne.
Environment
- NinjaOne Integrations
- SentinelOne
Description
SentinelOne is a comprehensive enterprise security platform that provides virus and threat detection, hunting, and response features. These features enable organizations to identify and resolve vulnerabilities, thereby protecting their IT operations.
View additional tutorials in our video library.
The benefits of using NinjaOne for SentinelOne integration include the following:
- Centralized management: Manage your SentinelOne data alongside other IT operations, all from within the NinjaOne console.
- Streamlined workflows: Automate routine tasks, such as endpoint deployment and policy enforcement, through policy conditions.
- Enhanced visibility: Gain comprehensive insights into endpoint security status through NinjaOne dashboards and reports.
- Proactive threat response: Respond to threats quickly and efficiently with automated actions triggered by SentinelOne alerts.
- Improved efficiency: Reduce manual effort and minimize the risk of human error through the use of automations.
We recommend using the following strategies when you integrate SentinelOne with NinjaOne:
- Align your policies: Ensure SentinelOne policies are aligned with your organization's security goals.
- Prioritize alerts: Prioritize alerts based on severity and potential impact.
- Optimize automation: Leverage automation to streamline repetitive tasks and accelerate incident response.
- Engage in continuous monitoring: Regularly review SentinelOne data within NinjaOne to identify trends and proactively address security concerns.
Index
Select a category to learn more:
- About SentinelOne
- Enable SentinelOne
- Retry Failed Installation
- Map NinjaOne to SentinelOne
- Navigate to SentinelOne from NinjaOne
- Additional Resources
About SentinelOne
SentinelOne OS Support
NinjaOne currently supports SentinelOne for the following operating systems (OSs):
- Microsoft Windows (x32): v23.3.3.264
- Windows (x64): v24.1.4.257
- Apple macOS: v24.2.2.7632 (Accessing this will prompt a Full Disk Access request.)
- Ubuntu Linux (x86-64_deb): v24.2.2.20
- Linux (Debian and RPM, x86–64 and ARM64): v24.2.2.20
Agent Updates
This section outlines information about agent updates.
- The SentinelOne agent does not automatically update, but a user can configure an update schedule through the SentinelOne portal.
- You can perform SentinelOne agent updates via the SentinelOne Web Management Console.
https://{management-console-domain}/docs/en/upgrading-agents.html#upgrading-agents
Resources and Notes
This section outlines important resources and notes.
- The integration does not support multi-tenancy at this time.
- A SentinelOne user can have only ONE (1) API token.
- The SentinelOne integration will not install if it detects the presence of other antivirus software on the endpoint.
- Disabling SentinelOne in NinjaOne does not result in the uninstallation of SentinelOne from devices.
- Users must have a token to access the API (Application Programming Interface) management console. Refer to SentinelOne Integration: Understanding API Tokens – NinjaOne Dojo to learn more.
- Service users need a minimum Scope of Access to be "View" for the SentinelOne integration (note, accessing the integration is NOT the same as managing the API renewal; those actions will require different permissions as outlined in SentinelOne API Tokens).
- Refer to the following link to view SentinelOne Knowledge Base service user overview and instructions for creating users at the account or site level:
https://{management-console-domain}.sentinelone.net/docs/en/service-users.html.
- Refer to the following link to view SentinelOne Knowledge Base service user overview and instructions for creating users at the account or site level:
- When you first install SentinelOne, it automatically runs a Full Disk Scan; during this time, the option to manually run a scan may not be available.
- You can find SentinelOne's documentation within the SentinelOne Management Console, at Help → Online Help.
Scope of Access Requirements
A Service User account in SentinelOne needs to meet the following minimum required permissions to enable this integration in NinjaOne.
| Setting | Minimum Permissions |
|---|---|
| Endpoints | View Move to Another Site Initiate Scan Abort Scan |
| Endpoint Threats | View |
| Accounts | View |
| Activity | View |
| Cloud | View |
| Cloud Account | View |
| Cloud Policies | View |
| Console Integration | View |
| Console Users | Views |
| Endpoint Policy | View |
| Groups | View |
| Roles | View |
| Service Users | View |
| Sites | View |
| Threat Intelligence | View |
| Threat Services | View |
| Unified Alerts | View Star Alerts = View Mobile Alerts = View Identity Alerts = View Generic Alerts = View Endpoint Alerts = View |
Enable SentinelOne
The SentinelOne integration currently supports the "Bring your own license model," which means you must have an existing SentinelOne account or license to enable the integration. If you do not have a license, you can easily purchase one through NinjaOne.
- Open Administration in the left side navigation pane; select Apps and click Add Apps.
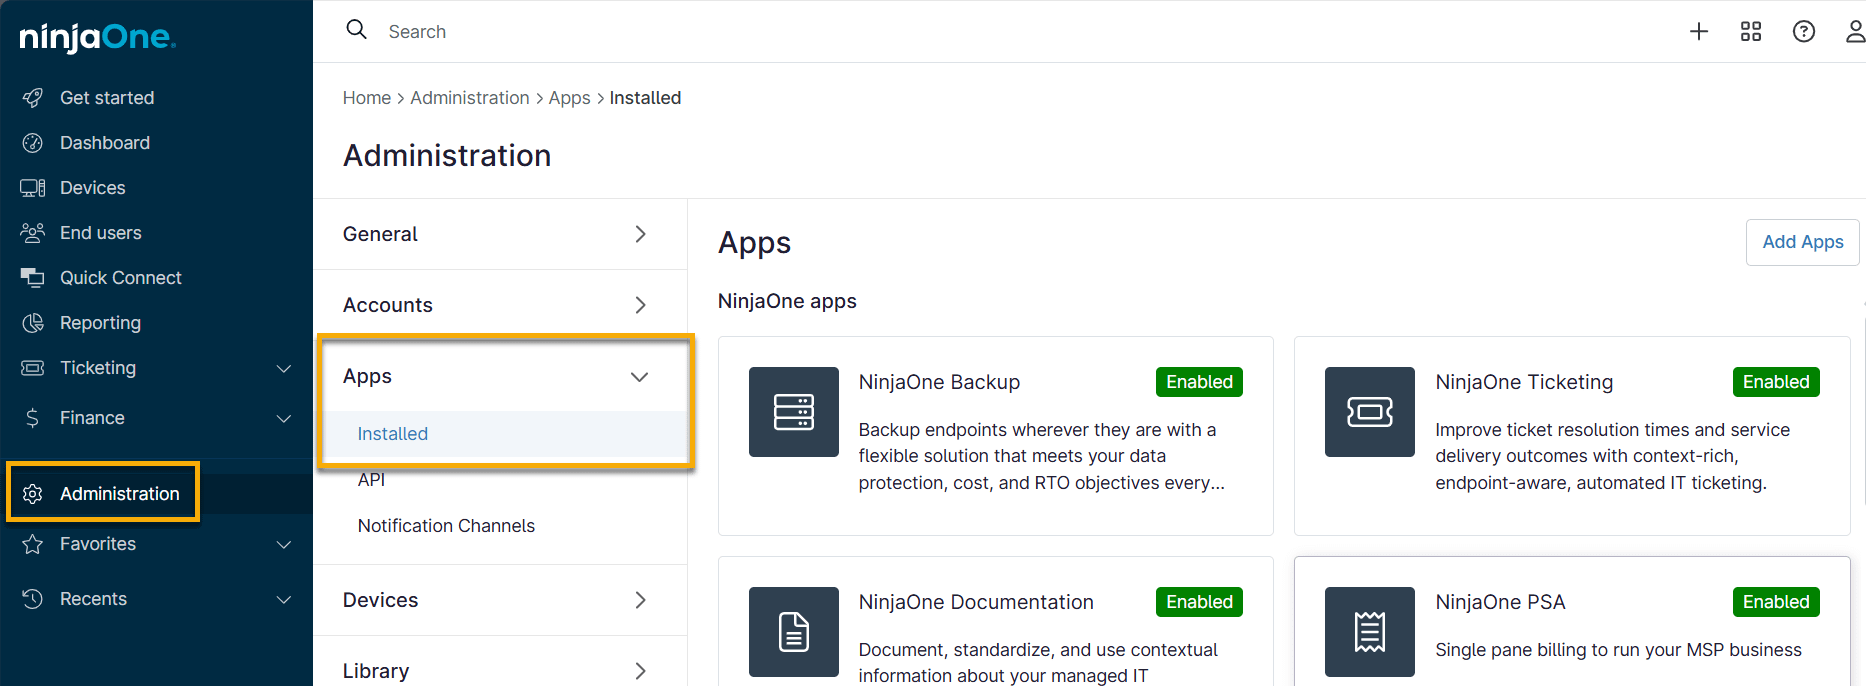
- Select the SentinelOne app and enable it.
The Set up SentinelOne account modal displays. - Accept the terms and click Continue.
- To obtain the API token, refer to NinjaOne Integrations: Understanding SentinelOne API Tokens for instructions.
- Enter your Site ID.
- To Find the Default Site ID:
- Log in to the SentinelOne Web Management console using your SentinelOne domain and established credentials.
- Select Settings from the left vertical menu in SentinelOne.
- Select Sites from the horizontal menu.
- If there are multiple "Sites,” select Default Site.
- Open the Site Info tab. You may need to scroll to the right to view this option.
- To Find the Default Site ID:

-
- Click the double paper icon to copy the Site ID data.
- In NinjaOne, paste the site ID into the Site ID field. Enter the URL from your SentinelOne account into the Management console domain field.
- Click Enable.
Retry Failed Installation
If the SentinelOne integration fails to install on the target device, the result of this activity displays in the Health section of the device dashboard. For more information about resolving health issues, refer to NinjaOne Endpoint Management: Manage Devices and Run Actions.
Click the arrow next to the health notification and select Retry Install to attempt troubleshooting.
If that does not work, you may need to turn off Windows Defender. When you install new antivirus software, it typically prompts you to turn off Windows Defender during the installation process. If it does not prompt you, you can turn off Windows Defender manually by following these steps:
- Open the Windows Security app by clicking the shield icon in the taskbar or searching for "Windows Security" in the Start menu.
- Click Virus & threat protection.
- Click Manage settings in the Virus & threat protection settings section.
- Turn off Real-time protection.
- Confirm that you want to turn off real-time protection by clicking Yes in the pop-up window.
Map NinjaOne to SentinelOne
Mapping between SentinelOne sites and NinjaOne organizations is tied to the NinjaOne account, rather than a particular user. You can change API tokens, and the mappings will remain the same.
Mapping Terminology
- NinjaOne accounts are referred to as "Organizations."
- SentinelOne accounts are referred to as "Sites."
- Organizations need to be mapped to Sites.
Navigate to SentinelOne Mappings
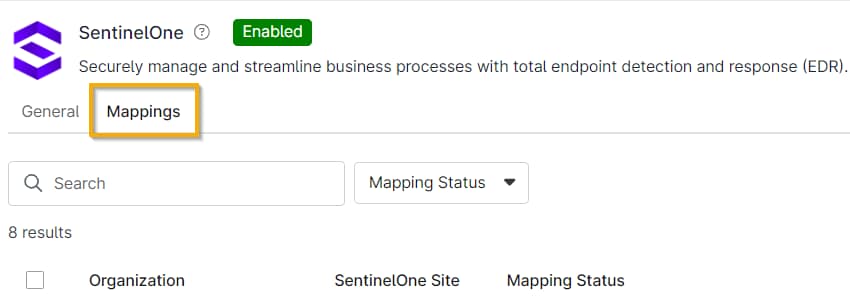
- In NinjaOne, click Administration in the left navigation pane.
- Select Apps in the middle menu.
- Open the SentinelOne app.
- Open the Mappings tab.
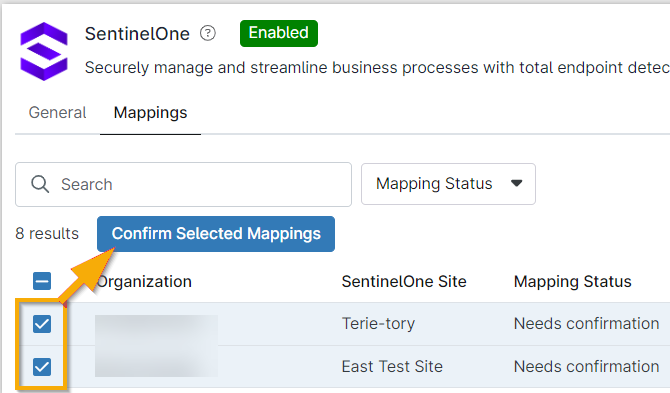
Mapping Statuses
There are three mapping statuses:
- Mapped
- Unmapped
- Needs Confirmation
Update mapping statuses by selecting one or more checkboxes for the desired organizations and clicking Confirm Selected Mappings.
For unmapped statuses, move your cursor over the row and click the ellipsis button to view the mapping action. A modal will display, allowing you to select the SentinelOne site from a drop-down menu. You can create new sites in SentinelOne through Settings → Sites → New Sites. Refer to SentinelOne developer documentation for more information.
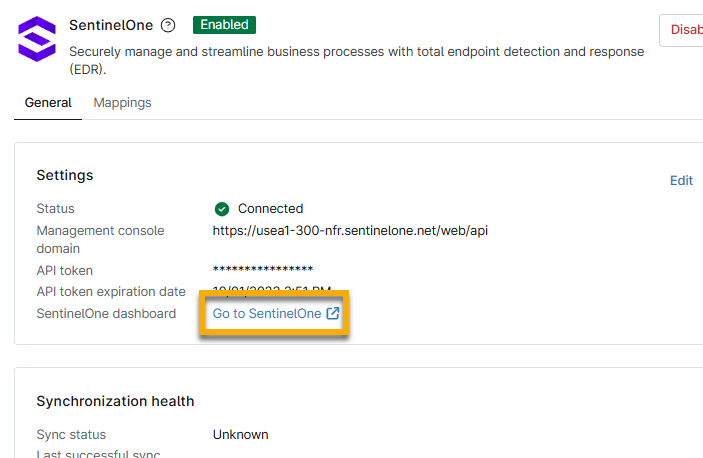
Navigate to SentinelOne from NinjaOne
Threats can be remediated from the SentinelOne dashboard.
- In NinjaOne, click Administration in the left navigation pane.
- Select Apps in the middle menu.
- Open the SentinelOne app.
- Click Go to SentinelOne.
Additional Resources
Refer to the following resources to learn more about the SentinelOne integration in NinjaOne: