
Apple App Management refers to the Mobile Application Management (MAM) specific for Apple devices. MAM is a set of tools and practices that allows IT administrators to securely control and manage applications on smartphones, tablets, and other mobile devices.
Apple Application Management allows IT administrators to:
- Manage mobile devices as Bring Your Own Device (BYOD).
- Mange mobile devices as company owned, or supervised mode, in which mode there´s a full control of the mobile device, not just applications.
- Install, update, and delete apps on both company owned and BYOD devices.
- Control access to business data within apps.
- Delete cached business data from BYOD devices or completely wipe the device in supervised mode.
How do I Enable Apple App Manager in NinjaOne?
There are two pre-requisites to manage Apple mobile devices and applications in NinjaOne:
A. Enable NinjaOne MDM, if not already enabled (this enablement is for Android or Apple).
B. Enable Apple device enrollment.
There are two ways to enroll Apple devices in NinjaOne: through the Apple Push Notifications (APNs) service and through the Automated Device Enrollment (ADE) service. These services are provided by Apple. APN enrollment is for BYOD devices, while ADE enrollment is for devices in supervised mode. This document focuses on Apple devices in BYOD mode and APN enrollment.
This enablement process only needs to be done once and is typically performed by the owner or administrator of the NinjaOne instance. An Apple account or Apple ID is required for this process. This account will be enrolled in the Apple Push Notification Service (APN). During the enrollment process, a certificate will be provided, which should be uploaded to NinjaOne.
Please note that this certificate has an expiration date and must be renewed within 30 days of its expiration. If, instead of renewing the certificate, a new one is uploaded, it is possible to do so; however, all enrolled devices will need to be re-enrolled.
Follow the next steps to enable NinjaOne MDM and enable device enrollment with APNs.
1. Go to Administration, then Apps, then NinjaOne MDM. The MDM configuration screen appears.
2. Click Enable. Two tabs will appear.
3. Select the Apple tab.
4. In the Apple Push Notification Service (APNs) section, click Enroll. A dialog box will appear.
(See the next screenshot for reference)
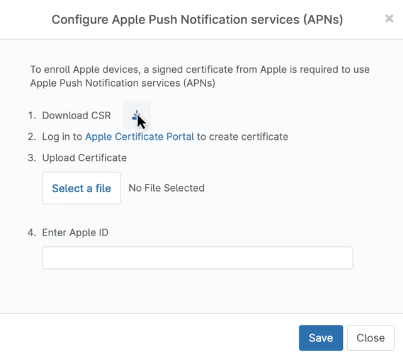
5. Download the CSR file, this will be needed in the next step.
6. Click on Apple Certificate Portal (step 2 in the dialog box). This will take you to the Apple portal. Login using your Apple ID.
7. Follow the instructions in the Apple portal, and at the end of the process, a certificate file will be provided. And you will be returned to NinjaOne.
8. Once you´re back to NinjaOne, upload the certificate file (step 3 in the dialog box).
9. Enter your Apple ID and click Save.
How do I Enroll in a BYOD Apple Device For Management in NinjaOne?
Follow the next instructions for enrolling an Apple mobile device in NinjaOne.
1. From any dashboard, click on the + sign on the upper right of the screen.
2. Select Device and then Mobile Device. A dialog box appears.
3. Fill out your organization name and location.
4. On Device Role select Apple IOS or Apple IPadOS, accordingly.
(See the below image for reference)
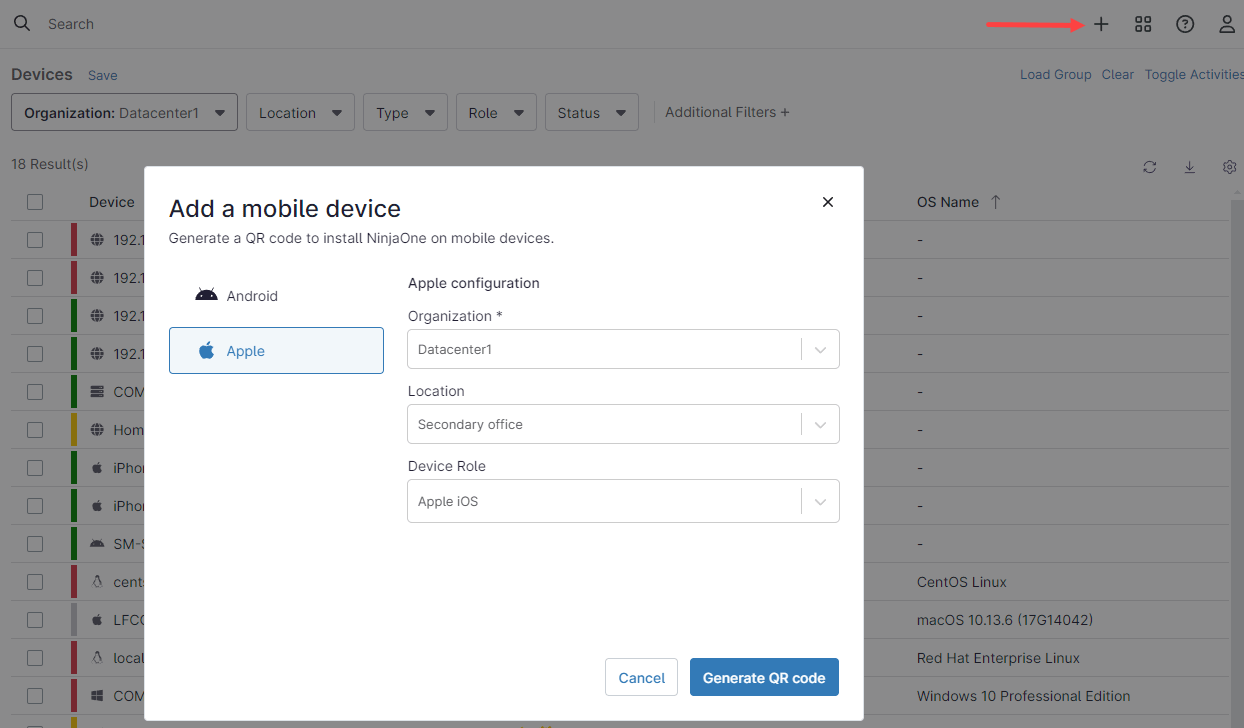
5. After completing all the fields, click Generate QR Code. A QR code will be generated and used for the registration process.
On the apple device:
6. Scan the QR code.
7. Accept downloading the enrollment profile file.
8. Go to configuration, find, and install the NINJARMM enrollment profile.
*It is possible to download the enrollment profile file and distribute it by other means, email, for example and the enrollment process can be done remotely.
Once Enrolled, How Can I Manage Applications on Mobile Devices With NinjaOne?
MDM policies are the way to manage applications in NinjaOne. Whether it´s a BYOD or a company-owned device, the policies have an Application section where you can make applications available for install, deny or force install applications. Follow the next instructions to automatically install IOS applications in NinjaOne.
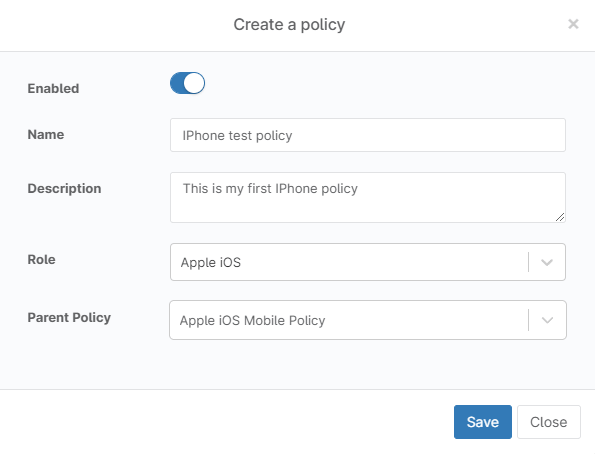
1. Go to Administration, then Policies, then MDM Policies.
2. Click Create New Policy.
3. In Name, type the name of your choice for your policy, for example, iPhone Test Policy
4. In description, type the description of your choice, for example, this is my first iPhone Policy.
5. Under Role, select Apple IOS.
6. Under Parent Policy, select Apple Mobile Policy.
7. Click Save
(see below screenshot for reference)
9. The policy editor appears.
10. On the left side, select the Applications tab.
11. Click add apps and select the Public App Store tab.
12. Search for the desired app, also select the app country. A list of matching applications will appear.
13. Click the desired application, A dialog box will appear.
14. Select the assignment type from the drop-down (force installed or blocked).
15. If the selection was blocked, go to step 17.
16. If the selection was Force Installed, fill out the remaining fields.
(See below screenshot for reference).
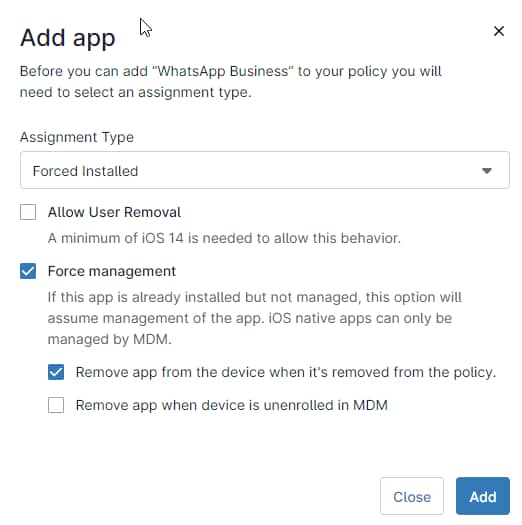
17. Click Add.
18. You can continue adding applications, once you´re done, click Save on the upper right side of the screen. Enter your MFA method response and close.
Note: in BYOD mode, applications are not automatically installed. NinjaOne sends a request to the phone for installing each application; the user can accept or deny the installation.
Strategy: Install Approved Applications in a BYOD iPhone
In this example we will provide instructions for enrolling a personal iPhone, we will create an MDM policy called iPhone BYOD, and we will add some applications that will be installed on the Apple phone.
A) Follow the next directions to create the MDM policy:
1. Go to Administration, then Policies, and then MDM Policies.
2. Click Create New Policy.
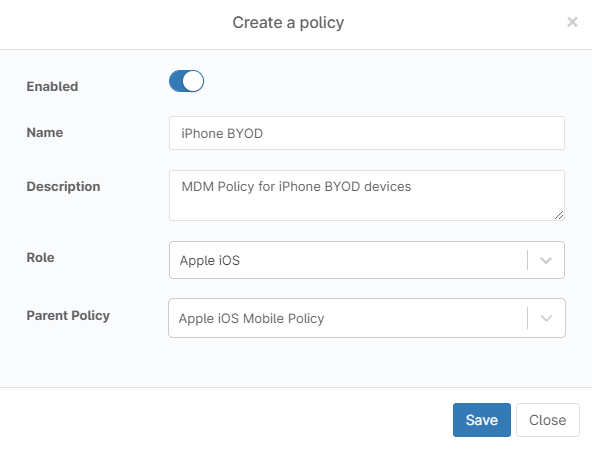
3. In Name type iPhone BYOD.
4. In description, type the description of your choice, for example, MDM Policy for iPhone BYOD devices.
5. Under Role, select Apple IOS.
6. Under Parent Policy, select Apple IOS Mobile Policy.
7. Click Save
(see the next screenshot for reference)
8. The Policy editor appears.
B) Once the Policy has been created, follow the next directions to add approved applications:
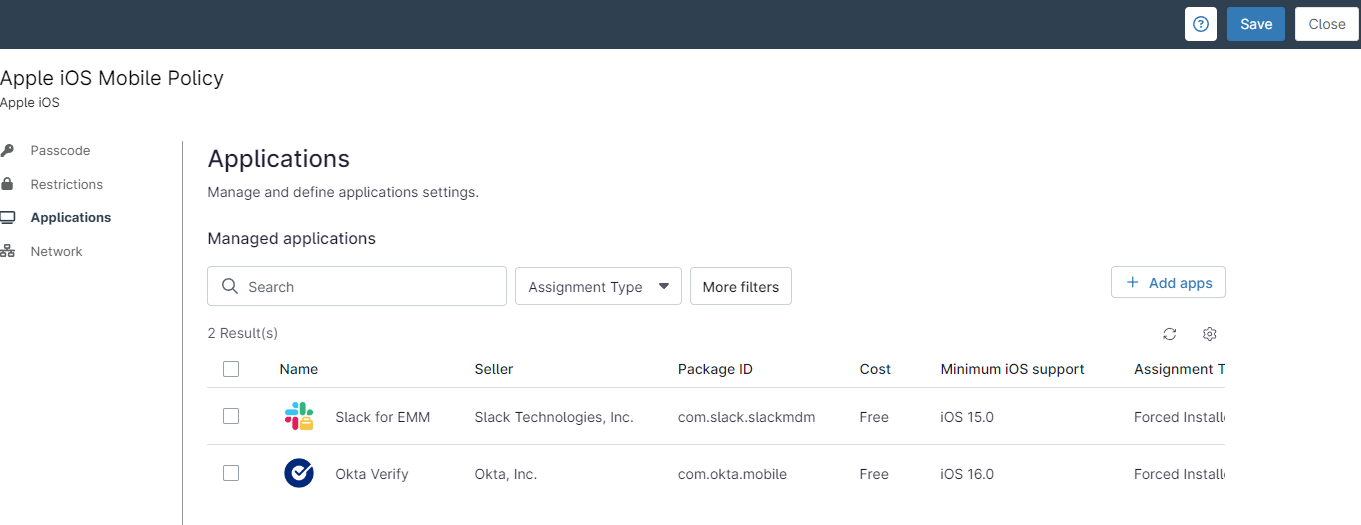
1. On the left side, select the Applications tab.
2. Click add apps and select the Public App Store tab.
3. Type Slack on the application name and click Search.
4. Click on Slack for EMM, a dialog box appears.
5. Under Assignment type, select Forced Installed.
6. Click Add.
7. Click add apps and select the Public App Store tab.
8. Type Okta on the application name and click Search.
9. Click on Okta Mobile, a dialog box appears.
10. Under Assignment type, select Forced Installed.
11. Click Add.
(See below screenshot for reference)
13. Click Save on the upper right side of the screen. Enter your MFA method response and close.
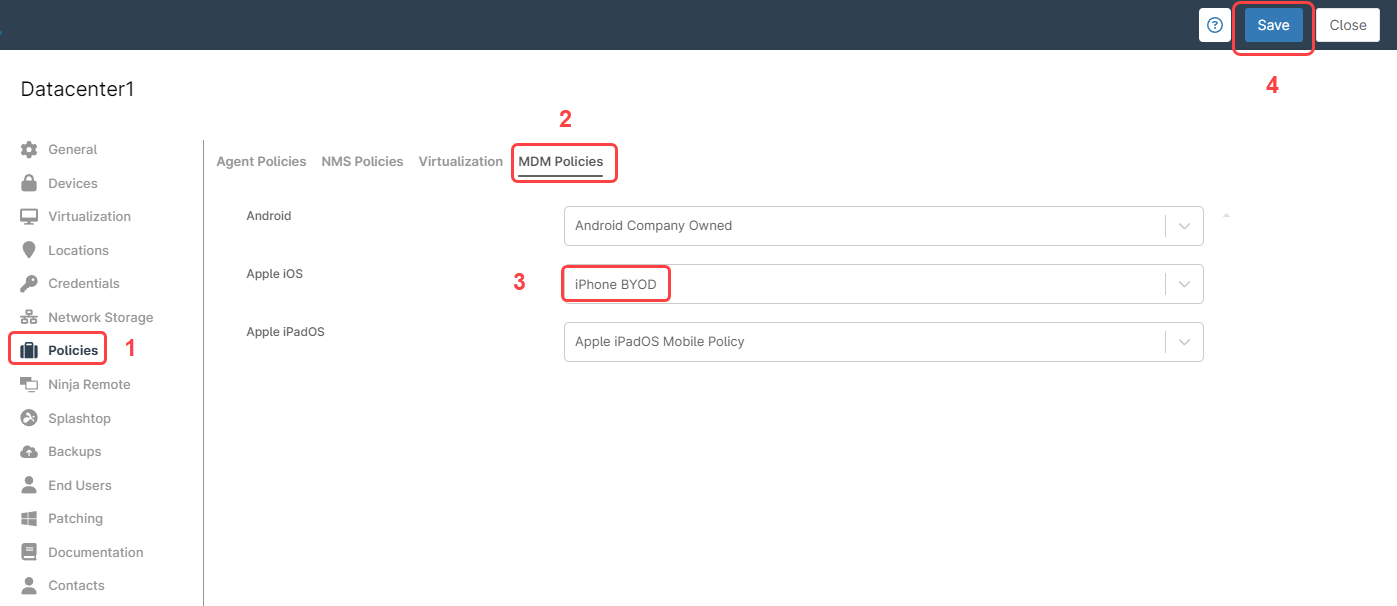
C) Set the newly created policy as the default policy for your organization, for that, go to your organization’s dashboard and click edit, then:
1. On the left side, select the Policies tab.
2. On the right side, select the MDM policies tab.
3. Under Apple IOS, select Android Company Owned from the drop-down menu.
4. Click Save.
(see the next screenshot for reference)
D) Enroll an iPhone device to your organization:
1. From any dashboard, click on the + sign on the upper right of the screen.
2. Select Device and then Mobile Device. A dialog box appears.
3. Fill out your organization name and location.
4. Under Device Role select Apple IOS.
5. After completing all the fields, click Generate QR Code. A QR code will be generated and used for the registration process.
6. On the apple device: Scan the QR code on the Apple mobile device.
7. Accept downloading the enrollment profile file.
8. Go to configuration and install the NINJARMM enrollment profile.
9. A few minutes after installing the enrollment profile, the iPhone device will receive installation requests for Slack and Okta Apps.
What Are The Advantages of Using NinjaOne Fapple app managementor Mobile Application Management?
- Unified management
Mobile devices can be administered through a single console, the same as all other devices.
- Cost savings
Strategies that simplify app management lead to considerable time and resource savings.
- Integration with Other Tools
The platform is designed to work in harmony with other security and helpdesk tools, creating a unified and more productive IT management environment.