In this article, you will learn how to configure kiosk basic settings. Kiosk mode is a critical feature for devices intended for public or specialized use, limiting access to only essential applications and functionalities. This ensures security, prevents unauthorized changes, and streamlines the user experience.
Effective kiosk management involves configuring settings that dictate user access, application behavior, and device lockdown. NinjaOne provides robust tools for configuring and managing kiosk settings across your Android device fleet, ensuring your kiosks operate seamlessly and securely.
How to Configure Kiosk Settings with NinjaOne
NinjaOne offers a straightforward approach to kiosk configuration. Here’s a step-by-step guide:
1. Access MDM Policies:
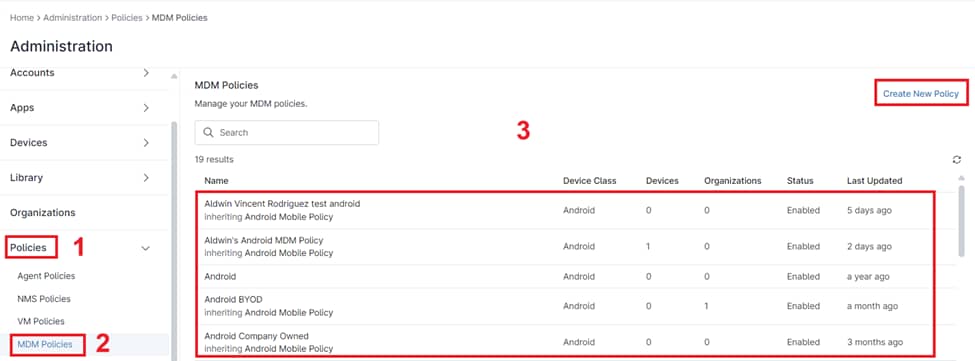
- On the left navigation pane, locate and click on the “Administration” area.
- From the dropdown, select “Policies” and then “MDM Policies“.
2. Create or Select a Policy:
- Click “Create New Policy” to start a new policy from scratch.
- Choose an existing policy from the list to modify it.

3. Configure Kiosk Mode:
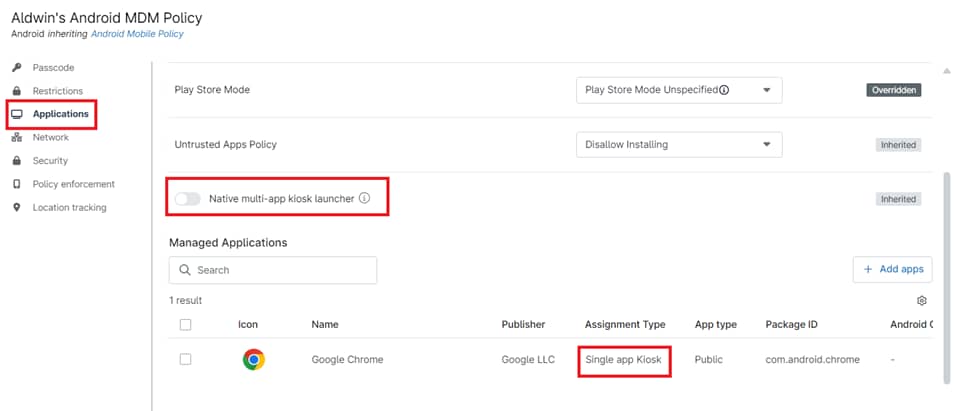
- On the Policy Editor screen, click on “Applications.”
- Enable the “Native multi–app kiosk launcher” or add an app and set it to “Single app kiosk” mode.
 4. Configure Kiosk Settings:
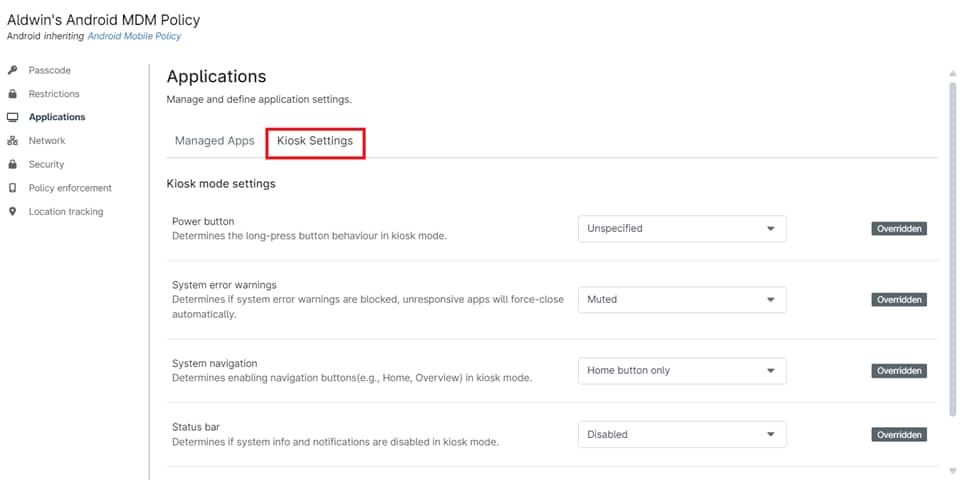
- Click on “Kiosk Settings” to fine-tune the kiosk environment.
- Power Button: Determines if the user can hold the power button to access power options (e.g., shutdown, restart).
- System Error Warnings: Controls whether system error warnings are displayed to the user. If blocked, unresponsive apps will automatically close.
- System Navigation: Determines if the user can use navigation buttons (e.g., Home, Overview) to exit the kiosk app or access other areas of the device.
- Status Bar: Controls the visibility of the status bar, which displays system information and notifications.
- Device Settings: Determines if the user can access the device’s settings app.
- Save and Apply:
- Once you’re satisfied with the kiosk configuration, click “Save” to preserve the settings.
- Click “Close” to exit the Policy Editor.
Note: Be sure to deploy the updated or newly created policy to the relevant devices or device groups to enforce the kiosk mode settings.
Benefits of Using NinjaOne for Kiosk Configuration
- Centralized Management: Configure and manage kiosk settings across multiple devices from a single console.
- Remote Deployment: Deploy kiosk policies to devices remotely, eliminating the need for physical access.
- Customization: Tailor kiosk configurations to meet specific needs and use cases.
Strategies for Kiosk Configuration with NinjaOne
- Define Clear Objectives: Clearly define the purpose of the kiosk and the desired user experience.
- Prioritize Security: Implement strict access controls and security measures to protect sensitive data and prevent unauthorized access.
- Ongoing Monitoring: Continuously monitor kiosk devices for performance, security, and compliance.
Examples of Kiosk Use Cases with NinjaOne
- Retail Kiosks: Lock down point-of-sale systems, product information displays, and self-service kiosks.
- Healthcare Kiosks: Secure patient check-in systems, medical information displays, and telehealth platforms.
- Education Kiosks: Configure devices for student assessments, library catalogs, and interactive learning experiences.

