
Before going through the steps to enroll an Android device, it is important to show the differences between the three usage types. The table below shows such differences:
| Usage type | Personal/Work (BYOD) | Personal/Work (COPE) | Company-owned |
| Feature | |||
| Pre-requisites for enrollment | User must install the Android Device Policy (ADP) application and scan the QR code from it. The personal profile is untouched. | Device must be factory reset before enrolling. The QR code is scanned during the initial setup. | Device must be factory reset before enrolling. The QR code is scanned during the initial setup. |
| Profiles |
|
|
Only one work profile which cannot be removed or paused. |
| Applications | User is free to install or uninstall any applications on the personal profile; Applications on the work profile are managed by the IT department, with limited end user control, depending on the permissions assigned by IT. |
User is free to install or uninstall any applications on the personal profile; Applications on the work profile are managed by the IT department, with limited end user control, depending on the permissions assigned by IT. |
Applications are managed by the IT department, the user has limited control on them, depending on the permissions assigned by IT. |
| Result of the Erase Device security action | The work profile is deleted, including installed applications and cached data, without any end user confirmation. The personal profile is untouched. | The device is factory reset without any end user confirmation. | The device is factory reset without any end user confirmation. |
| Security control | Work data is secured within the work profile, but the rest of the device is under the user’s control. | Although there is a personal profile, Company can enforce security measures across the entire device. | Company can enforce security measures across the entire device. |
| Data leakage risk | May be challenging to enforce on personal data. | Easier to enforce compliance with corporate standards. | Easier to enforce compliance with corporate standards. |
| Control over device | Company has full control over the work profile only. | Company has full control over the work profile and some control over the personal profile. | Company has control over the entire device. |
Table 1. Differences in the type of use
5.1.1 Enrolling mobile devices through QR code scanning
This method supports enrolling BYOD, COPE, and company-owned devices. For BYOD mode, the QR code is scanned using the Android Device Policy (ADP) app. For COPE and company-owned devices, the QR code is scanned during the Android initialization process after the device has been reset to factory defaults. Follow the instructions below for enrolling an Android mobile device through QR code scanning.
- From any dashboard in the NinjaOne console, click on the + sign at the top right of the screen.
- Select Device and then Mobile Device. The “Add a mobile device” dialog box appears.
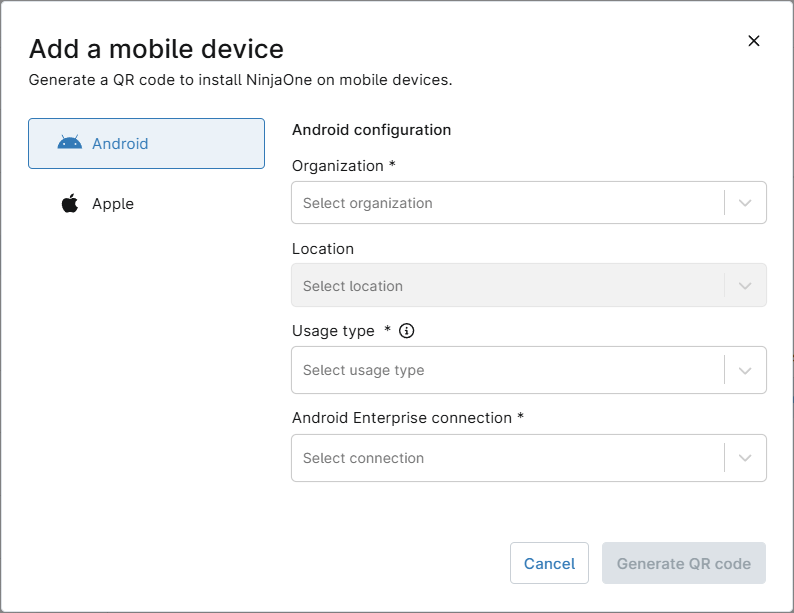
Figure 23. Add an Android mobile device dialog box. - On the left side, click on Android.
- Select the Organization and location.
- On Usage type, select For personal and work for BYOD and COPE. Select For work for company owned.
- On Android Enterprise connection, select the Android Enterprise connection corresponding to this company. (See Adding Android Enterprise connections to NinjaOne for reference.)
- Click Generate QR code.
A screen with the QR code appears, along with instructions to follow from the Android mobile device. Additionally, there are options to send the code by email or SMS.
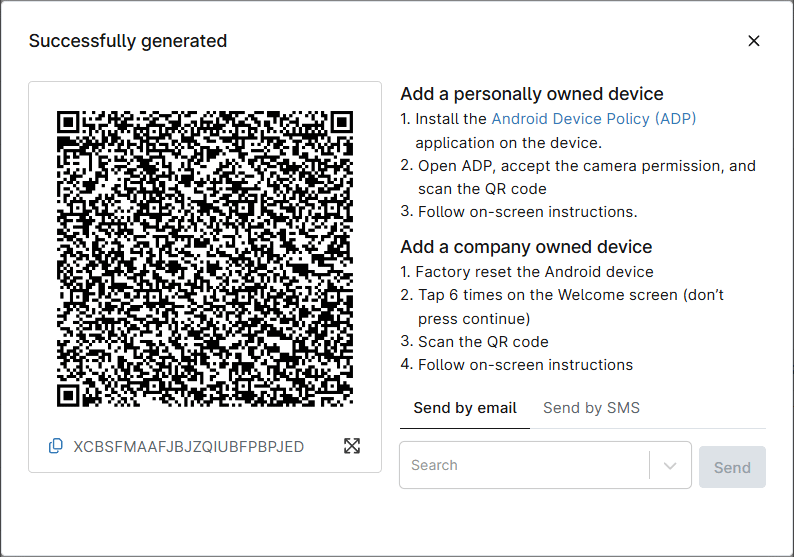
The remaining steps must be followed from the Android mobile device. Instructions vary depending on the usage type and they are shown in the screenshot above.
5.1.2 Enrolling Android devices through Zero-Touch Enrollment
Zero-Touch Enrollment (ZTE) is a technology that automates the device provisioning process. When a new device is powered on, it automatically enrolls into your MDM solution and applies the necessary configurations, without requiring manual intervention. This enrollment method leverages the Zero Touch Console, which is a portal designed for organizations to manage Android devices.
Here is how this method works:
- Device purchase and registration
When an Android device is purchased from an Android zero-touch reseller, the reseller adds the device’s IMEI or serial number to the organization’s Zero Touch Console. This links the device to the organization for automated enrollment. - Configuration creation
An IT administrator uses the Zero Touch Console to create and assign configurations to devices. These configurations contain all the necessary information to:- Automatically enroll the device in the NinjaOne platform.
- Assign a Company and location to ensure the correct policies are applied.
- Automatic enrollment
When the device is powered on and connected to the internet, it automatically retrieves its assigned configuration and enrolls into NinjaOne. There, it applies the relevant policies and installs applications, applying security measures, etc.
A company can obtain access to the Zero Touch Console for the first time through a process facilitated by an authorized Android Enterprise reseller approved by Google to sell devices with Zero-Touch Enrollment capabilities.
- Work with the reseller to register your organization for access to the Zero Touch Enrollment portal. Provide the reseller with the organization’s details such as company name, IT administrator contact information, address and business domain.
- The reseller will initiate the registration process, providing your organization with the necessary account setup and permissions.
- Once registered, an invitation to create an account and log into the Zero Touch Console will be sent from Google to the IT administrator.
Creating configurations in the Zero Touch Console
- Generate a QR code as indicated in section 6.1.1., using the Organization and Location you want for this configuration. Take note of the payload information, you can copy it and save it for later.
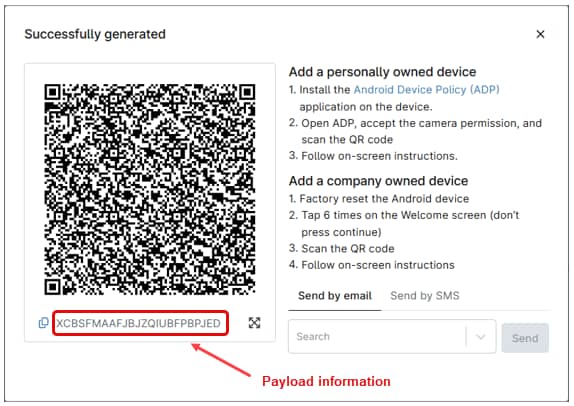
Figure 25. Android Payload information. - Login to the Zero-Touch portal.
- Click Configurations.
- Click +Add Configuration.
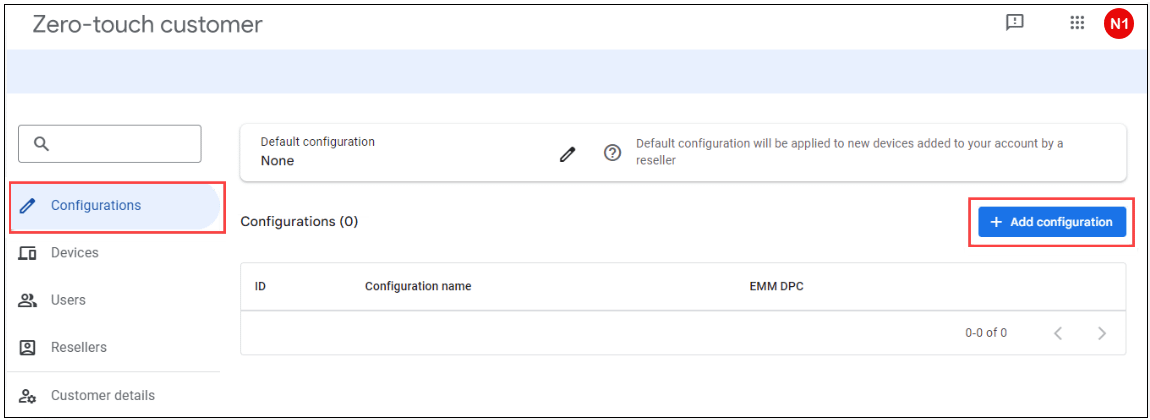
Figure 26. Zero touch portal: Add configuration. - Under name, type a name for this configuration.
- Under EMM DCP. Select NinjaOne from the drop-down.
- Under DCP extras, paste the payload information from the QR code generated on step 1.

Figure 27. Zero touch portal: Configuration details. - Continue filling out the company name, support email address, support phone number and a custom message. All this information will appear on the phone screen while it’s being enrolled.
- Click Add.
Assigning a default configuration in the Zero Touch Console
- Login to the Zero-Touch portal.
- Click Configurations.
- Click on the edit icon (the pencil) and select the configuration you want applied to new devices in the Default configuration panel.

Figure 28. Zero-Touch portal: Assign default configuration. - Click Save.
Note: If no default configuration is assigned in the zero-touch portal, new devices will not be enrolled in NinjaOne. Instead, they will remain in the zero-touch portal until a configuration is manually assigned, at which point they will be enrolled in NinjaOne.