Android Application Management refers to the Mobile Application Management (MAM) specific for Android devices. MAM is a set of tools and practices that allows IT administrators to securely control and manage applications on smartphones, tablets, and other mobile devices.
Android Application Management allows IT administrators to:
- Manage mobile devices as Bring Your Own Device (BYOD). In BYOD mode, Android app management can create a secure container on a device to isolate business data from personal data. Applications can be installed or rejected in the working container.
- Mange mobile devices as company owned, in which mode there is a full control of the mobile device, not just applications.
- Install, update, and delete apps on both company owned and BYOD devices.
- Control access to business data within apps.
- Delete cached business data from BYOD devices or completely wipe the device on company-owned ones.
How do I Enable Android App Manager in NinjaOne?
To be able to manage mobile devices and applications on Android mobile devices, there are two pre-requisites:
A. Enable NinjaOne MDM, if not already enabled (this enablement is for Android or Apple).
B. Enroll Android Enterprise for your company in NinjaOne. This enablement only needs to be done once and is typically done by the owner or administrator of the NinjaOne instance.
During this process, your organization will be enrolled in Android Enterprise (if not already enrolled), Android Enterprise is free and requires a Google account for sign-in and setup.
NinjaOne recommends creating a new Google account, preferably using an existing enterprise email or shared mailbox address. Public email accounts such as Gmail, Yahoo, or Hotmail are not permitted for this purpose.
Follow the next steps to achieve these two prerequisites.
- Go to Administration, then Apps, then NinjaOne MDM. The MDM configuration screen appears.
- Click Enable. Two tabs will appear.
- Select the Android tab.
- Click Enroll. This action will take you to the Google Play site for the Android Enterprise enrollment process.
- Follow the instructions on the Google Play site and fill out the information required by Google. Other required registration information will be automatically transmitted between NinjaOne and Google Play. Once this is done, select Complete Registration to return to NinjaOne.
- Now, Android Enterprise should appear as enrolled.
How do I Select if The Mobile Device is BYOD or Company-Owned?
Whether it’s a BYOD or a company-owned device, depends on the usage type selected during enrollment. Follow the next instructions for enrolling an Android mobile device in NinjaOne.
- From any dashboard, click on the + sign on the upper right of the screen.
- Select Device and then Mobile Device. A dialog box appears.
- Fill out you organization name and location.
- On Device Role select Android.
- On usage type select For Personal or work.
See the image below for reference.

After completing all the fields, click Generate QR Code. A QR code will be generated and used for the registration process. Please note that company-owned devices must be factory reset prior to the enrollment process.
Once Enrolled, How Can I Manage Applications on Mobile Devices With NinjaOne?
MDM policies are the way to manage applications in NinjaOne. Whether it´s a BYOD or a company-owned device, the policies have an Application section where you can make applications available for install, deny or force install applications. Follow the next instructions to automatically install Android applications in NinjaOne.
1. Go to Administration, then Policies, then MDM Policies.
2. Click Create New Policy.
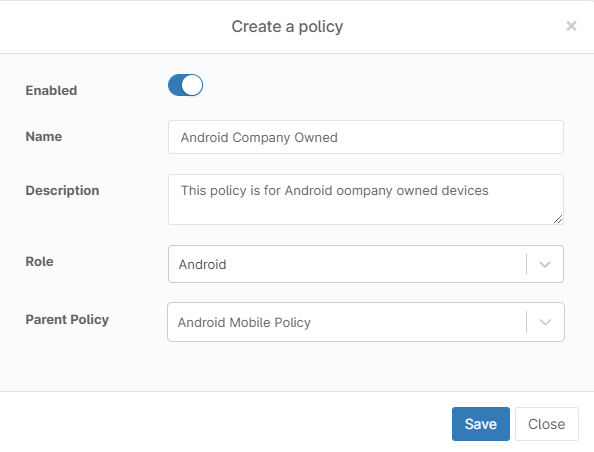
3. In Name, type the name of your choice for your policy, for example, “MDM Test Policy”
4. In Description, type the description of your choice, for example, “this is my first MDM Android Policy.”
5. Under Role, select Android.
6. Under Parent Policy, select Android Mobile Policy.
7. Click Save
(see below screenshot for reference)

8. The policy editor appears.
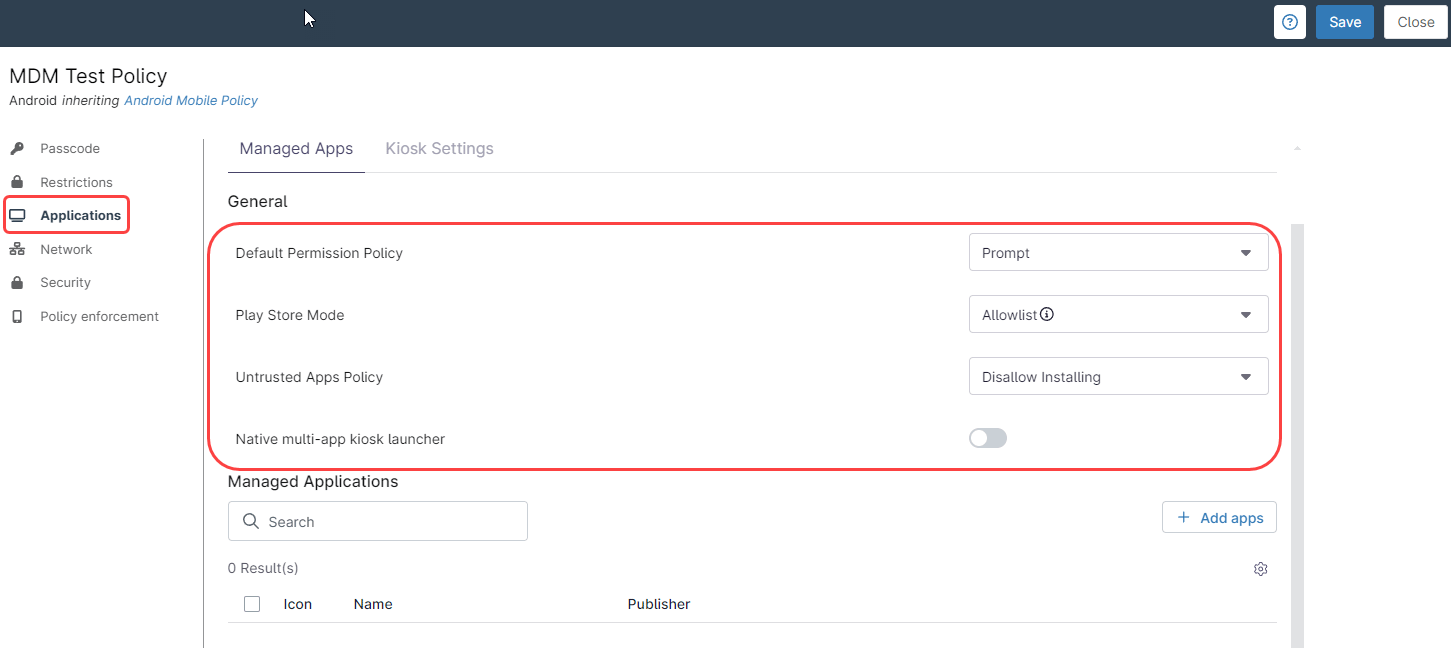
9. On the left side, select the Applications tab.
10. Fill out the General Application Settings as per the table shown below.
(See below screenshot for reference)
| Application Setting | Description |
| Default Permision Policy | When a new application is installed, certain permissions may be required to be set; this policy assigns a default response for permission requests. |
| Play Store Mode | When set to “Allowlist”, only the apps that have been approved will show in the Play Store—no other apps will display or be searchable. When set to “Blocklist”, the Play Store shows all apps available to the Play Store with the exception of apps that have been explicitly blocked through the policy. |
| Untrusted Apps Policy | If Play Store Mode is allowed, this policy controls which apps can be installed. |
| Native mule-app kiosk launcher | Toggle this switch to enable or disable the Kiosk Settings tab. |
11. Click add apps and select Play Store. The Play store screen appears.
12. Click on the desired application, then click on Select. The Play store screen disappears.
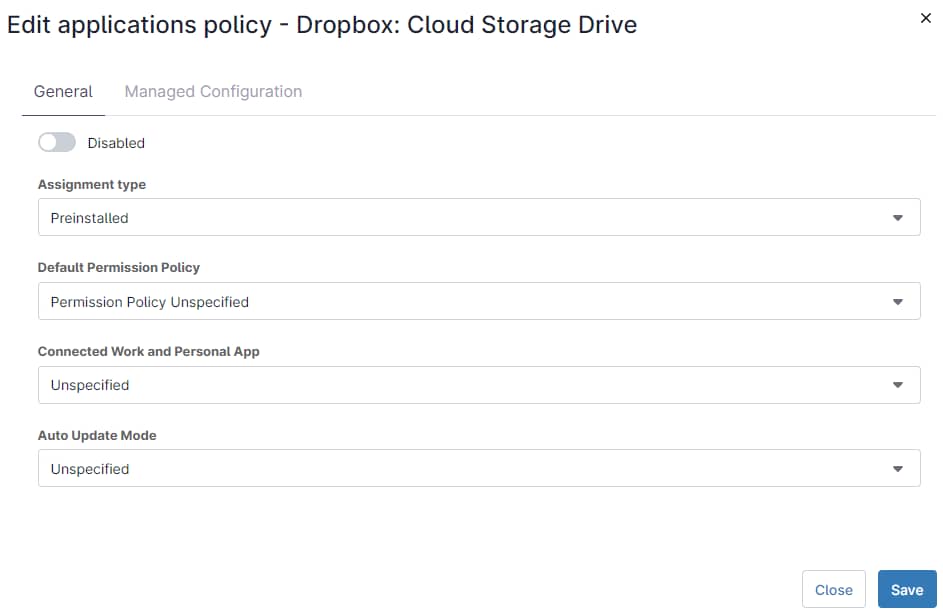
13. To edit the individual application settings, check the newly added app and click the blue Edit button. You can also click the dots at the right of the application and select edit.
(see below screenshot for reference)
14. Fill out the Application Assignment type, per the table below.
(see below screenshot for reference)
The Disabled button is for temporarily disabling the application when needed and keeping the setting untouched.
| Assignment Type | Description |
| Unspecified | Defaults to Available. (Not available for system apps). |
| Preinstalled | The application is automatically installed and can be removed by the device’s user. |
| Force Installed | The application is automatically installed and cannot be removed by the device’s user. |
| Blocked | Restricts the device’s user from using or installing the selected app.
If the app is already installed, this setting will uninstall it. |
| Available | The application is available for the device’s user to install it. (Not available for system apps). |
| Required for Setup | The application is automatically installed and cannot be removed by the user. Device setup cannot be completed until the application is installed. (Not available for system apps). |
| Single app Kiosk | The app is automatically installed in kiosk mode. It is set as preferred and allowlisted for lock task mode. Device setup cannot be completed until the application is installed.
After installation, users cannot remove the app. This assignment type can be selected for only one application per policy. When this is present in the policy, the status bar will be automatically disabled. |
15. Click Save.
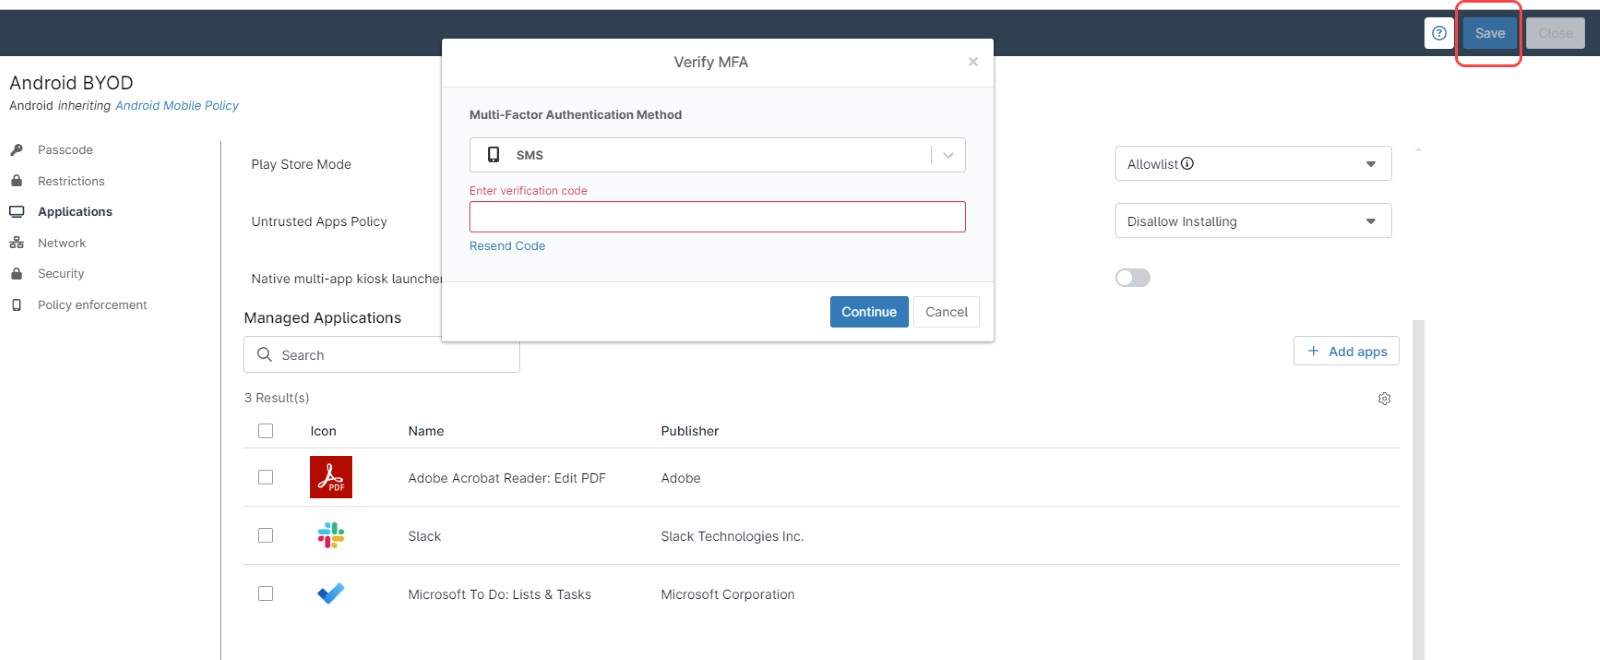
16. At this point, you can continue adding applications, once you´re done, click Save on the upper right side of the screen. Enter your MFA method response and close.
Strategy: Install Approved Applications in a Company-Owned Android Phone
Company owned devices require a stricter control regarding device settings and applications, and NinjaOne provides such control.
In this example we will provide instructions for setting up a company owned Android phone and we will create an MDM policy called “Android Company Owned”, and we will add some applications that will be automatically installed on the phone.
A. Follow the next directions to create the MDM policy:
- Go to Administration, then Policies, and then MDM Policies.
- Click Create New Policy.
- For Name type “Android Company Owned”.
- In description, type the description of your choice, for example, “this policy is for Android company owned devices”.
- In Role, select Android.
- Under Parent Policy, select Android Mobile Policy.
- Click Save
(see the next screenshot for reference)

8. The Policy editor appears.
B. Once the Policy has been created, use the following instruction to add approved applications:
- On the left side, select the Applications tab.
- Under Default Permission Policy, select Grant.
- In Play Store Mode, select Allowlist.
- Under Untrusted Apps Policy, select Disallow Installing.
- Keep the Native multi-app kiosk launcher option off (default).
- Click add apps and select Play Store. The Play store screen appears.
- Click on Adobe Acrobat Reader, then click on Select. The Play store screen disappears.
- Check the newly added app and click the blue Edit button.
- Under Assignment type, select Force Installed.
- Under Default Permission Policy, select Grant.
- Under Connected Work and Personal App, select Unspecified.
- In Auto Update Mode, select Default.
- Click Save.
- At this point, you can continue adding applications, once you´re done, click Save on the upper right side of the screen. Enter your MFA method response and close.
(see the next screenshot for reference)
C. Set the newly created policy as the default policy for your organization, for that, go to your organization´s dashboard and click edit, then:
- On the left side, select the Policies tab.
- On the right side, select the MDM policies tab.
- Under Android, select Android Company Owned from the drop-down menu.
- Click Save.
(see the next screenshot for reference)
D. Enroll an Android device to your organization:
Prerequisite, factory reset the Android device. Android version must be 9 or later.
- From any dashboard, click on the + sign on the upper right of the screen.
- Select Device and then Mobile Device. A dialog box appears.
- Fill out your organization name and location.
- Under Device Role select Android.
- Under usage type select for work.
- Click on Generate QR code. A screen with a QR code and instructions will appear.
- On your Android device, after factory reset and restart, tap 6 times on the Welcome Screen (don’t press continue).
- Scan the QR code.
- Follow the instructions on the Android device.
After a few minutes, the Android device will be ready to use and the apps we selected in step B will be installed automatically, and it will not be possible to uninstall them.
What Are the Advantages of Using NinjaOne For Mobile Application Management?
- Unified management
Mobile devices can be administered through the same unified console as all other endpoints.
- Cost savings
Strategies that simplify app management lead to considerable time and resource savings.
- Integration with Other Tools
The platform is designed to work in harmony with other security and helpdesk tools, creating a unified and more productive IT management environment.


