Enabling and Managing Windows Updates with NinjaOne

Keeping Windows devices up to date is essential for maintaining security, performance, and reliability across an organization. Regular updates deliver critical patches, new features, and stability improvements that help safeguard systems against vulnerabilities and ensure compliance with industry standards.

This guide provides step-by-step instructions on how to enable Windows updates using NinjaOne. It also explores best practices and the key benefits of using NinjaOne to automate and streamline update deployment across your IT environment.

How to Enable Windows Update in NinjaOne 

NinjaOne simplifies managing Windows Updates to keep devices secure and up-to-date. Follow these steps to enable and configure updates.

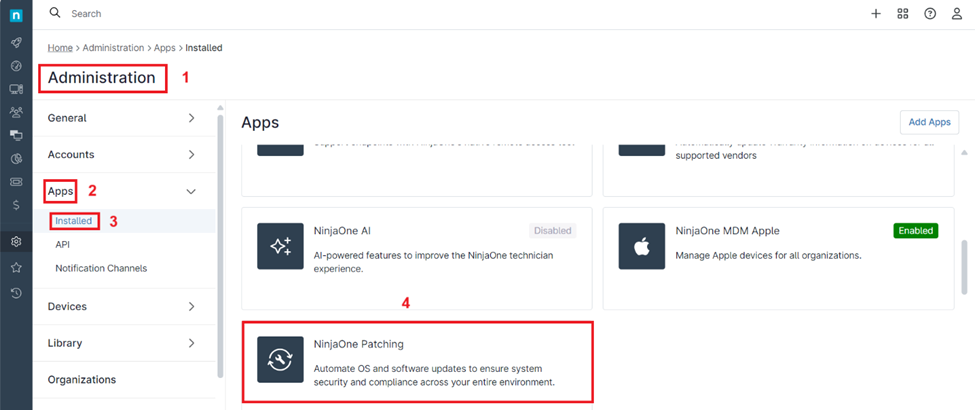
1. Verify that NinjaOne patching is activated by navigating to Administration > Apps > Installed > NinjaOne Patching.

Verify that NinjaOne patching is activated

2. Inside the NinjaOne Patching app, you can add a preemptive OS Patch Approval or Rejection by entering the KB number, providing a description, and selecting whether to approve or reject the update.

add a preemptive OS Patch Approval or Rejection by entering the KB number

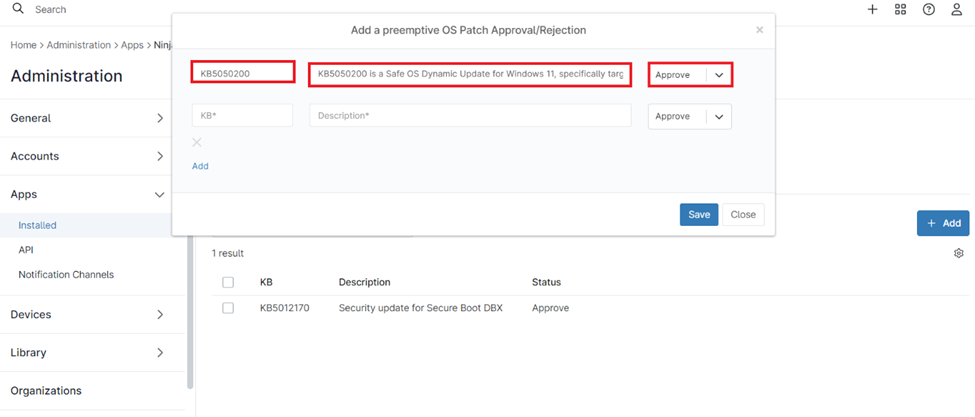
3. Click Add and then Save to confirm your settings.

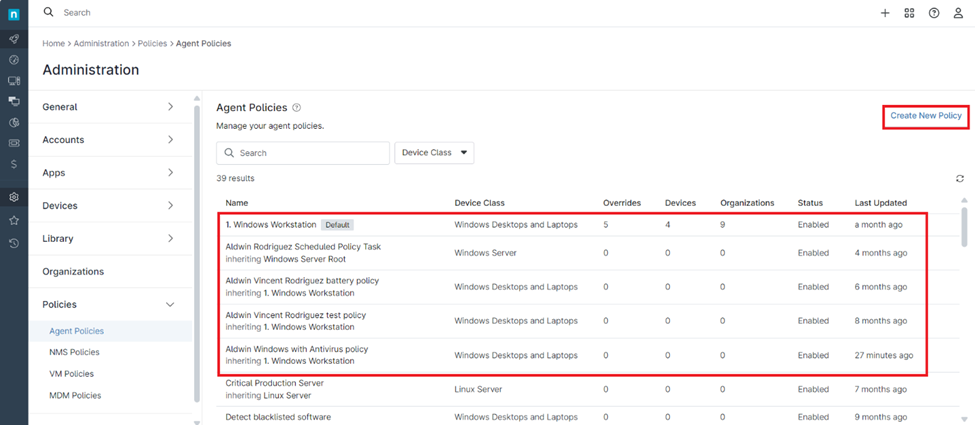
4. After specifying the desired KB patches and updates, proceed to Administration > Policies > Agent Policies to customize how NinjaOne manages Windows Updates.

Customize how NinjaOne manages Windows Updates

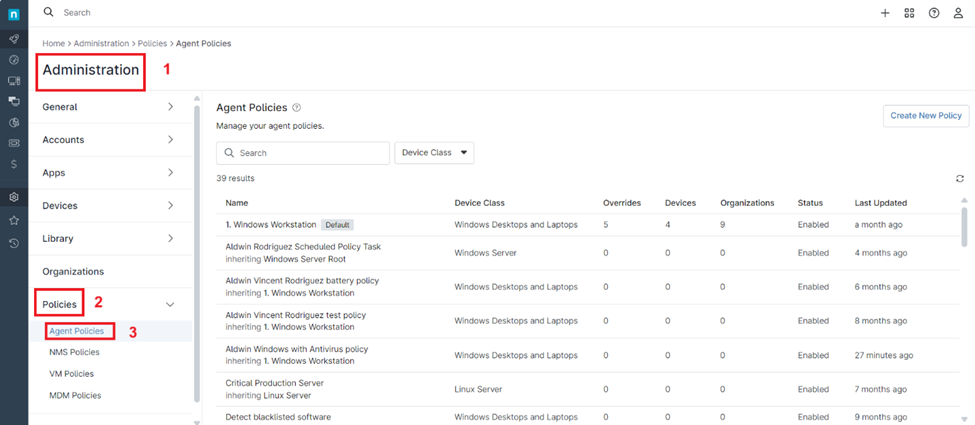
5. Create a new Windows policy or select an existing one from the list.

Create a new Windows policy or select an existing one from the list

6. In the Policy Editor, select Windows Patches from the menu on the left. Ensure that Windows Patching is Enabled and set the Mode to Configure Windows Updates. Under the settings, choose one of the following options:

a. Download recommended updates and install on a schedule.

b. Download recommended updates but allow the user to choose when to install.

c. Notify the user of recommended updates, but do not download.

d. Turn off Windows Updates.

Select Windows Patches

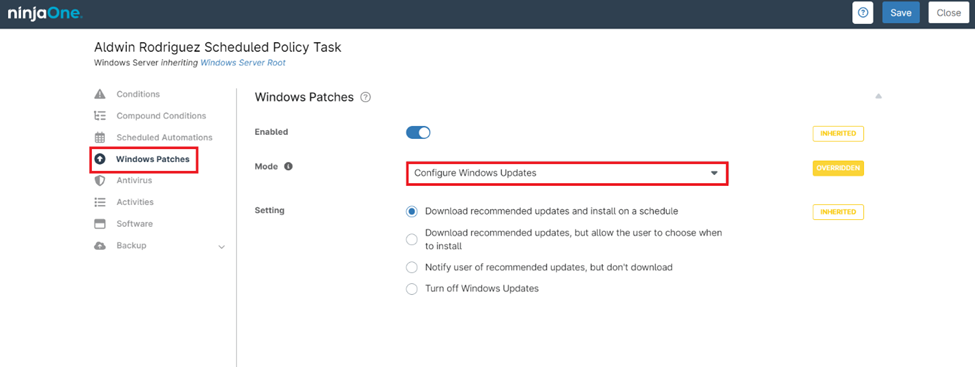
7. After finalizing your configurations, click Save and then Close to exit the Policy Editor.

Note: For the Windows Update configuration to take effect, make sure the policy is applied to the relevant devices or organizations.

The Benefits of Using NinjaOne for Windows Updates

1. Centralized Management

NinjaOne enables IT teams to manage updates for all devices from a single dashboard, eliminating the need for manual intervention.

2. Automation and Scheduling

Automate update rollouts with precision scheduling to reduce disruptions to end-users.

3. Scalability

Efficiently manage updates across hundreds or thousands of devices with NinjaOne, offering a flexible solution for enterprise environments.

Strategies for Managing Windows Updates with NinjaOne

1. Set Update Cadence Based on Business Needs

  • For critical systems, schedule updates during off-hours to avoid disruptions and ensure continuous operation.
  • For non-critical systems, configure frequent updates to maintain security and performance.

2. Leverage Reporting

Generate reports to audit update compliance and identify devices with outdated patches.

3. Group Devices Strategically

Create device groups based on roles or update requirements, allowing for targeted and efficient policy application.

FAQ

Windows Update is a service from Microsoft that automatically provides updates to the Windows operating system, including security patches, bug fixes, and feature enhancements, to keep devices secure and functioning optimally.

To enable Windows Update permanently, you can configure your system to automatically download and install updates. First, open Settings from the Start menu, then go to Update & Security and select Windows Update. Click on Advanced options and ensure that the Automatic Updates option is turned on. This will ensure that your system receives important security patches, bug fixes, and feature updates automatically without requiring manual intervention. Additionally, to prevent updates from being disabled, make sure your Group Policy settings are configured to allow automatic updates, and confirm that the Windows Update service is set to “Automatic” in the services management console.

In some scenarios, such as troubleshooting or maintaining a consistent update schedule, how to enable automatic updates in Windows 10 becomes essential for ensuring long-term security and performance without manual monitoring. This proactive approach saves time and guarantees that the system is always running the latest updates.

To enable Windows Update using the Command Prompt (CMD), first, open Command Prompt as an Administrator by searching for “cmd” in the Start menu, right-clicking on Command Prompt, and selecting “Run as Administrator.” Once the Command Prompt is open, type the following command and press Enter to start the Windows Update service:

net start wuauserv

This will activate the Windows Update service, allowing updates to be automatically downloaded and installed. To ensure that the Windows Update service starts automatically each time your system restarts, type the following command and press Enter:

sc config wuauserv start= auto

If you encounter a windows update error during this process, it may be due to conflicts with other services or corrupted system files. In such cases, you can run the Windows Update Troubleshooter or use the sfc /scannow command to repair any system file issues that might be preventing updates from functioning properly.

To enable Windows Update from the Registry, first press Windows + R to open the Run dialog, then type regedit and press Enter to open the Registry Editor. Next, navigate to the following path:
HKEY_LOCAL_MACHINE\SOFTWARE\Policies\Microsoft\Windows\WindowsUpdate. If the WindowsUpdate key doesn’t exist, right-click on the Windows key, select New > Key, and name it WindowsUpdate. Inside the WindowsUpdate key, right-click on the empty space, select New > DWORD (32-bit) Value, and name it EnableWindowsUpdate. Set the value of EnableWindowsUpdate to 1 to enable Windows Update. After making these changes, close the Registry Editor and restart your computer for the changes to take effect.

It is important to note that in some cases, such as when Bitlocker enabled after Windows Update, additional configurations may be required to ensure updates work properly with encryption services.

The main difference is that Windows Update is a built-in service that automatically delivers security and feature updates for Windows operating systems. In contrast, third-party patch management solutions offer more granular control, automation, and support for a wider range of applications, providing enhanced flexibility and advanced features tailored to enterprise needs.

×

See NinjaOne in action!

By submitting this form, I accept NinjaOne's privacy policy.