Integrating Single Sign-On (SSO) and System for Cross-domain Identity Management (SCIM) with NinjaOne offers a seamless authentication and user provisioning experience. SSO simplifies access to multiple applications using a single set of credentials, while SCIM automates user account management and synchronization across systems.
This integration streamlines user provisioning and access management by automating account creation and updates across systems. It reduces manual intervention, improving accuracy and efficiency, while also simplifying the management of user identities within the IT environment.
How to Setup SCIM and SSO Integration
Setting Up SSO in NinjaOne
Follow these steps to quickly enable SSO within the NinjaOne platform:
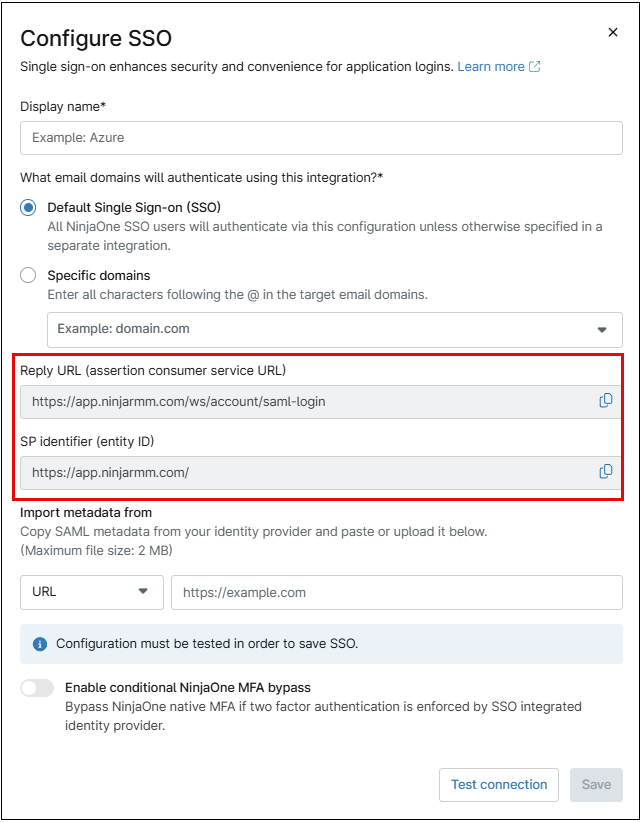
1. Navigate to Administration > Accounts > Identity Provider. In the top-right corner, click Add Provider.

You can also search for and filter existing providers using the available search and filter options.
2. Enter the display name, typically the email domain associated with this integration.
3. Enter the specific domain(s) for each SSO integration if you’re not using the default.
4. Copy the entity ID from NinjaOne and paste it into the corresponding field in the SSO provider’s settings. For Azure, this should be entered in the ‘Identifier (Entity ID)’ field. Repeat the process for the reply URL. Once done, click ‘Save’ to complete the configuration.
5. From the SSO provider (in this example, Azure), copy or download the SAML Signing Certificate.
6. Under ‘Import Metadata from:’, select ‘URL’ and paste the URL (or choose ‘File’ or ‘XML’ to upload the appropriate content). Then, click ‘Test Connection.’ If an error message appears, verify that the correct user has been assigned. If no user has been assigned, please assign one before testing the URL again.
7. After testing the connection, you may be prompted to log in. When the test succeeds, click Save, and on the resulting page, click Enable. Single sign-on will now be active.
“SSO for NinjaOne Technicians and End Users can be enabled by following the detailed steps provided in this link: Enable SSO – NinjaOne
Skip Multi-Factor Authentication (MFA)
Skip log in MFA will bypass NinjaOne MFA when SSO is in use. It will conditionally skip Ninja Login MFA based on evidence in the SAML response that MFA was performed during the user’s login via IdP. This ensures that the user is not required to enter MFA twice to access the NinjaOne console.
Notes:
- Only Entra ID (Azure) and Okta are supported
- If you are using a branded site you have to add both the native and branded URLs to your IdP’s ACS URL list – For example, https://<branding_hostname>/ws/account/saml-login
- We have not conducted full testing on other providers, and they are not currently supported by NinjaOne
Follow the steps below to configure skip MFA (the example uses Okta).
1. Navigate to Administration > Accounts > Identity Provider.
2. On the right side of the console, click Add provider (or edit an existing provider).
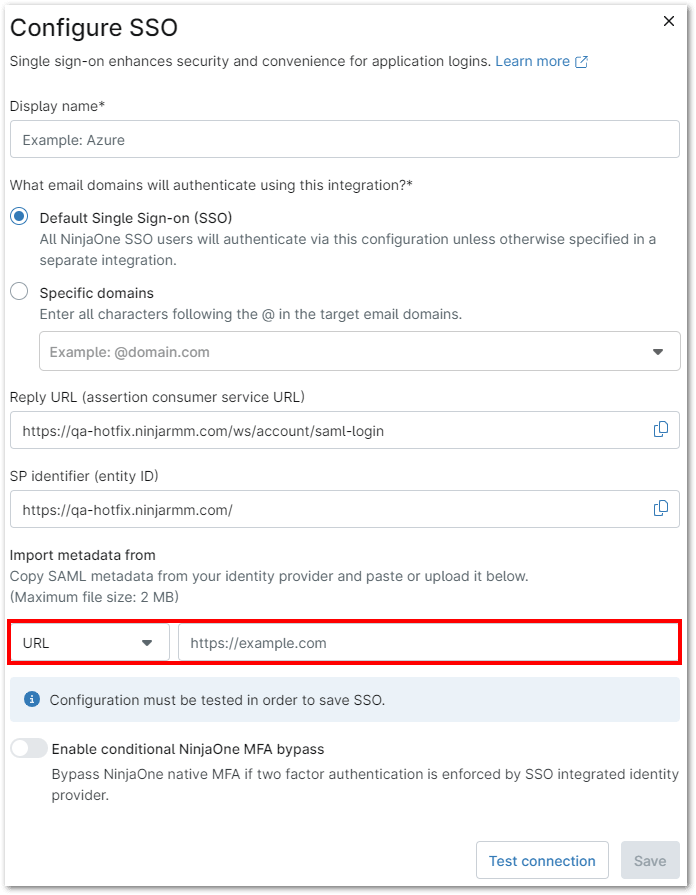
3. Copy SAML metadata from your identity provider (Okta in this case) and paste it or upload, depending on the format. (Refer to this page to find information on how to download the metadata for Okta)
4. Activate the Enable conditional NinjaOne MFA bypass toggle button.
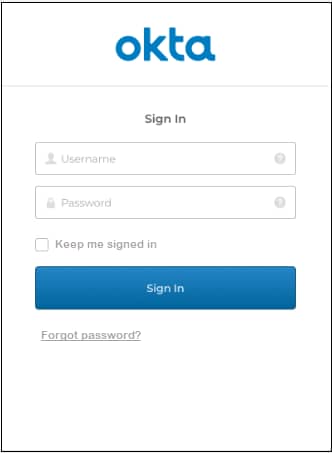
5. Click Test Connection. The Okta Sign In window opens requiring a Username and Password.
6. Enter your credentials and click Sign in.
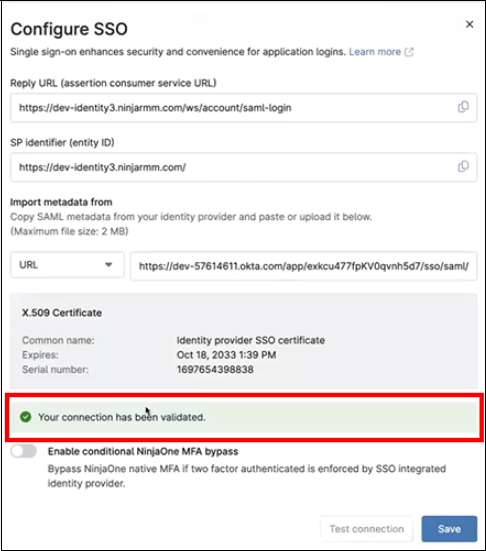
7. If prompted to receive a push notification, click to send. The Configure SSO window opens in the NinjaOne console indicating the connection has been validated.
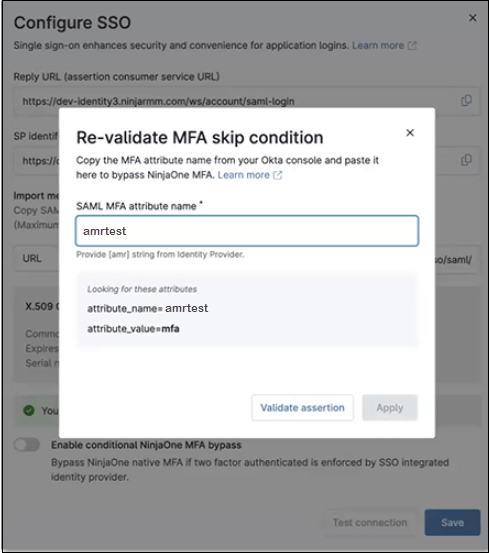
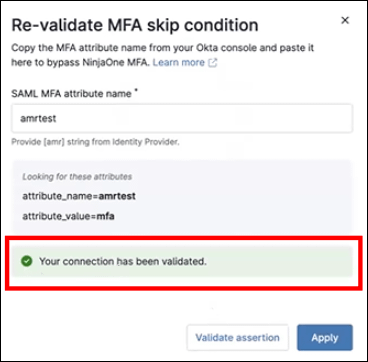
8. Toggle on the Enable conditional NinjaOne MFA bypass. The Re-validate MFA skip condition window appears (This may be automatic with Azure if the value is immediately identified).
9. Enter a name in the SAML MFA attribute name (amrtest in this case).
10. Click Validate assertion. If the connection shows validated, click Apply and then Save.
Once it is enabled, you can see this under Administration > Accounts > Identity Provider section of their Ninja UI:
Note: This does not override MFA for administrative tasks throughout NinjaOne. Customers may still be prompted for MFA depending on their actions within the NinjaOne UI.
For security purposes, even with SAML enabled, MFA will still be required for all high-risk transactions. (Anything that can be destructive i.e., changing policies, editing a script, etc.)
Configure SCIM:
After enabling and configuring SSO in NinjaOne, enable SCIM provisioning to automate user provisioning, deprovisioning, and access rights management.
Important Note:
- The following instructions have been confirmed to support Entra ID and Okta only. However, if your IdP supports SCIM, these instructions should still provide comprehensive guidance when followed correctly. Please note that on-premises Active Directory is not supported with this configuration. If using a hybrid SSO setup, ensure it is thoroughly tested before activation in NinjaOne.
- A Microsoft Entra ID Enterprise Application in Microsoft Azure is required.
1. Navigate to Administration > Accounts > Identity Provider and toggle on ‘Enable SCIM provisioning’ in the SCIM section.
2. Enter the MFA code and click ‘Continue’ to enable the Identity Provider.
3. Generate the SCIM secret token.
4. In your Microsoft Azure Enterprise Application, go to Manage > Provisioning and click ‘Get Started.
5. Copy the tenant URL and Secret token from NinjaOne, then paste them into the Azure provisioning configuration.
Note: The URL is the SCIM API endpoint, formatted as https://{tenant-hostname}/ws/scim/v2, where {tenant-hostname} is your tenant’s native hostname (e.g., app.ninjarmm.com, eu.ninjarmm.com).”
6. Test the connection to verify it is successful.
7. Expand the Mappings section and click Provision Azure AD Users.
8. Configure the following attributes and delete all unused ones.
| Azure Active Directory Attributes | customappsso Attribute |
| userPrincipalName | userName |
| Switch([IsSoftDeleted], , “False”, “True”, “True”, “False”) | active |
| emails[type eq “work”].value | |
| givenName | name.givenName |
| surname | name.familyName |
| mailNickname | externalId |
9. Select “Show advanced options” and click “Edit attribute list” for customappsso.
10. Add a new attribute with the following details and click Save:
- Name: urn:ietf:params:scim:schemas:extension:ninjaone:2.0:User:organizationId
- Type: String
- Required: Yes Leave other options blank.
11. (Optional) If you plan on creating technicians, then also create the following attribute:
- Name: urn:ietf:params:scim:schemas:extension:ninjaone:2.0:User:userType
- Type: String
- Required: Not selected
12. After adding the attribute, select “Edit” for attribute
urn:ietf:params:scim:schemas:extension:ninjaone:2.0:User:userType
13. Select the mapping type (constant, direct, or expression).
Note: To create both end users and technicians, use the expression mapping type. For help, see the Reference for writing expressions for attribute mappings in Microsoft Entra Application Provisioning – Microsoft Entra ID.
14. To create the custom attribute that defines the End User’s organization, click Add New Mapping.
15. Map End Users to their NinjaOne organization ID, found under Administration > Organizations. Hover over the Actions ellipsis and select “Copy Org ID.”
Important Note:
- In most situations you will want to use expressions to dynamically assign users to their correct organization.
- To create global end users, use all as the user’s organization ID.
16. The target attribute: urn:ietf:params:scim:schemas:extension:ninjaone:2.0:User:organizationId.
17. Click Ok, and then click Save.
18. Return to Provisioning, turn on the Provisioning Status, and then click Save. Users will now be provisioned in NinjaOne automatically.


