
In NinjaOne, user roles and permissions determine the level of access and permissions granted to individuals within the platform. These roles are essential for maintaining security by ensuring that users have access only to the areas and functions they need. NinjaOne categorizes accounts into three main types: System Administrators, Technicians, and End Users.
System Administrator. Their main role is to design, configure, and maintain the NinjaOne platform. They have access to the full system, including branding, the threats dashboard, and user administration, these permissions can never be edited in any way.
Technicians. Their role is to monitor and manage endpoints for optimal performance and security configuration using NinjaOne platform features and solutions. Technicians are limited to the actions and devices they manage based on permissions assigned by a System Administrator. By default, they have no permissions for any part of the system, the System Administrator assigns them. Even when a technician has full system permissions, they don´t have access to the system branding, the threats dashboard, and technician administration.
End Users. These are users who are allowed by the Administrator or technicians to perform backup and restore operations, access Service Desk ticket functions, and/or control remote access to designated devices only. By default, they have no permissions for any part of the system, the permissions are assigned by the System Administrator or a technician with permissions to do so.
What permission can be assigned to the different account types in NinjaOne?
End-user roles can have permissions for:
- Connections. This permission grants access to remote control devices.
- Backup. This permission is to allow the restoration of files from devices with backup enabled.
- Ticketing. This permission grants access to the ticketing system.
Technician roles can have permissions for:
- System. This permission controls access to 25 different NinjaOne system features, for instance, manage reports, uninstall software, uninstall patches, manage backups, manage apps, create device groups, etc.
- MDM Connections. Specify the access that technicians will have to manage MDM connections
- Organizations. Specify the access that technicians will have to each Organization
- Devices. Specify the access that technicians will have to devices, like secure fields, remote tools, remote access, create new devices and device roles.
- Policies. Specify the access that technicians will have to each Policy.
- Automation Library. Specify the access that technicians will have to each automation category.
- Ticketing. Specify the access that users will have to Ticketing.
- Documentation. Specify the access that users will have to Documentation.
- Services Automation. Specify the ability to configure and access Service Automation features.
How can permissions be assigned to a technician or end user?
There are two ways to assign permissions: individually (or explicitly) and by role.
Every user has a property editor, where general information can be entered, and permissions and roles can be edited too. The user permissions can be assigned individually or by role.
See the following screenshot showing the technician property editor. This editor appears when a new technician is created.
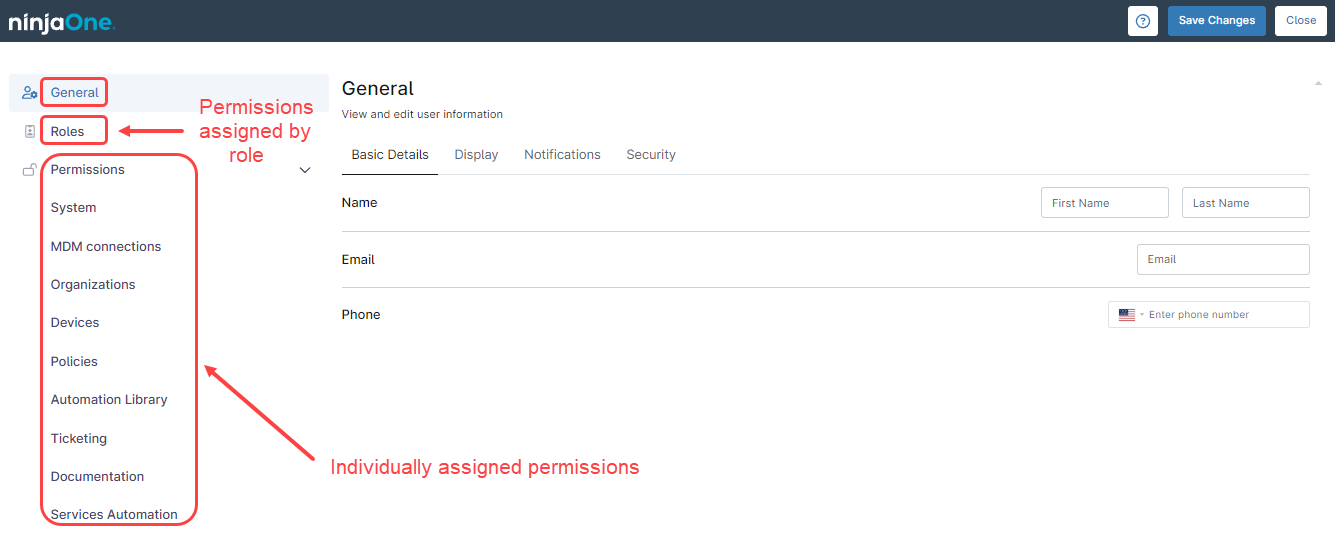
When permissions are assigned individually, each user is explicitly assigned permissions for each part of the system. When permissions are assigned by role, the user is granted the permissions granted to the role itself. It is important to note that when the permissions are assigned by role, this overrides individual permission assignments.
It is a best practice to assign permissions by role, rather than individually, see below why this kind of assignment is considered better:
- Consistency and Standardization: Roles help ensure that permissions are consistently applied across all technicians in the same job function. This reduces the risk of errors or oversights that might occur if permissions were set individually.
- Efficiency and Scalability: Managing permissions by role is much more efficient, especially as your team grows. Instead of configuring permissions for each technician individually, you can set them once for a role and then assign that role to multiple technicians. This makes onboarding new technicians faster and easier.
- Easier Maintenance: When permissions need to be updated (e.g., when a new tool is added or security requirements change), you only need to update the role, not each individual technician. This simplifies ongoing maintenance and reduces the chances of discrepancies.
- Security: By using roles, you minimize the risk of inadvertently granting unnecessary permissions. It is easier to audit and control access when roles are clearly defined and managed, which enhances overall security.
- Clarity and Understanding: Roles provide a clear understanding of what each technician is allowed to do based on their job function. This clarity helps both the technicians and administrators know what to expect, reducing confusion and potential mistakes.
- Compliance and Auditing: If you need to comply with certain regulations or need to audit who has access to what, roles make it easier to demonstrate compliance. You can quickly show that certain roles have specific permissions, which align with your compliance requirements.
Overall, role-based permissions streamline the process of managing access controls, making it more organized and secure.
It is important to note that a user can be added to multiple roles, in that case, the most permissive role takes precedence.
Strategy – Create a Windows Administrator technician role
In this example, we will create a Windows Administration technician role, with permissions limited to only Windows devices. We will start by creating a technician role from the full permissions template, and then we will remove all unrelated permissions.
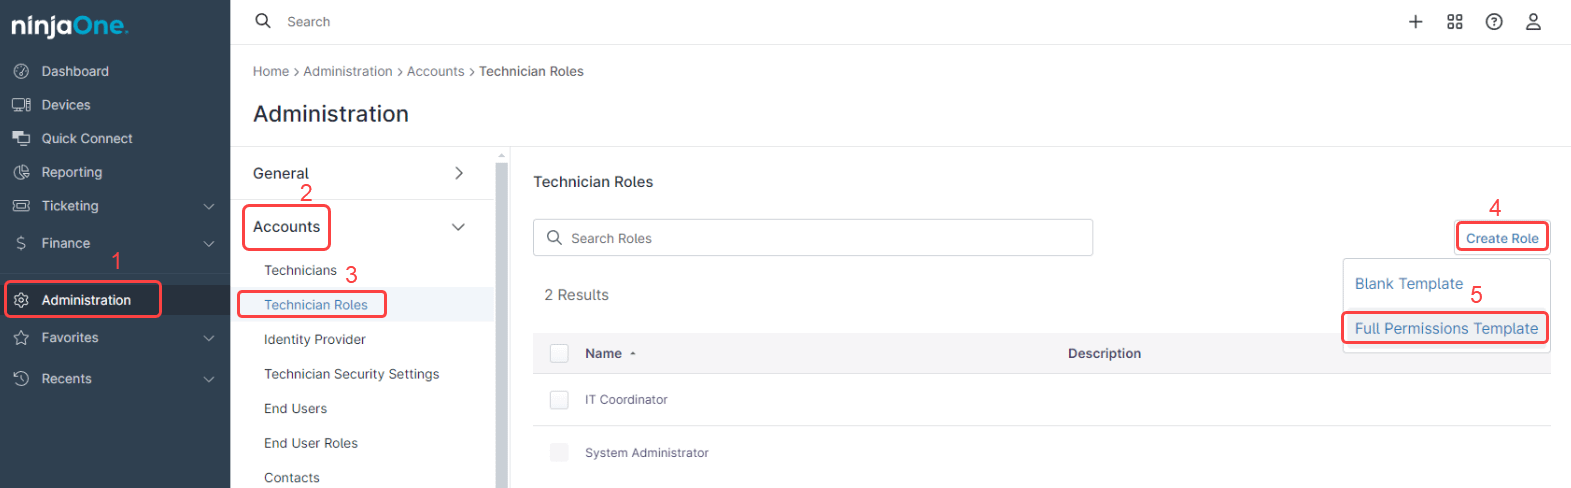
1. Navigate to Administration, Accounts, and then Technician Roles.
2. Click Create Role.
3. From the drop-down, Select Full Permissions Template.
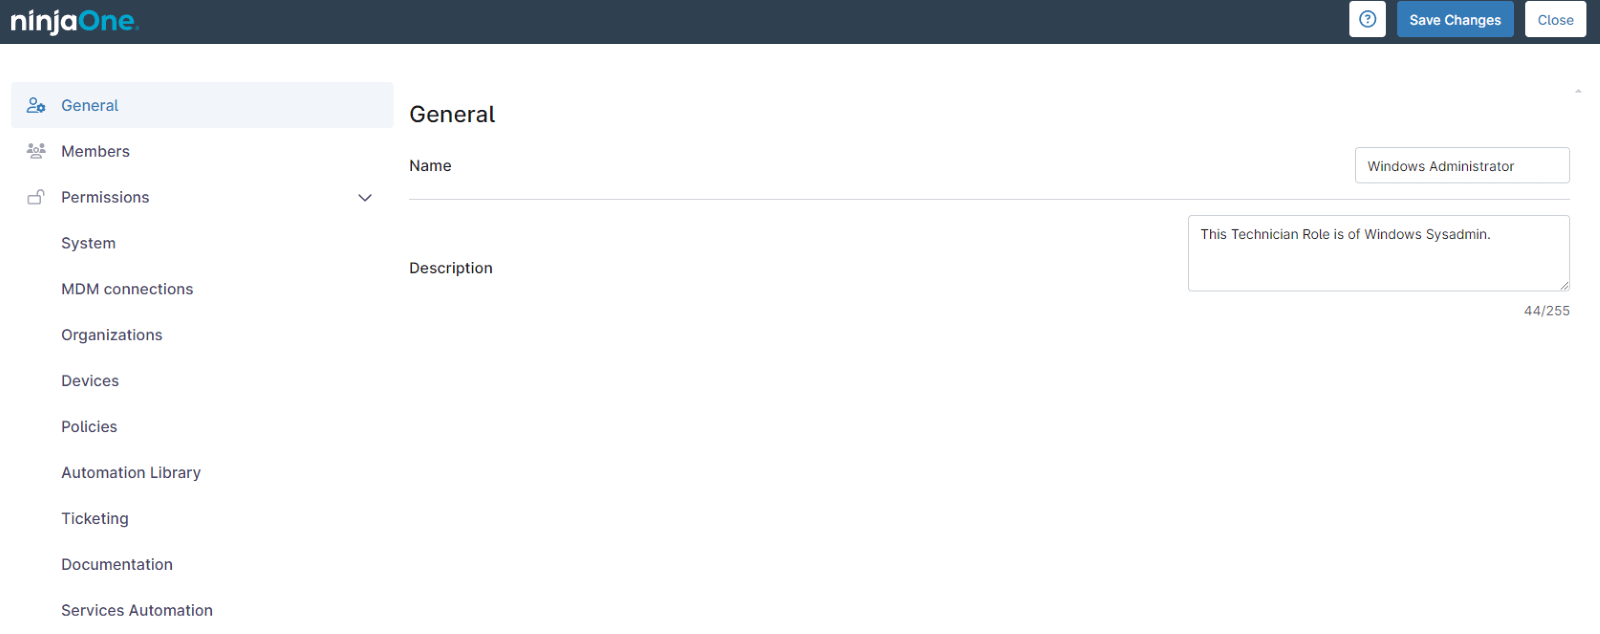
4. The Technician role editor appears. Fill in the General information: Role name and description. For this example, the role name will be Windows Administrator.
5. Go to the MDM connections tab. Set the MDM connections to switch to the Disabled position.
6. Go to the Devices tab. Scroll down to Default Access and set to No access to all device roles except Windows Desktops and Laptops, Windows Server, and Hyper V VM Host. Access to Hyper V VM Guest and VMware VM Guest may be enabled if you prefer.
7. Go to the Policies tab. Select all non-Windows related policies, then click Edit Permissions, from the drop-down, select No access, then click Apply. Make sure that after this action, all Windows-related policies have View, Update, and Delete permissions.
8. Click Save Changes in the upper right corner. Enter your MFA method response and click Continue.
9. Click Close in the upper right corner.