
Software Installation and Software Deployment
Software installation is the technical process of placing a program or software onto a specific device and preparing it for use. This involves copying files, configuring settings, and ensuring the software runs correctly on the device. Typically, the task is performed by the user or IT department on individual endpoints.
However, as the number of endpoints grows, software installation becomes more time consuming, requiring a more efficient approach. This approach, known as software deployment, involves planning, preparation, distribution, installation, configuration, testing, tracking and maintenance of software across multiple devices within an organization.
Automated software installation plays a crucial role in software deployment. Even without a formal deployment strategy, automating installations significantly reduces effort and minimizes human errors.
What are the typical file formats used to install software?
An installation file format is a specific type of file used to install software on a computer or other device. These files contain the necessary data, scripts, and instructions to set up and configure the software on a target system. The most common installation file formats are listed below.
- MSI. MSI Stands for Microsoft Software Installer. It refers to a specific file format and technology used to install and manage software on Windows operating systems.
- AppX. It´s a Windows application package format introduced by Microsoft for Universal Windows Platform (UWP) apps. It´s used to distribute, install, and update apps on Windows 8, Windows 10, and later versions.
- EXE. Stands for Executable file, commonly referred to as a “.exe” file. It is the most common type of executable file format on Windows operating systems.
- PKG. File format used for software packages on several different platforms and devices. It´s used on Mac devices amongst others.
- DMG. Refers to Apple Disk Image files, it’s not technically “software” itself, but rather a container format used to distribute software on macOS systems.
- RPM. File format used for RHEL, CentOS and Fedora Linux distributions.
- DEB. File format used for Debian-based Linux distributions like Ubuntu.
Can I install software with NinjaOne?
Yes, NinjaOne is an excellent tool that provides the ability to perform automated software installation, centralized management, and a user-friendly interface.
Can NinjaOne install software on Windows devices?
Yes, NinjaOne can install software on Windows endpoints. The file formats supported are EXE and MSI.
Can NinjaOne install software on Mac devices?
Yes, NinjaOne can install software on Mac endpoints. The file formats supported are DMG and PKG.
How do I install software for my endpoints with NinjaOne?
Here are the steps required for installing software using NinjaOne.
- Create an installation package.
- Submit the installation package using one of the following methods.
- On demand to one or multiple endpoints.
- Using a scheduled task.
- Using a Policy.
How do I create an installation package to use with NinjaOne?
Follow the steps below to create an installation package in NinjaOne.
- Download the installation executable file from the distribution point. This executable must be capable of doing a silent and unattended installation.
- Investigate the installation options. Check the software documentation to see if/what command line parameters (or switches) are required for the silent and unattended installation, like language, silent option, suppress messages, etc.
- Test the installation file manually on a target computer. Make sure the installation runs silent, and unattended. Adjust the switches, if necessary, until the installation is as expected. Take note of the command line switches or parameters, since they will be needed later.
- Create an automation in the NinjaOne library using this package.
Strategy: Create a NinjaOne automation to install software from scratch
The best way to illustrate this strategy is using an example. In this example, we will create an automation to install the Foxit PDF reader software on a Windows endpoint.
The first step is to download the installation file from this link.
Once the installation file (an .EXE file in this case) is downloaded to your Downloads folder, open a command prompt window, navigate to the Downloads folder, and run the following command:
FoxitPDFReader20243_enu_Setup_Prom.exe /?
(This will display the available command-line switches.)
A pop-up window will appear showing the different command-line options. From the list, select the following options:
- /SP
- /VERYSILENT
- /SUPRESSMSGBOXES
Next, let’s test the installation by manually running the following command:
FoxitPDFReader20243_enu_Setup_Prom.exe /SP /SUPRESSMSGBOXES /VERYSILENT
After running the command, the installation should proceed silently and without interaction, confirming that the process is successful.
Finally, upload the installation file to NinjaOne. Follow the steps below to complete this process:
- Navigate to Administration > Library > Automation.
- Click the +Add button on the right of the screen and select Installation from the drop down that appears. The Install Application dialog box appears. See the next screenshot for reference.
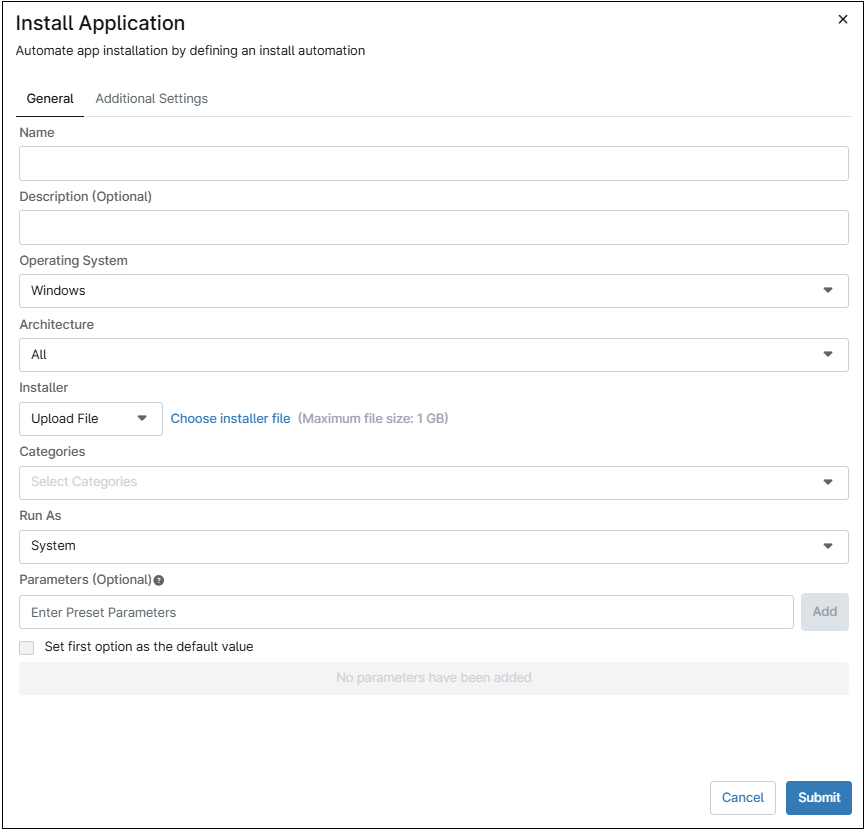
Let’s dive into each field and explain what they mean.
Name: A name to identify this installation package.
Description: A brief description of what this installation package does, this is optional.
Operating system: The operating system this installation package is intended for.
Architecture: Some installation package distributions are 32-bit or 64-bit specific, if this is the case, choose accordingly, if not, then choose “All”.
Installer: this is where the installation executable file is uploaded. Choose the installer file to be used, this can be from your computer or a URL.
Categories: This is the category given to this package, this is used to allow or deny technicians to see it and run it. Run script permissions are provided to technicians per category in NinjaOne.
Run as: The user account used to submit the installer. Normally, choose “System.”
Parameters: The command line switches or parameters required for the installation, we will type here exactly what will be appended to the executable file in the command line. For our example, it will be /SP /SUPRESSMSGBOXES /VERYSILENT
On the “Additional Settings” tab we have more options.
Helper files: Additional files that the installer may need to run.
Installer icon: An optional icon used to identify this installation package.
Pre-script: Some script that may be needed right before the installation.
Post-script: Some script that may be needed after the installation takes place. Note that this script will be skipped if the installation package fails to install.
Check the software documentation to see if any of the above options are required, for our example case, they are not.
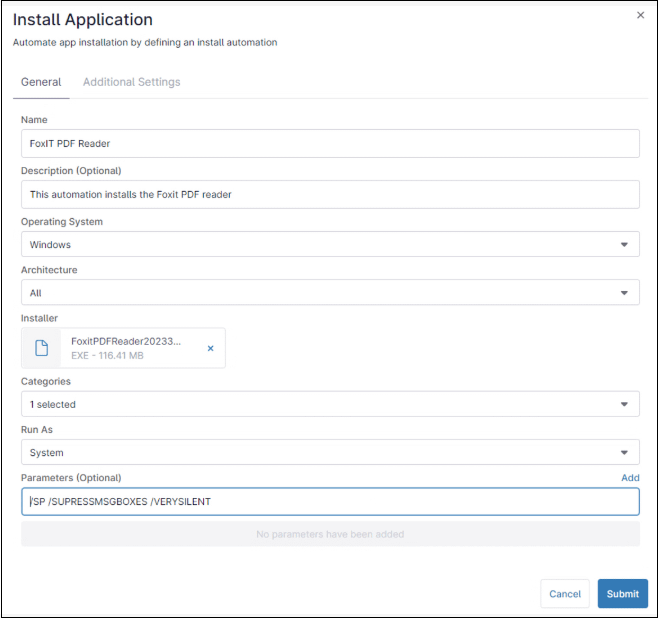
Fill out the required fields and click the Submit. After entering the MFA method response, the new automation will be sent to the malware scanner for review, which may take a few minutes. After successful scanning, the new automation will be available in the Automation Library. The next screenshot shows the options used for our example.
How do I Submit the installation package on demand to one or multiple endpoints?
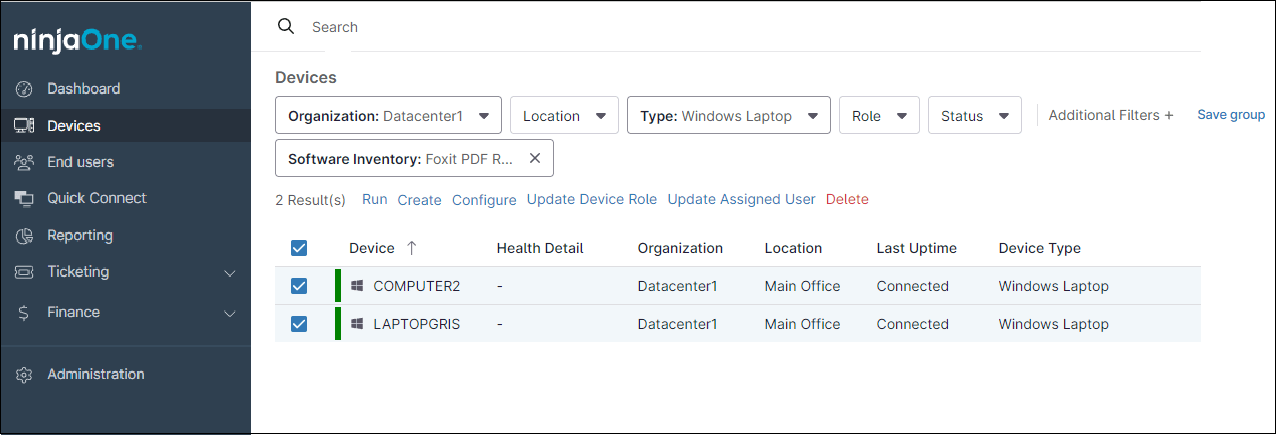
To easily explain how to submit the installation package to one or several endpoints. Let´s illustrate this with an example. Find all Windows Laptops in the Datacenter1 organization without Foxit PDF reader installed. Then, launch the installation on the target endpoints that meet the criteria.
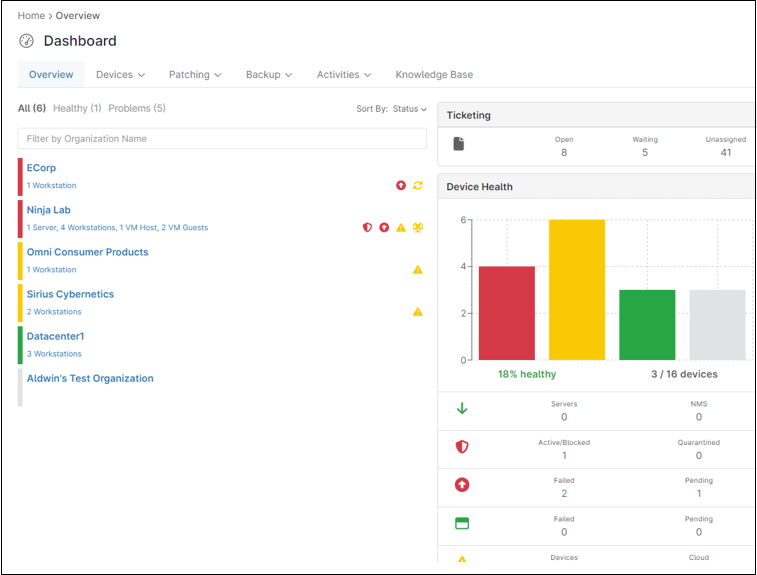
The next screenshot shows an overview of the system dashboard used for this example.
Now, follow these instructions.
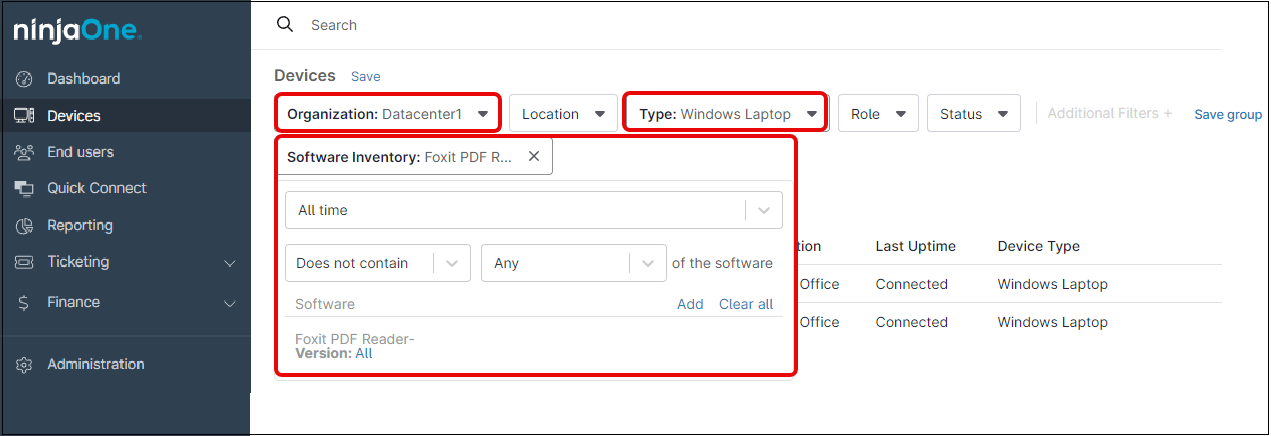
a) Go to the devices dashboard and start applying filters.
For our example, we will select:
Organization: “Datacenter1”.
Type: “Windows Laptop”.
Then, go to More filters and select Software Inventory. A dialog box will appear.
In the Software Inventory dialog box select “Does not contain,” then “Any,” and then under Time span, select “All time”.
Add software “Foxit PDF Reader” (at this point, the Foxit PDF Reader installation package must be in the Automation Library). After applying the filters, the list will be narrowed down to only the devices meeting the criteria, which in this case is two.
b) Select the target device(s) by placing a check mark next to them.
c) From the blue ribbon select Run, then Run Automation and then Install Application. The Automation Library will appear.
d) Find the desired installation package, which in this case is “Install Foxit Reader.”
e) Click on the application to install. A dialog box will pop up with the name, description, system account (Run As) and Preset Parameter to use for installing the package.

f) Fill out the dialog box accordingly and click on Run. Then, respond with Yes or No to confirm your action.
Please note that in case of any of the endpoints being offline, the installation will be queued and it will be applied when the device comes back online.
How do I Submit the installation package to a group of endpoints using a scheduled task?
In NinjaOne, you can use filters to select a set of endpoints that meet specific criteria—for example, Mac computers that lack a particular software. You can then save this selection as a group. Afterward, you can create a scheduled task to deploy the installation package to this group at a defined interval. This allows for fully automated software installation without human intervention.
Let’s illustrate this with an example. Create a computer group for Windows laptops in the Datacenter1 organization that do not have Foxit PDF Reader installed. Then, set up a scheduled task to run once a day and install Foxit PDF Reader on that group.
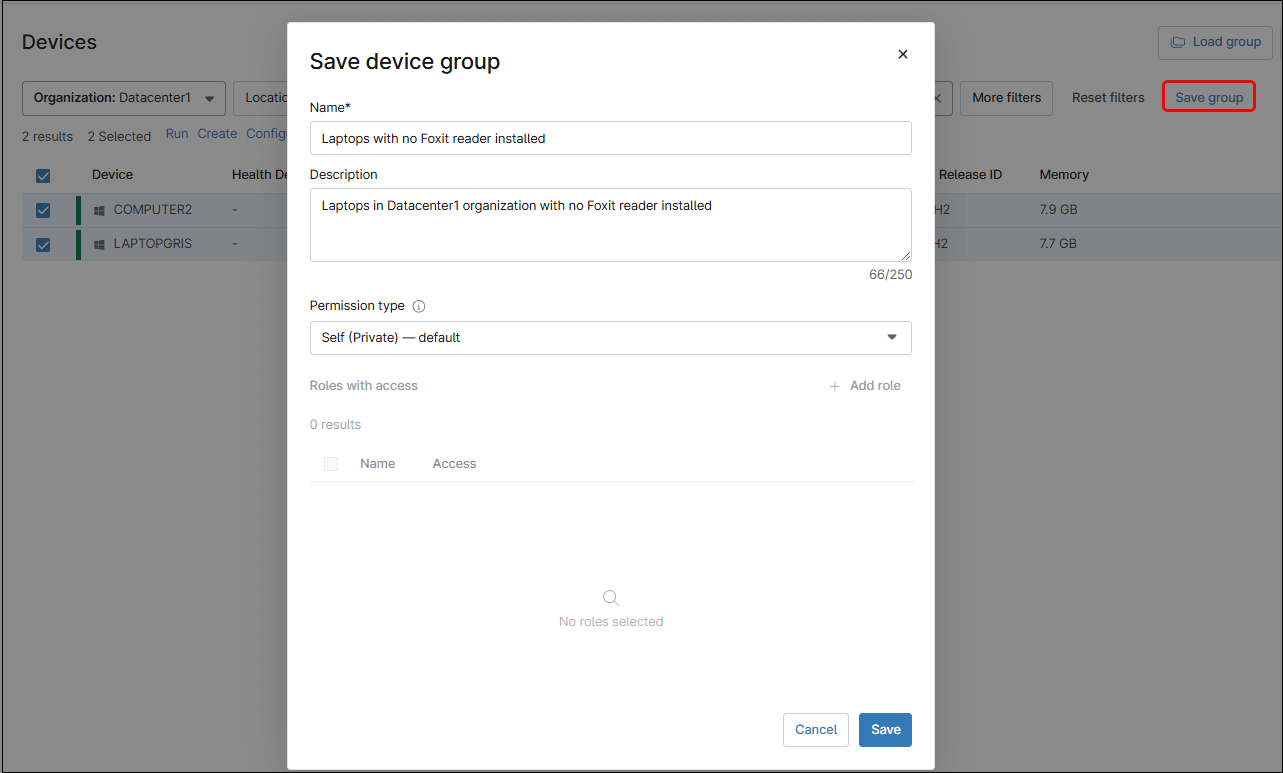
In our previous example, we used filters to narrow down the endpoint list. We will continue using the same filter in this section. This time, however, we will save it as a group called “Laptops with no Foxit installed.”
To do this, click Save group, as highlighted in red in the screenshot below. Then, fill in the group name, description, and permission type, and click the Save blue button.
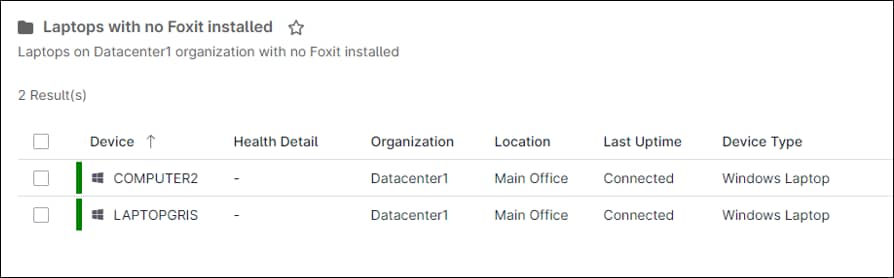
The new group will appear along with its member devices. Note that this group, like all other device groups, is dynamic. This means that if additional devices meet the criteria—or if existing ones no longer meet them—the group will update automatically.
Now that we have the group ready, let´s create the schedules task that will be applied to this group.
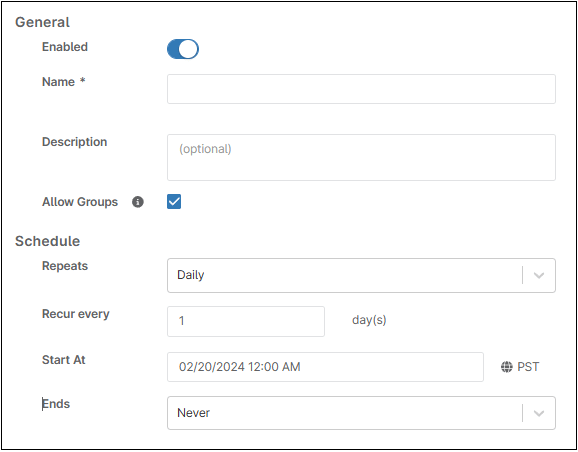
a) Navigate to Administration > Tasks, then click New Task.
b) Fill out the general task details per the example description to create the schedule. Make sure to checkmark Allow Groups.
Next, click Add on the right side of the screen to add automation. Search for “Install Foxit PDF Reader” and when the desired automation appears, click on it. A dialog box will appear, fill out the fields as in the previous section and click Apply.

c) Go to the Targets tab and click Add to create the target list. A dialog box will appear. Select Group in the first place, then search for our previously created group “Laptops with no Foxit installed” select it with a checkmark and click Apply.
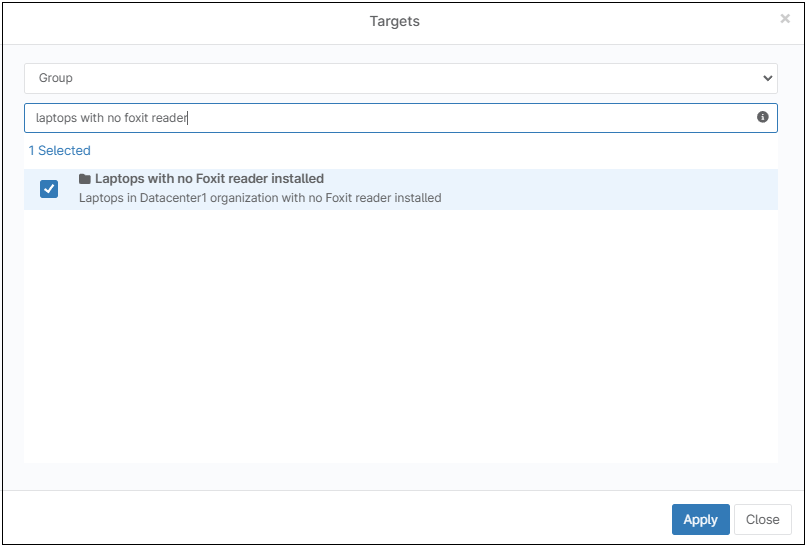
Then save, enter your MFA method answer and close.
One important thing to note here is that offline endpoints will not be installed or queued. This is a limitation for this method.
How do I Submit the installation package using a policy?
By using a policy, NinjaOne can run automations when a condition is met. We can add a condition to an existing policy, for instance, “Windows Workstations,” but we can also narrow down our target device list by creating a new policy inherited from “Windows Workstations,” add the condition, and apply it only to the target devices that need this software installed.
Let´s get back to our example of installing Foxit PDF reader on just laptops for Datacenter1 workstations. Since there are no policies affecting just to Windows laptops, let´s create a new policy inherited from “Windows Workstations” and apply it to the laptop group at the organization level. For that, follow the next instructions.
a) Navigate to Administration > Policies > Agent policies and click Create New Policy at the right of the screen. The create a Policy dialog box appears.
b) Enter the policy name, description, role and optionally, select a parent policy.
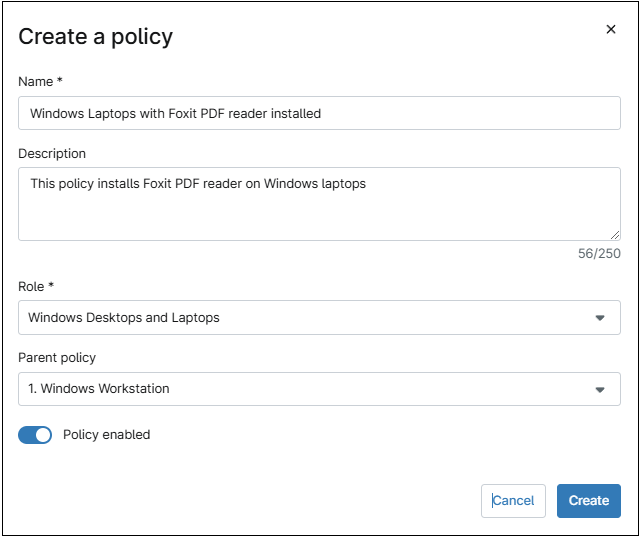
After saving, the screen automatically goes to editing the new policy.
c) Click Add a Condition, the Condition dialog box appears.
d) Click Select a condition, a new dialog box appears.
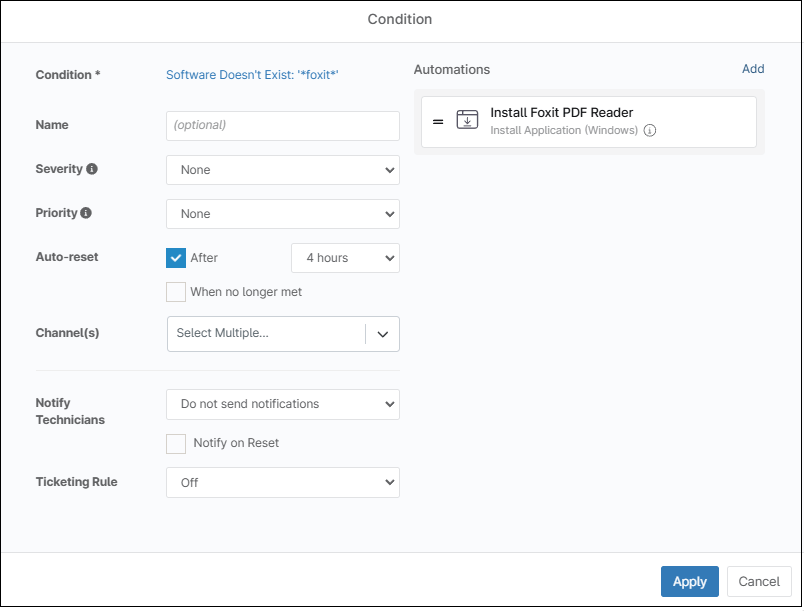
e) From the drop-down menu select “Software”, then under Presence, select “Doesn´t exist,” then, under names, type “*Foxit*” then hit the Enter key (The leading and trailing wildcard (*) means that the software name is anything containing Foxit. Another option is typing the software name exactly as Windows names it in the list installed software, but using wildcards is a safer option), then click Apply.
This condition means that it will be met when a device does not have software installed with “Foxit” included in the name. See the next screenshot showing how it looks after the condition was added.
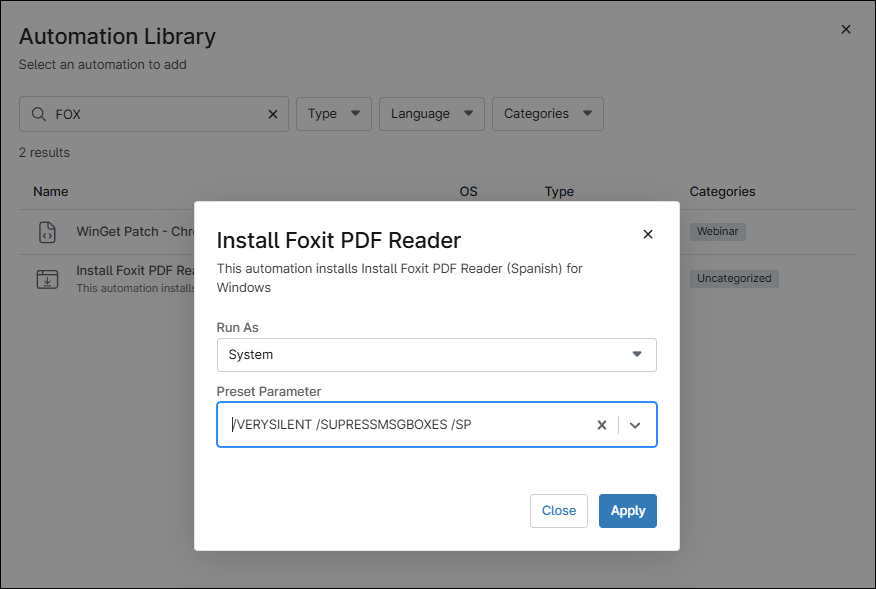
f) Now let´s add an automation. Click Add on the right of the screen, the automation library dialog box appears.
g) Find the “Install Foxit PDF Reader” automation that we created previously and click on it.
h) Confirm the “Run As” and Preset parameters” as needed and click Apply.
The screen goes back to the condition dialog box, at this point click Add.

Then Click Save, enter your MFA method answer, and click Close.
i) Go to the Organization dashboard and select the Datacenter1 organization. Click on Edit at the right of the screen. Then select the policies tab, at the left of the screen. Select Agent Policies at the top of the screen. One the Windows Laptop policy, select the “Windows Workstations with Foxit PDF installed” from the drop-down menu, then save. From now on, all Windows laptops in this organization, existing or new, will have Foxit PDF reader installed.
When to use each of the installation methods explained?
- Submitting the installation package on demand to one or multiple endpoints is good when you need to eventually install software on one or a few devices.
- Use a policy when a broader group of devices needs the software, and the group can be linked to a policy, like an organization or a location.
- Use the scheduled tasks method when a broad group of devices need the software, but this group cannot be linked to a policy, for instance, a device group created using filters.