
Android Enrollment is the process of registering an Android device with an Enterprise Mobility Management (EMM) provider to allow for remote configuration, monitoring, and management. This is a crucial step in Mobile Device Management (MDM).
Here is a brief overview of how device enrollment typically works:
Initiation: The process begins with the device connecting to the enrollment server, often through a network connection.
Authentication: The user or device provides credentials, which may include a username, password, or a one-time enrollment token.
Configuration: Once authenticated, the device receives a management profile that configures it according to the organization’s policies.
Management: The device can now be remotely managed, monitored, and updated by IT administrators.
There are different enrollment methods depending on the MDM software used, the type of device or the management scheme. It can be a manual process initiated by the user or can be automated using mobile device management (MDM) for smartphones and tablets. Not all enrollment methods are supported by EMM providers.
What Are the Different Enrollment Methods for Android?
Here is a brief description of the different enrollment methods supported by Android Enterprise.
1. Manually enter an EMM token
With this setup method, a user (typically an IT admin) enters a token provided by your EMM in a device’s setup wizard. This method only works for company owned devices. Android 6.0 or later is needed for this type of enrollment.
2. Push setup details via Near Field Communication (NFC)
With this setup method, a user (typically an IT admin) bumps a new or factory-reset device with an NFC tag that contains setup details provided by your EMM. The NFC tag can optionally contain details such as Wi-Fi credentials, locale, time zone, and custom disclaimers. This method only works for company owned devices. Android 6.0 or later is needed for this type of enrollment.
3. Transfer setup details via QR code
With this setup method, a user (typically an IT admin) scans a QR code provided by your EMM to enroll a device from a device’s setup wizard. This method works for company owned and BYOD devices. Android 6.0 or later is needed for this type of enrollment.
4. Preconfigure devices using zero-touch enrollment
Zero-touch enrollment allows you to pre-configure Android devices purchased from a zero-touch reseller partner. On first boot, registered zero-touch devices check for an assigned enterprise configuration and set themselves up automatically. Devices pre-registered for zero-touch enrollment can be shipped to users directly.
After the device is turned on, users can follow the on-screen instructions to complete setup. This method only works for company owned devices. Android 9.0 or later is needed for this type of enrollment.
What Are The Android Enrollment Methods in NinjaOne MDM?
At the time of writing, QR code scanning is the only way to enroll Android devices in NinaOne, the ownership model must be selected at the time of enrollment, which can be company owned or personal (also called Bring Your own device (BYOD). The QR code can be scanned directly from the console if the Android device is available or sent via email or SMS for the device to read at a remote location.
Follow the next instructions to generate the QR code to register an Android mobile device to NinjaOne.
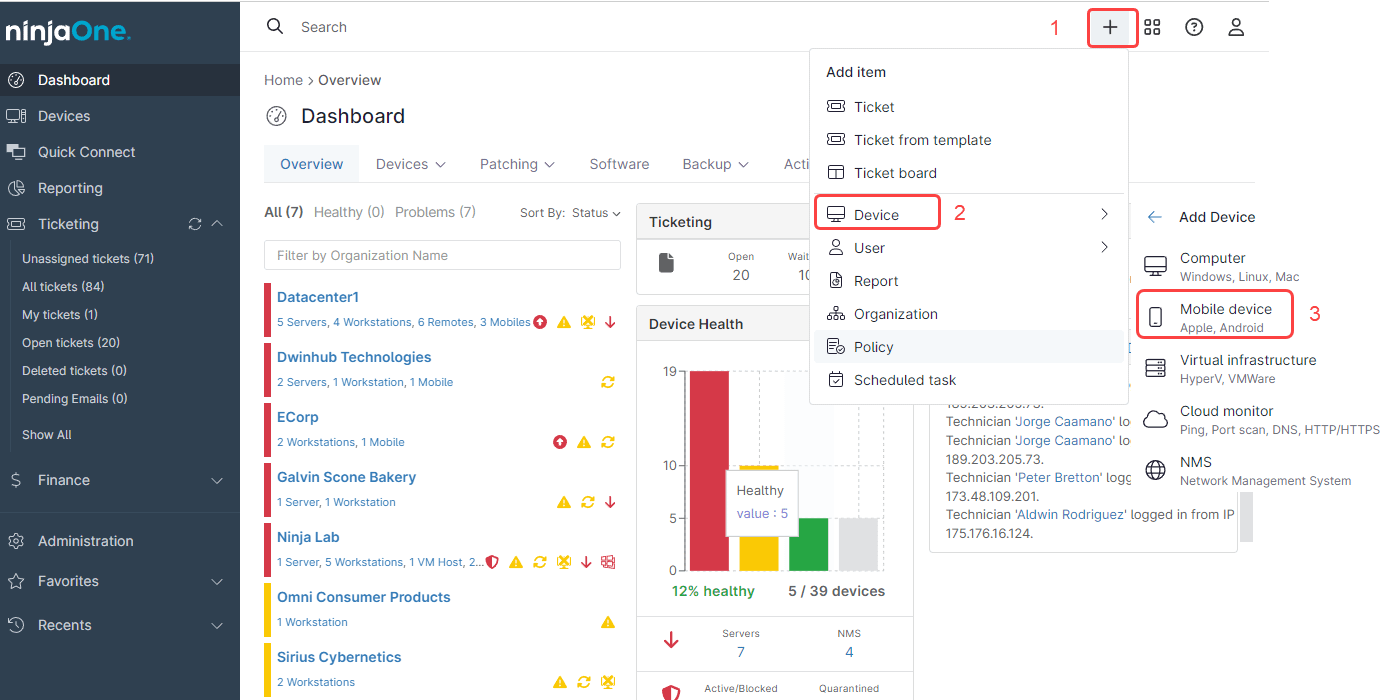
1. From any dashboard, click on the + sign on the upper right of the screen.
2. Select Device and then Mobile Device.
(See the following screenshot for reference)
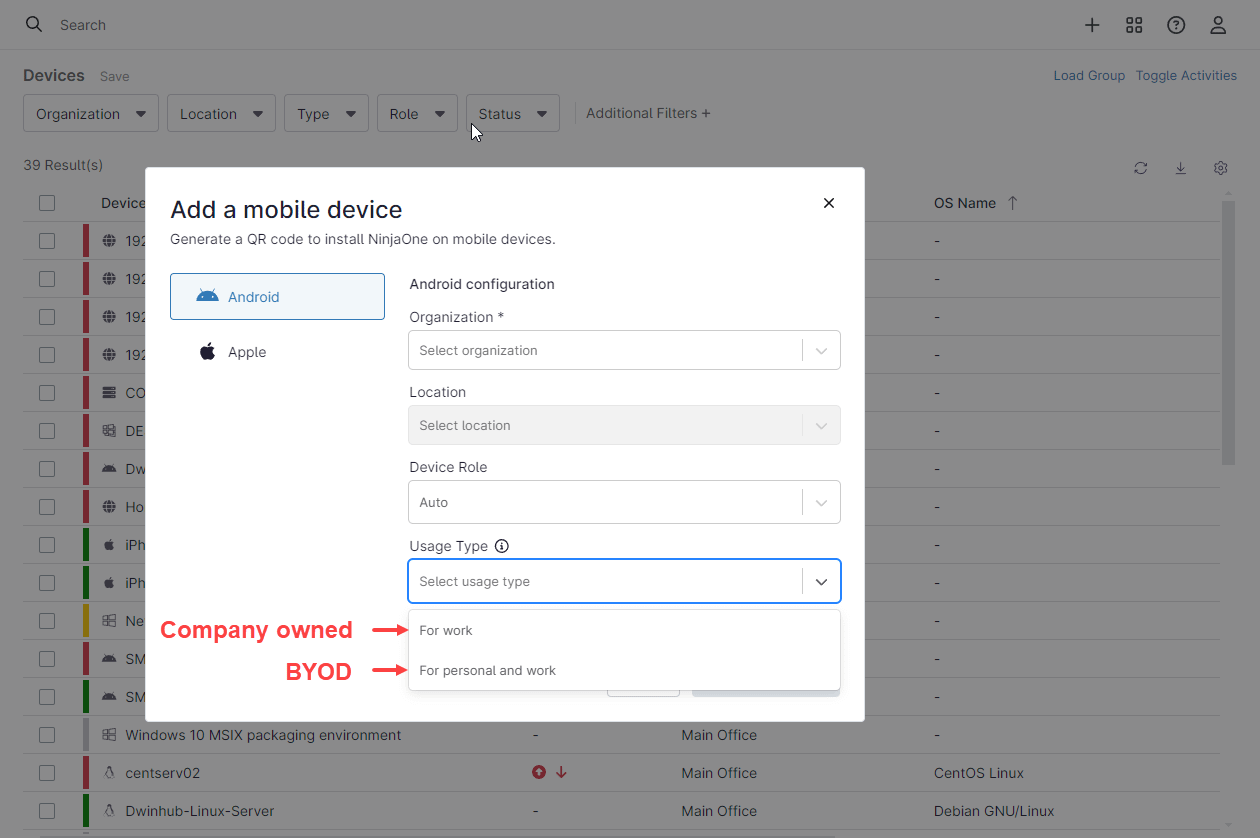
3. After the dialog box appears, fill out your organization name and location.
4. On Device Role select Android.
5. On usage type select For Personal or work.
(See the image below for reference)
After completing all the fields, click Generate QR Code. A QR code will be generated and used for the registration process.
What Are The Differences Between BYOD and Company Owned Ownership Models?
The table below shows the feature differences between these two ownership models.
| Feature | Personal/Work (BYOD) | Company owned |
| Ownership | User | Company |
| Pre-requisites for enrollment | User must install the Android Device Policy (ADP) application and scan the QR code from it. The personal profile is untouched. | Device must be factory reset before enrolling. The QR code is scanned during initial setup. |
| Profiles | There are two profiles, one personal and the other for work. Profiles are independent and they cannot communicate with each other. | Only one work profile. |
| Applications | User is free to install or uninstall any applications on the personal profile; Applications on the work profile are managed by the IT department, with limited end user control, depending on the permissions assigned by IT. | Applications are managed by the IT department, the user has limited control over them, depending on the permissions assigned by IT. |
| Result of the Erase Device security action | The work profile is deleted, including installed applications and cached data, without any end user confirmation. The personal profile is untouched. | The device is factory reset without any end user confirmation. |
| Security Control | Work data is secured within the work profile, but the rest of the device is under the user’s control. | The company can enforce security measures across the entire device. |
| Data Leakage Risk | May be challenging to enforce on personal data | Easier to enforce compliance |
| Control over device | IT has control over the work profile only. | IT has full control over the entire device. |