Device Provisioning

Device Provisioning is a process in IT that involves setting up and distributing IT equipment, including the crucial step of device enrollment. It’s important because it automates manual steps, enhances security, and allows for device customization.

The jobs done with Device Provisioning include preparation, enrollment, authentication, assignment and registration, communication, and reprovisioning. This process ensures devices, including mobile devices, are ready for use, secure, and can operate efficiently within an IT environment.

Mobile device provisioning is a key part of this process, ensuring mobile devices are properly set up for use. Device Provisioning is a key component in managing devices within the Internet of Things (IoT) and other IT resources. 

Device Provisioning Without NinjaOne

In the process of device provisioning without NinjaOne, you’ll prepare a computer with its necessary software and settings. This involves installing the operating system, setting up user accounts, and configuring network settings. Once these steps are completed, the computer is considered provisioned and ready for use.

If needed, the computer can be re-provisioned, which might involve updating software or changing configurations. This process, which a device provisioner would typically manage, can be automated using scripts or other tools, ensuring computers are ready for use, secure, and efficient within an IT environment. 

Efficiently provisioning devices with NinjaOne

Provisioning new devices can take anywhere from 1 to 5 hours per device, depending on the level of customization required. Automating most of the steps in new device setup can save significant time for high-growth and large organizations, while also increasing standardization. Here’s how to automate the process: 

1. Create User Accounts: Write scripts to create a local admin or local user account. 

2. Remove Bloatware: Automate the uninstallation of unnecessary applications. (resource: Removing applications

3. Install Applications: Use the ‘Install Application’ script to deploy productivity, security, and line of business applications. 

4. Map Network Drives: Script the creation of persistent mapped network drives. (resource: Create a persistent mapped network drive

5. Manage Permissions: Set file system rights by adding or removing user permissions. (resource: Set file system rights

6. Patch Everything: Automate the patching process using a comprehensive patch list. 

7. Setup Backup: Deploy backup solutions, such as Ninja Data Protection, to ensure data security. (ex: Setup and deploy NinjaOne Backup to back up a new device) 

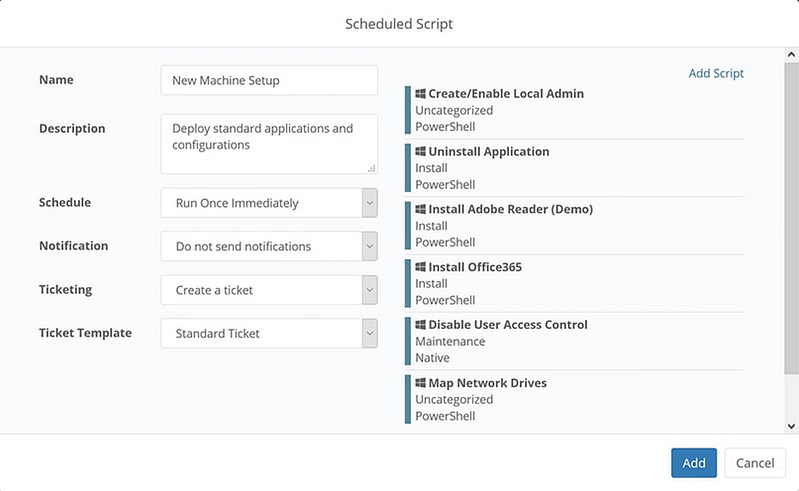
8. Create and Apply Policies: 

  • Create a new policy in NinjaOne. 
  • Add a scheduled script and set it to ‘Run once immediately.’ 
  • Include the above scripts in the scheduled scripts, prioritizing and ordering them based on dependencies. 
  • Save the policy and apply it to the target organization for onboarding new devices. 

9. Install NinjaOne: Download and install NinjaOne on the new device to complete the setup. 

By automating these steps, you streamline the provisioning process, ensuring that new devices are ready for use quickly and efficiently. 

An image of the Schedule Script window

Advantages of using NinjaOne

NinjaOne offers several advantages when it comes to provisioning devices, making it a preferred choice for many IT professionals. Here are some reasons why NinjaOne is considered better: 

  • Strong Automation Functionality: NinjaOne’s robust automation capabilities can significantly reduce the manual effort required in device provisioning, making the process more efficient. 
  • Efficient Software Deployment: NinjaOne provides a straightforward way to manage software deployment on a large scale, without needing a company network or VPN. This can make the process of setting up new computers much more efficient. 
  • Time-Saving: According to a survey, NinjaOne has led to a 95% reduction in end-user device setup time and 50% faster new client onboarding. This can save a significant amount of time for IT teams. 

Best Practices

Provisioning devices is a critical task in IT management. Here are three best practices to ensure a smooth process: 

  • Define Requirements: Clearly outline the software, settings, and permissions needed for each device. 
  • Centralize Management: Use a centralized system for consistency and simplicity. 
  • Plan for Scalability: Ensure your process can accommodate future growth. 

By following these practices, you can streamline device provisioning and enhance your IT operations.  

Real world examples

Device provisioning is a crucial aspect of IT management, ensuring that devices are ready for use with the necessary configurations and software. 

  • IT Consultancy 

An IT consultancy managing multiple clients can use NinjaOne to create different policies for each client, automating the provisioning process, saving time, and ensuring consistency across all devices. 

  • Educational Institution 

A university setting up a new computer lab can use NinjaOne to define the requirements once and then replicate the setup across all computers, making the process efficient and error-free. 

  • Growing Startup 

A rapidly expanding startup can use NinjaOne to automate the provisioning process. As the company grows, the process can easily scale, ensuring all new employees have their computers set up quickly and correctly. 

In these scenarios, NinjaOne’s device provisioning capabilities help to save time, reduce errors, and ensure consistency across all devices. Efficient device provisioning is key to smooth IT operations. 

Next Steps

Device Provisioning FAQs

Device Provisioning is the process of setting up IT equipment, such as phones and computers, to work in a specific manner. This could involve installing specific software, disabling or enabling certain features, or even replacing the entire operating system. The process ensures that the device operates seamlessly within the IT environment. 

Provisioning a device means setting it up with the necessary software and configurations to make it ready for use in a specific network or system. This process can include installing an operating system, setting up network configurations, and installing applications. It’s essentially preparing a device for its intended purpose. 

Android device provisioning is the process of setting up a device to be managed using policies by an enterprise. During this process, the device installs Android Device Policy, which is used to receive and enforce policies. The provisioning method used establishes the device’s ownership (personally-owned or company-owned) and management mode (work profile or fully managed device). 

When a device is “provisioned,” it means that it has been set up and configured to work in a specific manner, often involving the installation of certain software or applications, and the setting of various configurations. This setup process follows the device provisioning protocol. In the context of Android, a “device provisioned” means that the device has been successfully set up for use within an enterprise system, with the necessary policies and applications installed. 

On the other hand, “device not provisioned” often refers to a SIM card issue. When a SIM card is not provisioned, it means that the mobile network operator has not yet activated the SIM card for use on their network. This can occur for various reasons, such as when a new SIM card is inserted into a device, or when a SIM card has been deactivated and needs to be reactivated.

In this case, the device itself may be provisioned, but the SIM card is not, preventing the device from connecting to the mobile network. Additionally, if the device is currently not in provisioning mode, it cannot be set up or configured as intended, potentially leading to similar connectivity or functionality issues. 

Device provisioning and device enrollment are two important steps in setting up a device for use in a network or system, often used in the context of enterprise IT management. 

Device Provisioning is the process of preparing and configuring a device for use in a network or system. It involves setting up the device with the necessary software, settings, and security configurations to enable it to connect to the network and perform its intended functions. When a device is being provisioned, it undergoes this setup process. 

Device Enrollment, on the other hand, is the initial step where the device is registered or added to the network or system. Enrollment involves identifying the device, assigning it a unique identifier, and linking it to the appropriate user or organizational unit. 

In essence, enrollment can be considered a part of provisioning as it sets the groundwork for configuring the device. However, provisioning often goes beyond enrollment to include the installation of necessary software, the setting of various configurations, and the implementation of security measures. 

It’s important to note that the exact steps and processes can vary depending on the specific device and platform. Always refer to the official documentation for the most accurate information.  

Ready to become an IT Ninja?

Learn how NinjaOne can help you simplify device management.
Watch Demo×
×

See NinjaOne in action!

By submitting this form, I accept NinjaOne's privacy policy.