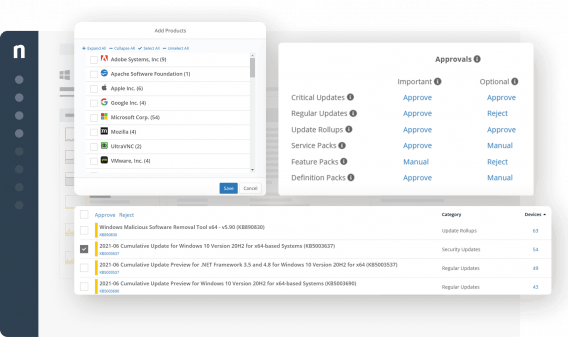
Patch management can be time consuming and complex…

Many patch management solutions require on-prem infrastructure, workarounds for remote workers, and complex implementations, which increase costs and leave vulnerabilities that could be exploited.
… but NinjaOne makes patching fast, easy, and reliable.

With no complex infrastructure to manage and a modern, intuitive workflow, NinjaOne simplifies patch management, improves patch compliance, and reduces time spent on patching.
Powerful and intuitive remote monitoring and management
Best-in-Class Support
NinjaOne has been recognized as #1 in support year-after-year by our partners on G2. With free and unlimited onboarding, training, and support, we are your partner in success.
Fast, Intuitive UI
NinjaOne makes your technicians more efficient with an intuitive, modern interface that puts all your decisions in one place and cuts out extra clicks. New technicians can learn NinjaOne in a matter of hours, not weeks.
Easy and effective automation
NinjaOne vs. KACE Reviews
| Criteria |  |
Quest KACE |
|---|---|---|
| Overall Rating | 4.8 out of 5 (1,443) | 4.1 out of 5 (95) |
| Meets Requirements |
9.1
Responses: 1,295 |
8.7
Responses: 81 |
| Ease of Use |
9.2
Responses: 1,310 |
7.9
Responses: 81 |
| Ease of Setup |
9.3
Responses: 1,182 |
7.6
Responses: 69 |
| Ease of Admin |
9.3
Responses: 1,187 |
8.2
Responses: 71 |
| Quality of Support |
9.4
Responses: 1,253 |
8.1
Responses: 75 |
| Ease of Doing Business With |
9.6
Responses: 1,162 |
8.3
Responses: 68 |
| Product Direction (% positive) |
9.8
Responses: 1,296 |
7.5
Responses: 79 |
Based on G2 Fall 2024
Quest KACE
KACE is a unified endpoint manager developed by QUEST. It’s an IT management solution that offers a wide range of features that help IT teams and technicians discover and track devices in their IT environment, automate routine tasks, secure networks, and more.PRODUCT SUMMARY
USE CASES
- Simplified management: KACE provides a single platform for IT teams and technicians to manage their endpoints across multiple operating systems.
- Ease of use: KACE’s interface is straightforward and easy to use for well-experienced IT professionals.
- Windows support: The platform does a good job managing and supporting Windows machines.
SHORTCOMINGS
- macOS support: Some users report that KACE falls short in terms of Mac management.
- Frequent alerts: Frequent alerts about system restarts after patching can be disruptive for some users.
- Ticketing: Users find filtering and finding tickets in the tool difficult.
NinjaOne
Why your peers choose us over Quest KACE
KACE offers similar features to NinjaOne but differs in strengths. NinjaOne is a better choice for both IT professionals and MSPs because of its powerful feature sets, which ensure that the platform is easy to learn and use regardless of expertise level. NinjaOne also follows a “single pane of glass” approach that enhances functionalities such as automation, patch management, backup and restore, and many more, all while reducing complexity and saving IT professionals and MSPs valuable time and resources.
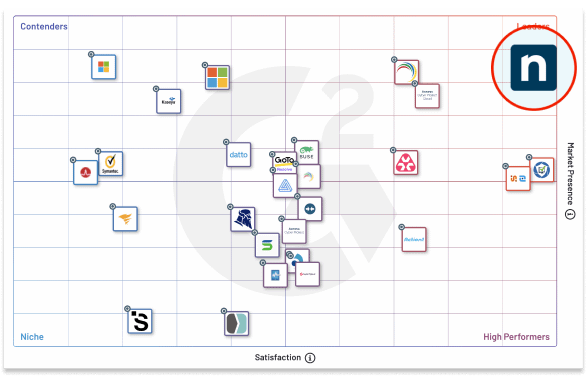
Aside from that, NinjaOne is a reputable enterprise-grade IT solution offering great support for major operating systems such as Windows, Linux, and specifically macOS, for which KACE may need some additional workarounds. That’s why NinjaOne ranks #1 on G2 for essential software such as RMM, automated endpoint management, and patch management. It’s supported by the platform’s customer support team, which is known for its responsiveness, expertise, and dedication.
“To be able to update software, install new software across all those computers has been crucial. To be able to patch the computers on a schedule and just not have to worry about it is very critical. Patching with NinjaOne has significantly reduced the vulnerabilities in our network.”
Braden Walter, Network and System Admin at Cancer and Hematology Centers
NinjaOne is the clear choice
Cloud-Native Device Management
Employees today expect the same experience whether in the office or working from home. IT teams need the ability to monitor, manage, secure, and support devices no matter where employees are.
The NinjaOne difference:
- Manage any internet connected device.
- Manage devices from anywhere using the NinjaOne web and mobile app.
- No servers, on-premises infrastructure, or VPNs required.
Usability
Usability translates directly to technician efficiency – an intuitive interface is easier to learn, fewer clicks result in faster action, and an easy-to-manage solution reduces overhead and implementation costs.
The NinjaOne difference:
- Fast interface that’s intuitive and minimizes clicks.
- Industry-leading time to value with minimal setup time.
- Easy-to-learn solution that lets technicians ramp quickly.
Powerful automation
Device management is littered with repetitive, error-prone tasks that are ripe for automation. IT teams need tools that help them automate device management tasks at scale.
The NinjaOne difference:
- Deploy any script or automation to any internet-connected device.
- Automate key tasks including device setup, patching, backup, and maintenance.
- Trigger automations based on device state, health, and performance changes for closed-loop remediation.
Large-scale device management
Technicians need the ability to see how devices are managed holistically and make changes across devices at scale to ensure efficient device management.
The NinjaOne difference:
- Policy-based device management
- Policy inheritance for efficient management
- Easy overrides for customized management
|
|
KACE Cloud |
KACE SMA |
||
|---|---|---|---|---|
| Deployment | ||||
| Cloud-Based | ||||
| On-Prem | ||||
| Requires VPN | ||||
| Multi-Tenant | ||||
| OS Support | ||||
| Windows 10 / 11 | ||||
| Windows Server | ||||
| MacOS | ||||
| Linux | ||||
| iOS / Android | ||||
| Feature | ||||
| Patch Management | ||||
| Inventory & Asset Management | ||||
| Script Deployment | ||||
| Complex Automation | ||||
| Software Deployment | ||||
| Remote Control | ||||
| Real-time Monitoring | ||||
| Alerts & Notification | ||||
| Service Desk | ||||
| User Portal |
#1-Rated Patch
Management Solution
NinjaOne helps IT teams improve security with automated patch management software that enables you to identify, evaluate and deploy patches to any device, anywhere – no infrastructure required.
Improve patch compliance by 35% (and spend 90% less time doing it) by fully automating patching across Windows, Mac, and Linux endpoints.

Having a cloud-based replacement for SCCM was a must. Not only did NinjaOne replace our need for SCCM, but it was also easier and more reliable than Microsoft Intune.”
Sandro C.,
IT Automation Engineering Manager
“Our security team is happy, our patch compliance looks good, and we’re always finding new things we can do with NinjaOne.”
Jacques G.,
IT Director
Automated patching and scripting have transformed our estate… providing consistency and heightening our security stance to our users. Compliance and security have been vastly improved.”
Sam Pollard,
IT Infrastructure Manager, Bradford & Sons
NinjaOne gives us a centralized patch management solution that is compatible with remote workers. It helps us be proactive and ensure security compliance.”
Mathieu Alain,
IT Director, Korem Inc
NinjaOne is Trusted by Over 20,000 MSPs & IT Pros Across the Globe


NinjaOne vs. KACE FAQs
How does Quest KACE compare to NinjaOne?
While KACE and NinjaOne offer similar features, they differ in comprehensiveness. NinjaOne’s all-in-one IT solution has attracted over 20,000 customers in over 80 countries, proving that the platform is trusted by many IT professionals worldwide. It excels in managing complex IT environments with its robust features like remote monitoring and management, patch deployment, and automation.
NinjaOne also excels in areas where KACE may need improvements, such as macOS support and ticketing. This makes NinjaOne a better choice for IT professionals and MSPs who are managing a mix of environments and client needs.
Does Quest KACE have an IT Reporting feature?
Both NinjaOne and KACE have an IT reporting feature. This allows IT teams to generate various reports on device activity and health.
Does Quest KACE have a Server Monitoring feature?
KACE UEM offers server monitoring through the integrated KACE SMA component. However, its advanced functionalities might require additional licensing.
Does Quest Kace provide a good user interface?
KACE is well-suited to experienced IT admins. However, new users might encounter a steep learning curve and find the user interface complex and challenging. NinjaOne, on the other hand, is built with ease of use in mind, ensuring a user-friendly interface that can cater to any IT professional regardless of their expertise level.
Watch a Free Demo of the #1 RMM on G2


