
Policy Scheduled Tasks
Policy scheduled tasks or automations encompass a variety of automated actions, including the ability to create scheduled tasks for repetitive processes. These automations are executed on a predefined schedule. They are essential components of system administration and management, ensuring that critical maintenance, updates, and enforcement activities occur consistently and reliably without manual intervention.
Manually Creating Scheduled Tasks
To manually create a scheduled task, access your system’s task scheduler (Task Scheduler in Windows, crontab in Linux/macOS). Within the scheduler, define a new task, giving it a name and description. Set the trigger (schedule, event, or condition) for when the task should run, and then specify the action to be performed (start program, send email, etc.). Configure any additional settings like conditions or user accounts. After saving the task, test it manually to confirm proper functionality before it runs automatically. This entire process can be time-consuming and prone to errors, and can quickly become tedious when dealing with numerous or complex tasks.
Effortless Task Scheduling With NinjaOne
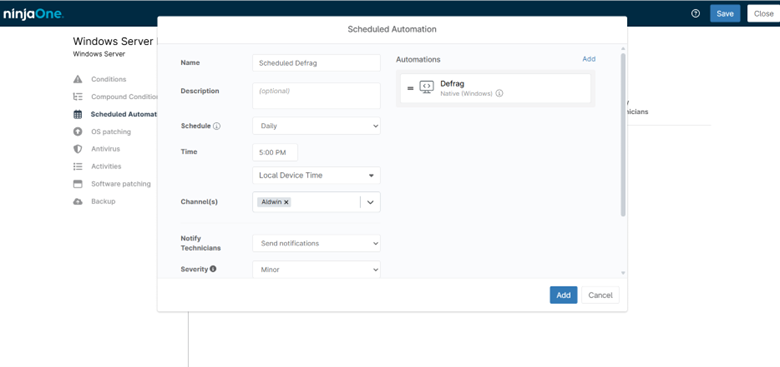
NinjaOne simplifies the automation of your IT tasks through scheduled policies. Follow these steps to get started:
- Access Policies: Navigate to Administration > Policies.
- Create or Edit: Choose to create a new policy or update an existing one.
- Select Scheduled Automations: Within the policy settings, find the Scheduled Automations section.
- Add a Scheduled Automation: Click the Add a Scheduled Automation button to begin.
Customization Options:
- Name: Provide a clear and descriptive name for your automation.
- Description: (Optional) Add a brief explanation of the automation’s purpose.
- Schedule: Define the frequency of the schedule (daily, weekly, monthly, etc.) and set specific times if needed.
- Channels: Choose where you want to receive notifications about the automation’s progress or completion (e.g., email, Slack).
- Notify Technicians: Select the technicians who should be alerted about the automation.
- Ticketing Rule: (Optional) Associate the task with a ticketing rule in your help desk system.
- Add Automation: Select the specific automation or task you want to schedule. You can choose from pre-built scripts, custom scripts, or actions like software deployment or patch management.
- Save and Close: Click Save and Close to finalize your scheduled automation.
Strategies And Best Practices for NinjaOne Scheduled Policy Tasks
NinjaOne’s scheduled policy automations offer a powerful toolset for automating IT processes and ensuring consistent policy enforcement. To maximize their effectiveness, consider these strategies and best practices:
Strategies:
- Prioritize High-Impact Tasks: Focus on automating tasks that are repetitive, time-consuming, or prone to human error. These tasks often include software updates, patch management, security scans, and data backups.
- Create a Structured Task Hierarchy: Organize tasks into logical groups based on their purpose or the systems they affect. This hierarchy makes it easier to manage and maintain automation as your environment grows.
- Leverage Policy Inheritance: Utilize NinjaOne’s policy inheritance feature to apply automation to multiple devices or groups efficiently. This minimizes the need to create duplicate tasks and simplifies management.
- Monitor and Fine-Tune: Regularly review task execution logs and reports to identify any issues or inefficiencies. Adjust schedules, triggers, or actions as needed to optimize task performance.
Best Practices:
- Use Descriptive Names and Descriptions: Clearly label automations with meaningful names and provide detailed descriptions to facilitate understanding and troubleshooting.
- Set Appropriate Triggers: Choose the right trigger for each task based on its purpose and frequency.
- Test Thoroughly: Before deploying an automation to production, test it in a non-production environment to ensure it functions as expected.
- Document Everything: Maintain comprehensive documentation of your scheduled policy automations, including their purpose, configuration, and any dependencies.
Practical Use Cases of Policy Scheduled Tasks:
- Scheduled Temporary File Cleanup: A process that automatically scans endpoints at defined intervals to identify and remove temporary and unnecessary files. Its goal is to reclaim disk space, reduce clutter, and maintain optimal system performance. By running on a recurring schedule, it ensures that devices stay clean without requiring manual intervention, contributing to better stability and more predictable storage usage across the environment.
- Scheduled Service Refresh: A process that automatically restarts selected Windows services at defined intervals to clear stale state, recover leaked memory, and restore normal performance. By refreshing long-running services before issues accumulate, this scheduled task helps prevent slowdowns, application errors, and endpoint instability, ensuring systems remain responsive over time.
- Scheduled Disk Defragmentation (HDD only): Runs periodic defragmentation on hard drives (not SSDs) to improve performance and reduce wear.
- Scheduled Certificate Validation Checks: Automatically scan certificates on servers to detect upcoming expiration dates and trigger alerts for renewal before outages occur.